


When it comes to bashing out everyday documents, there’s rarely much need to venture beyond Word’s Home tab. But tucked away within the interface, there’s a wealth of additional tools waiting to be discovered. These features aren’t really “secret”, but many users never find them – and they could save you considerable time and effort.
Below we outline our top 20 easily overlooked features in Word. Many of them have been in Word for a decade or more and can be found in the menus of Word XP and Word 2003, but we’ll focus on the ribbon interface from Word 2007 and above, which was, after all, invented to help users find the software’s more esoteric features.
1. Select Similar Formatting
In an ideal world, every element in your document would have a style assigned to it. But if you’ve relied on local formatting, it’s still easy to make global changes. The Editing section, at the far right of the Home tab, includes the handy option to “Select all text with similar formatting”. This lets you easily highlight all your ad hoc headings, captions, and so forth at once and tweak their appearance in a single swoop – or apply a style for easier management in the future.

2. Clipboard Panel
The clipboard panel offers a convenient way to keep more than one element on your clipboard at once. Click the tiny pop-out icon within the Clipboard section of the Home tab to open it. Up to 24 recent cut and copy operations are remembered, and you can click on any one of them to paste it at the insertion point. The Options dropdown at the bottom lets you control when the Clipboard panel appears; one option is to make it appear when you press Ctrl+C twice.

3. Translate
Word’s Review | Translate function sends the text of your document to the Microsoft Translator web page and displays a translation in a browser window. In Word 2010 and 2013, you can also activate Review | Translate | Mini Translator, which presents a ghosted tooltip when you hover over a selected passage of text; move your pointer onto it to see a pop-up translation in your selected language. There are dozens of languages to choose from: browse them by selecting Choose Translation Language from the Translate dropdown.

4. Kerning
Professional desktop publishing software supports kerning – the selective adjustment of spacing between characters to make the text more aesthetically pleasing. Word doesn’t do this by default, but it can be turned on by clicking the pop-out icon in the Font section of the Home tab and ticking the box labeled “Kerning for fonts”; enter a minimum point size in the box to the right. If you use kerning on tiny fonts, however, the letters can appear to run together, which reduces readability.

For easier access use the CTRL+D keyboard shortcut, or CMD+D on a Mac. This shortcut will take you directly to the Fonts screen regardless of which version you’re using. Those running Word 2007 or earlier will need to check the Character Spacing option. If you’re running a later version, select the ‘Advanced’ tab at the top of the pop-up windown as shown above.
5. Insert Chart
If you want to include an Excel chart in your document, you don’t have to leave Word. Selecting Insert | Chart in Word will open a miniature Excel view, in which you can edit or import your data. Just close the Excel window once you’re done – it will be presented in chart form within Word. At the top of the Word window, the Chart Tools tabs give you full control over the design and appearance of your chart, so there’s no need to launch Excel manually.

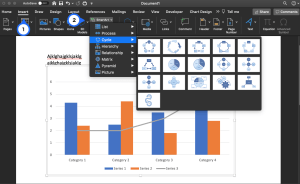
6. SmartArt
SmartArt helps you illustrate processes and relationships through almost 200 pre-designed layouts for pyramid organizations, cycles, hierarchies, matrices, and more. To use it in Word, simply click Insert | SmartArt and select a template. Then type your labels into the floating panel that appears and drag the handles to resize the SmartArt. If you want it to float over your document, you can achieve this easily by creating a textbox (via Insert | Text Box) and putting your SmartArt inside it.
7. Insert Screenshot
If you’re writing a tutorial – or you simply want an easy way to include in your document an image from another program – you can grab an area of the Windows desktop by selecting Insert | Screenshot; the dropdown menu lets you directly import any open window as an image. Alternatively, you can select the Screen Clipping option to drag a rectangle with the mouse and capture a customized area of the screen.

8. Insert Quick Parts
Businesses often need to create letters and documents that contain standard elements or paragraphs, such as an address. Word’s AutoText feature can help. Select a passage of text, then select Insert | Quick Parts | AutoText | Save Selection To AutoText Gallery. You can now reinsert that text into any document by selecting it from the Insert | Quick Parts | AutoText menu. You can also set up Quick Parts for elements such as your company name and email address, and in the Building Blocks Organizer you can set up quick-access templates and objects, too.

Keep in mind that this option is not available to Mac users at the time of writing.
9. Hyphenation
Allowing the odd word to spill across two lines can improve the appearance of your document. It can keep your right margin from becoming too ragged or, in fully justified text, it can prevent large “islands” of white space from appearing between each word. Word can automatically hyphenate words as needed, but the feature is turned off by default: to enable it, go to the Page Layout tab and select Hyphenation | Automatic.

10. Line numbers
If you’re referring to code, legal documents, or even poetry, you might want to number your lines for easy reference. Word’s numbered-list tool applies indentation settings that may not be what you want: select Page Layout | Line Numbers instead and Word will apply neat numbering in the document margin. By default, line numbering is applied to the whole document, but you can make it skip selected text by choosing Line Numbers | “Suppress for current paragraph”.

11. Digital Signatures
It isn’t always obvious whether a digital document is an authentic original. To sign a document with a personal encryption key, go to the File tab (or the orb in Word 2007), select Protect Document, and choose “Add a digital signature”; you’ll be prompted to save the document before your signature is added. The signature will be automatically invalidated if the document is altered, so its presence is a guarantee of authenticity. If you want to invite someone else to sign a document, go to the Insert tab and, within the Text section, select Signature Line.
12. Watermark
When you’re circulating a draft of a document or sharing something private with a work colleague, it’s useful to be able to watermark the page so you can see at a glance what type of document it is. The Watermark dropdown, under the Page Layout tab, lets you add a large grey watermark saying “DRAFT”, “CONFIDENTIAL” or “URGENT” in two clicks. Select Custom Watermark to place your own text or an image.

Mac users will need to use the ‘Insert’ tab at the top of their computer screen to access the Watermark option.

13. Citations
For academic works, Word can also help you manage your citations. On the References tab, you’ll find a button to Manage Sources; here, you can enter the details of each work you refer to, then insert references to them by clicking the Insert Citation dropdown. You can choose a citation format from 14 recognized styles, including APA and MLA standards, and at the end, you can generate a bibliography with one click.

14. Macros
Office’s scripting interface is sophisticated, to say the least, but if you want to automate a simple, repetitive task, there’s no need to type a line of code. On the View tab, click the Macros dropdown and select Record Macro. In the dialog that opens, choose a button or keyboard shortcut (remember to click Assign to confirm your choice); then perform the task you want to automate. When you’re done, go back to the dropdown and select Stop Recording. Now pressing your chosen button or key combination at any time will repeat the operations you recorded.

15. Outline View
If you’re using Word for a large project, such as a college dissertation or a novel, it can be helpful to divide the document into sections and subsections. Go to View | Outline to access a hierarchical display that lets you mark up headings and collapse the body text under them; this gives you a clear overview of your document, which can be effortlessly reorganized by moving sections around. You can also collect several documents into one master project: click Show Document in the Master Document section of the Outlining tab to import or create subdocuments.

16. Page Color
If you want your document to stand out, you can use the Page Layout | Page Color dropdown to apply a background wash; select Fill Effects and you can add patterns and textures. Fills and patterns are automatically applied to all pages of your document. Also, although you can see them onscreen, they’re not printed, so they won’t interfere with the readability of your hard copies.

Some users may find the Page Colors selection under the ‘Design’ tab depending on the version of Microsoft Word and system that you’re using.
17. Insert Index
A third useful feature for longer works is the ability to automatically generate an index. To use this feature, you must first mark your references in the text by selecting the relevant word or phrase, then clicking References | Insert Index. When you’ve marked up all your headwords, click Insert Index to create an index. This will contain references to the instances you’ve marked, and self-updating links to the page numbers on which they appear.

18. Combine and Compare Documents
Word can automatically compare or combine two documents: you’ll find the tool under Review | Compare. If you prefer to do the job yourself, click View | View Side by Side; this will automatically position your documents next to each other at identical zoom factors, so you can easily look back and forth between them. If you click the Synchronous Scrolling button, they’ll even scroll up and down in lock-step when you move the cursor around or drag the scroll bar.

19. Document Inspector
Press officers and civil servants have landed themselves in hot water in the past for distributing documents with sensitive information embedded in their metadata, or that’s recoverable via Word’s Track Changes option. Don’t make the same mistake: in the Info section under the File tab (or the Orb in Office 2007), you’ll find a selection of options under the “Prepare for sharing” dropdown that let you check for hidden information (and confirm compatibility with other editions of Word).

20. Customize the ribbon
The ribbon interface was designed to be more stable than the highly customizable Office 2003 interface. However, if you select File | Options | Customize Ribbon, you can add new functions to it, and remove ones you don’t want to see. You can add features that aren’t normally exposed at all – there’s a helpful selection of “Commands not in the ribbon” – and even create your own tabs. If that’s too complicated, you can customize the Quick Access toolbar that appears at the top of the screen by using the tiny dropdown arrow at its right end.

Related Posts
 How To Find Your Secret Recovery Phrase in MetaMask
 How to Delete a Secret Chat in Telegram
 How To Make a Photo Collage in Microsoft Word
 How to Curve Text in Microsoft Word
 How to Fit a Table to the Page in Microsoft Word
 How To Insert a Checkbox Into Microsoft Word
 How to Remove an Anchor in Microsoft Word
 How to Insert a Signature in Microsoft Word
 How To Convert a PDF File to a Microsoft Word Document
Disclaimer: Some pages on this site may include an affiliate link. This does not effect our editorial in any way.


