Contrary to what some people might think, burning an ISO file to a USB drive is not the same as copying it. It’s a much more detailed process, which might even involve using third-party apps. Among other things, knowing how to burn ISO files to a USB drive can end up saving your data.
In this guide, we will show you how to burn ISO files to a USB drive for different operating systems. We will also go through the process of booting and extracting ISO files to new devices.
How to Burn ISO to a USB Device?
An ISO file, or an ISO image, is used to create an archived copy of large sets of data, which is stored for backup purposes. Therefore, it’s best to view ISO files as smaller versions of original files. That’s why large programs, video games, and operating systems are usually duplicated as ISO files.
While ISO files used to be burned to CDs and DVDs, in today’s modern practice, they are more frequently burned to USB drives. Apart from storing and backing up large amounts of data, ISO files are also extracted and booted from USB drives to be transferred to new devices.
The term “to burn” files comes from the outdated practice of recording data on CDs with a CD-R drive laser. Hence, the term “burning files” has been applied to USB drives as well, even though the process is completed in an entirely different manner.
There are several ways you can burn an ISO file to a USB. You can use built-in software or third-party apps. In this guide, we will show you how to burn ISO files to a USB drive in order to install and boot various operating systems.
Linux
To install Linux on a new device, you will need a USB drive with at least 8GB of space. To make a copy of the Linux operating system, we will be using a third-party app called UNetbootin. So go ahead and download the Linux version of this app.
The next thing you need to do is download the Linux distribution ISO file. You can do that by going to the Ubuntu desktop download page and clicking on the “Download” button. Keep in mind that ISO files can be from one to 4GB large.
Now, it’s finally time to burn the ISO file to your USB drive. Here’s how it’s done.
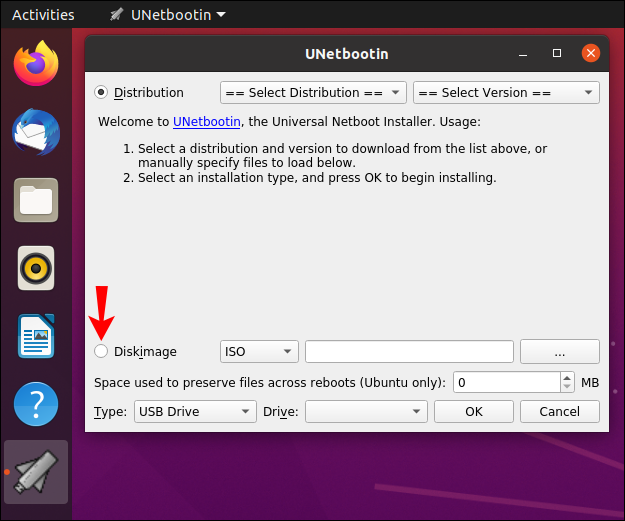
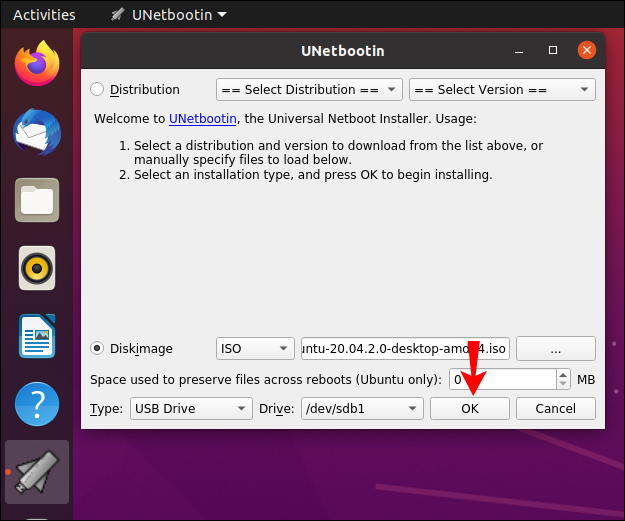
- Launch the UNetbootin app.
- Click on the “Diskimage” option at the bottom of the window.

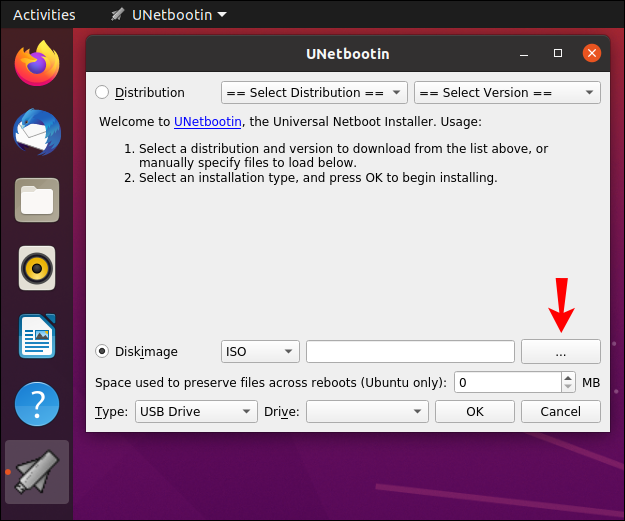
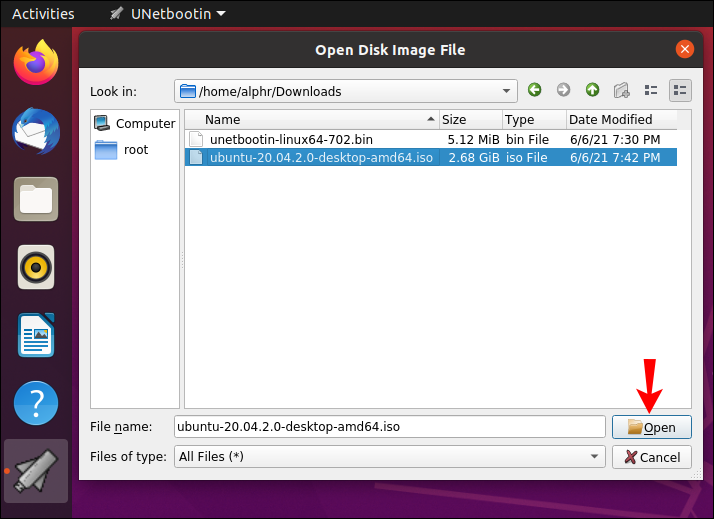
- Go to the three dots in the bottom-right corner of your screen.
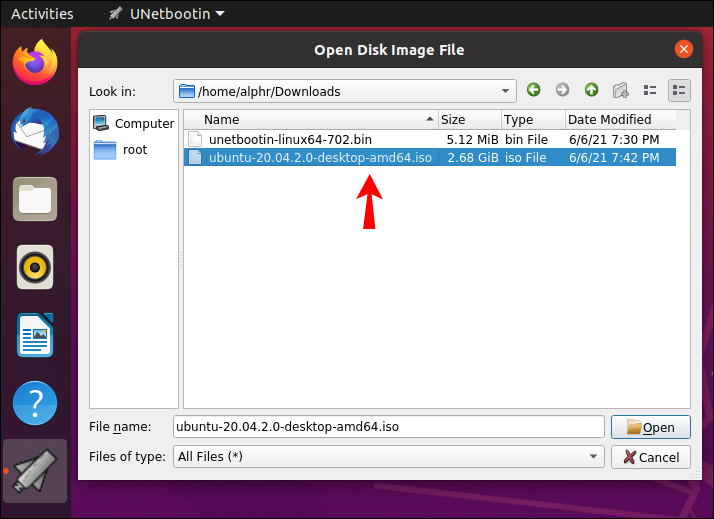
- Find the ISO file in “Downloads.”
- Click “Open.”
- Choose “USB Drive” next to “Type:” in the bottom-left corner of your screen.
- Next to “Drive:” also select your USB.
- Click on “Ok.”

It will take the app some time to burn the Linux distribution ISO file to your USB. Once the process is complete, you can go ahead and remove the flash drive from your device.
Mac
To burn a bootable macOS ISO file to a USB drive, you will need a USB with at least 14GB of space and an installer for macOS. Your installer should depend on your macOS version – Big Sur, Catalina, Mojave, High Sierra, or El Capitan. Once you download the macOS installer, here’s what you need to do next:
- Insert your USB drive.
- Go to the Applications folder on your dock.
- Head over to “Utilities” and then “Terminal.”
- Copy this command:
sudo /Applications/Install\ macOS\ *.app/Contents/Resources/createinstallmedia --**volume /Volumes/MyVolume
* Insert the name of your macOS (Catalina, Mojave, High Sierra, Big Sur, El Capitan). If the OS consists of two words, then insert “\” between them (for example: “Big\ Sur.app”).
** the name “volume” and “my volume” represent the name of your USB drive. Therefore, you should type in the exact name of your USB drive instead of “volume.” - After you paste the command in Terminal, press the “Return” key.
- Enter your administrator password.
- Press the “Y” key and “Return” again.
- Click “OK.”
- Turn off Terminal and remove your USB drive.
Windows 10
To burn the Windows 10 OS ISO file to a USB drive, we will be using Microsoft and the built-in “Windows ToGo” app. Therefore, you will need to download the Windows ISO file from Microsoft’s official site. Here’s what you need to do next:
- Insert a USB drive that has at least 32GB of space, which must be certified by Microsoft.
- Go to the Control Panel.
- Navigate to “Windows ToGo.”
- Select your USB from the list of devices.
- Go to “Add search location.”
- Select the ISO file you want to burn.
- Set a password if you want.
- Click on “Next.”
This will begin burning your Windows 10 ISO file to your USB drive. Keep in mind that during this process, all the contents on your USB drive will be wiped, therefore, you should have a backup.
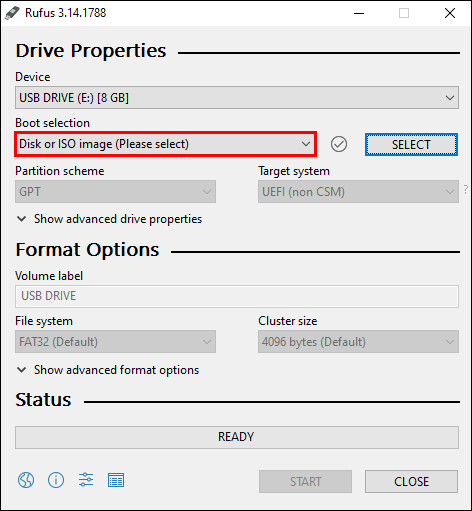
The Rufus Tool
You can also use the Rufus Tool for Windows 7, 8, 10, Vista, and XP. You can download it here. Once you’ve downloaded the app, you can begin burning an ISO file to a USB drive. Here’s how it’s done:
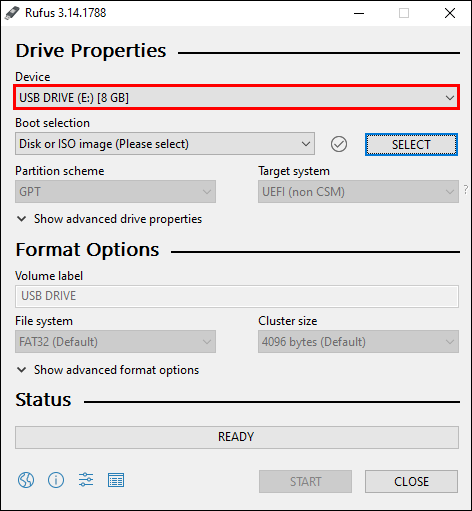
- Insert your USB device.
- Launch the Rufus Tool.
- Under “Device,” find your USB from the drop-down menu and click on it.
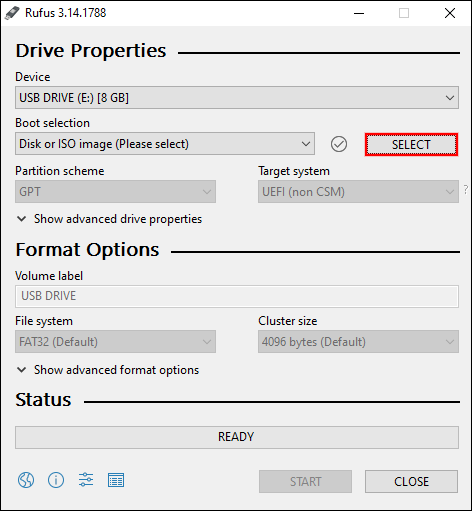
- Under “Boot selection,” choose “Disc or ISO image” from the drop-down menu.
- Go to the “Select” option.
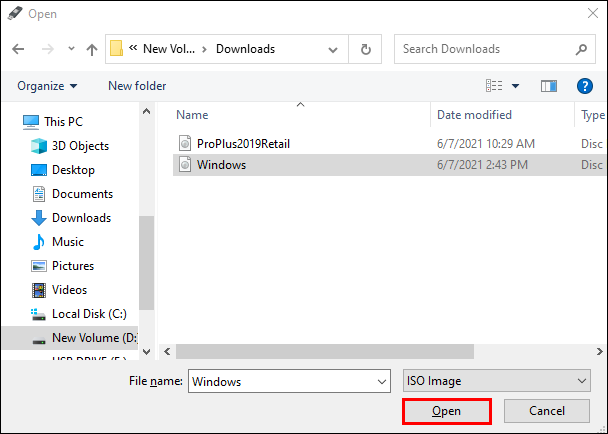
- Click on your ISO file and select “Open.”
- Choose “Start” in the bottom-right corner of the window.
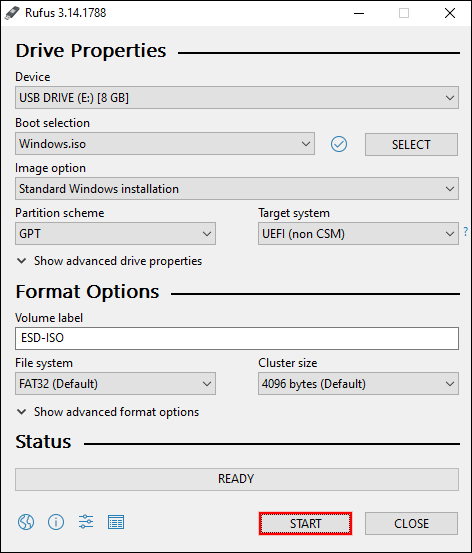
When the burning process is complete, close the Rufus Tool and take out the flash drive.
How to Boot From the USB Drive?
Once you have burned the ISO file to your USB drive, it’s time to boot it on another device. What you are basically doing is installing the ISO file again, just in another place. This process can take from 10 to 20 minutes. Here’s how it’s done:
- Insert the USB drive into the new device.
- Turn the device off and on again.
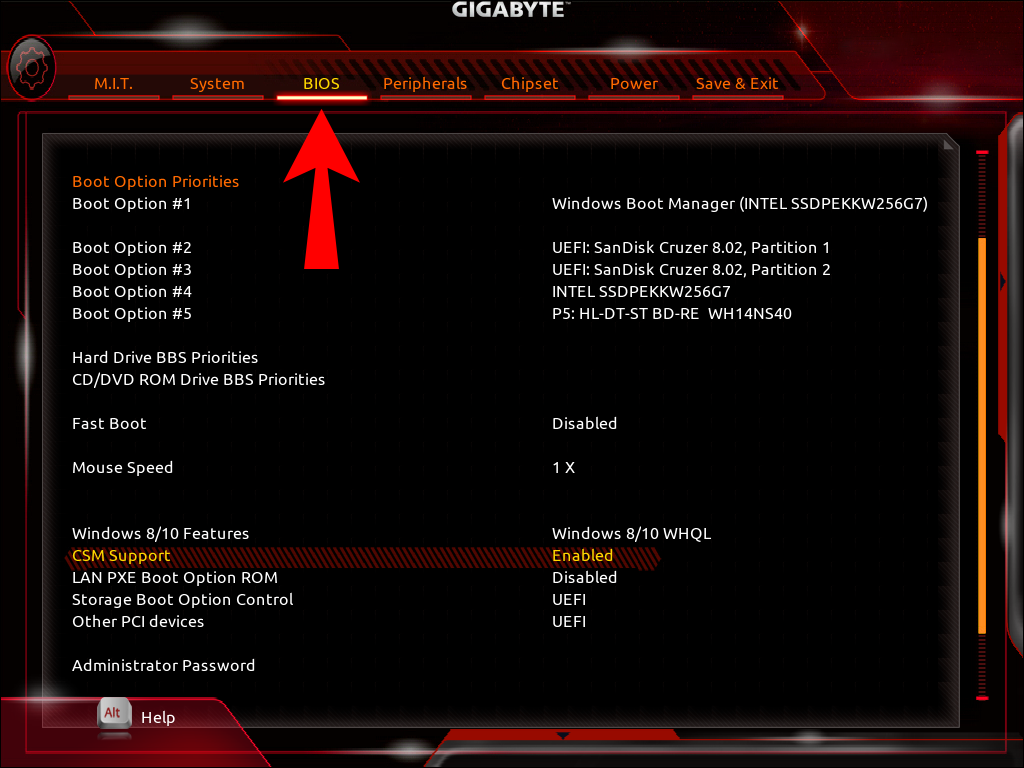
- While the device is restarting, press one of these keys: Del, ESC, F1, F2, F8, or F10 (it depends on the device) to go to the BIOS setup.
- Navigate to the “Boot” tab.
- Change the Boot so that “USB/Removable devices” is first on the list.
- Go to “Save and Exit.”
- Select “Yes” to confirm the changes.
- Restart your device again.

When you turn on your computer again, the ISO file will be booted from the USB drive.
How to Extract ISO Images With File Compression Programs?
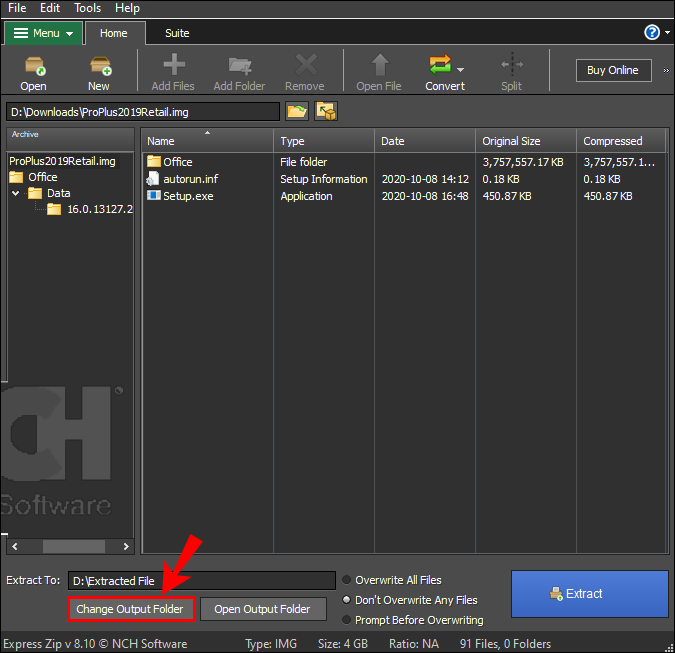
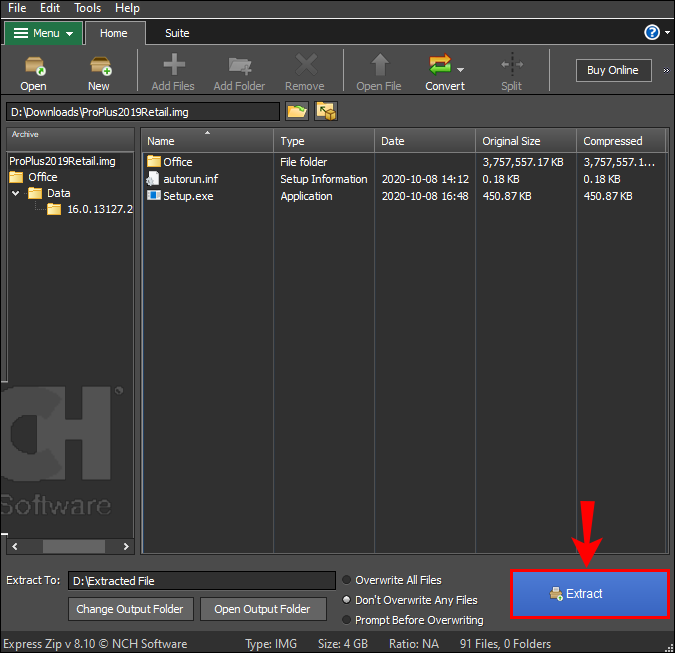
In some cases, the ISO image isn’t meant to be booted (for example, Microsoft Office.) If that’s the case, you need to use a file compression program to extract the ISO file onto the formatted USB. For this purpose, you can use Express Zip File Compression Software.
- Launch the program once you’ve downloaded it.
- Click “Open” in the upper-left corner of the program.
- Choose “Open an existing archive.”
- Go to “Change output folder” in the bottom-left corner of the screen.
- Select your desired location for the ISO file.
- Go to “Extract” in the bottom-right corner.


Additional FAQs
How Do I Burn an ISO File to a Disc?
You also have the option to burn an ISO file to a disc. Here’s how you can do it on Windows:
1. Insert an empty disc into your computer, whether it’s a CD or DVD.
2. Find the ISO file that you want to burn.
3. Right-click on the file and choose “Burn disk image.”
4. Choose the “Verify disc after burning” option.
5. Go to the “Burn” button in the bottom-right corner of the window.
6. Wait for the ISO file to be burned to the disc.
7. Choose “Close.”
To burn an ISO file to a disc on your Mac, follow the steps below:
1. Insert an empty disc.
2. Open “Finder.”
3. Locate the ISO file and click on it.
4. Go to “File” on the top toolbar.
5. Choose the “Burn disc image” from the list of options.
6. Click on “Burn.”
That’s about it. Now all you have to do is wait for the burning process to be completed, and you can take out the disc from your computer.
Import Files as ISO Images to USB Drives
Now you know how to burn ISO files to a USB drive. You also know how to import different operating systems into ISO files so that you can reinstall them on different devices. While the Rufus Tool is the best option for burning ISO images to a flash drive, there are countless other software programs that you can use for this purpose.
Have you ever burned an ISO file to a USB drive? Did you use any of the methods outlined in this article? Let us know in the comments section below.
Disclaimer: Some pages on this site may include an affiliate link. This does not effect our editorial in any way.


