Google Meet has given other video conferencing services a run for their money. It helps you turn your PC or mobile device into a virtual meeting room, whiteboard, or presentation area in just a few clicks. If you’ve got a presentation coming up, Google Meet can provide all the tools you need to get your message across efficiently and effectively. You don’t even need to download and install anything.
There’s only one problem: once your presentation starts, you can’t see your audience anymore. In this situation, gathering feedback from participants can be difficult.
Fortunately, there are still a few creative ways to present and see participants at the same time. In this article, we’re going to show you how to go about it.
How to Present and View Participants in Google Meet on a PC
A PC presents arguably the most convenient and efficient way to present on Google Meet because it enables you to run many different applications at once. For example, you could present an Excel spreadsheet and a PowerPoint document while also running accounting software in another window. All of this would require much more time (and energy) on a phone or tablet.
Let’s now explore the steps that can help you share your screen and present while still seeing other participants.
Method 1: Attaching Another Monitor to Your PC
One of the best things about modern PCs is that they come with input for at least one more monitor. By attaching another monitor before beginning your Google Meet presentation, you can have the participants on one monitor and then use the other one for the actual presentation. You could even attach a third monitor if you want a lot more maneuverability during your presentation.
Most modern desktop/laptop computers have at least one VGA port, which you can use to attach another monitor. If your computer doesn’t have one, it most likely has an HDMI port that serves the same purpose. However, if it doesn’t have that either, you can use one of the USB ports available, but you’ll need a USB-HDMI adapter to facilitate the connection.
Once you’ve attached the second monitor, do the following:
- Click on the Windows icon at the bottom left of your screen and then scroll down and click on Settings.
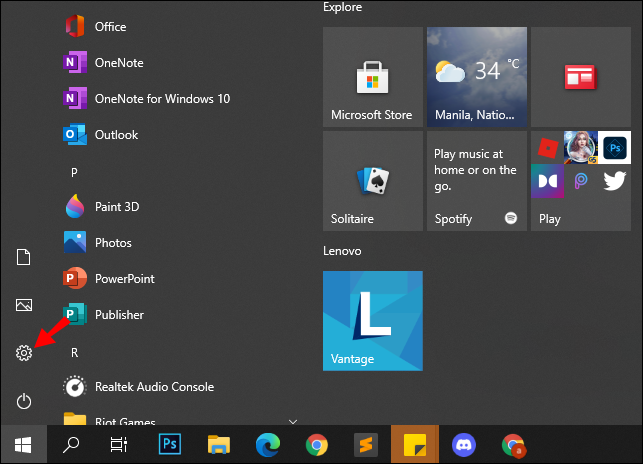
- Click on System.

- Click on Display.
- Under the Multiple displays subheader, change the setting from Duplicate these displays to Extend these displays. This will allow you to combine your screens into one extended desktop.
- Click on Keep changes to confirm the changes.
- At this point, launch Google Meet.
- Separate the Google Meet tab from the tabs hosting the content you want to present.
- Drag the Google Meet tab over to the second monitor.
- When you’re ready to start, click on the Present button at the bottom of the Google Meet tab and then select Your Entire Screen. Windows will then display all the monitors attached to your system and allow you to choose the one that has the content you’d like to show.
- Click on Share to start your presentation.


With this arrangement, all the content you wish to present will be on one monitor, and your audience will be on the other. This will allow you to engage all participants throughout the session. You could even pause and invite questions or comments.
Method 2: Using the Dualless Chrome Extension
Most people love Google Meet because it provides a wireless, hassle-free video conferencing service. For this reason, the idea of attaching extra monitors may not be very appealing. It could be that you don’t even have some extra space for additional monitors. Perhaps you don’t have spare monitors at all. Whatever the case, the Dualless Extension could be the perfect solution.
The Dualless Extension helps you split your browser window into two screens with variable ratios. You can dedicate one of the portions to the presentation and use the other for your Google Meet live feed.
Here’s how this method works:
- Open the chrome web store and install the Dualless extension.
- Once installed, the extension’s icon should appear in the top right corner of your browser. If it doesn’t,
- Click on the extensions button.
- Select the Dualless extension from the list of extensions added to your browser,
- Click on the pin icon next to the extension. This will pin the extension to your address bar for convenience.
- Click on the extensions button.
- Launch Google Meet and click on the extensions button. This will initiate the process of splitting your screen into two.
- Select the split ratio. You’ll be provided with suggestions, including 7:3, 6:4, 5:5, 4:6, and 3:7. You could juggle between them and select the best one for your needs.
- At this point, the Google Meet tab will be split into two screens. You can now share your screen on one side and use the other for your Google Meet live feed.


Although the Dualless Chrome extension is an attractive option if you don’t have a spare monitor, it can only be useful when the content you’d like to show is on your browser.
Method 3: Joining the Meeting Using a Second Device
If the content you’d like to show isn’t on a browser and you don’t want the hassle of attaching an additional monitor to your PC, why not join the meeting a second time?
One of the best things about Google Meet is that you can run two instances in the same meeting: one as the presenter and the other as a participant. For this to work, you obviously need a second device. It could be another PC, an Android phone, or an iOS device. This arrangement allows you to use one device for your presentation and the other for audience monitoring.
Here’s how to go about it:
- Launch Google Meet and generate an invite code.
- Use the code to join the meeting from the second device.
- Initiate screen sharing and start presenting.


If you go with this option, be sure to switch off the mic and the speaker sound on your second device. That way, you won’t have to deal with echo noise during the presentation.
How to Present and View Participants from an iPhone
When presenting from an iPhone on Google Meet, your options to see and engage your participants are severely limited. That’s because the screen is relatively small, and any attempts to do both these actions won’t work natively. You can’t connect an extra screen as you would on a computer. However, you can still run two instances in the same meeting: as the presenter and as a participant. Here’s how:
- Assemble your devices (your iPhone and an extra device that supports Google Meet).
- Start a video call from your iPhone.
- Join the meeting from the second device.
- Tap on Share screen on the iPhone.
- Tap on Start Broadcast.


How to Present and View Participants on an Android Device
Like the iPhone, a workaround with a second device is recommended. You can still join the meeting both as the presenter and as a participant if you have an extra device that supports Google Meet. Here’s how:
- Gather your devices (your Android phone and an extra device).
- Start a video call from your Android.
- Join the meeting from the second device.
- On your Android phone, tap on Share screen.
- Tap on Start sharing.
Device Links
50px" />


Additional FAQs
How Many People Can I See at Once While Presenting?
You can see and interact with up to 49 participants when presenting from a PC.
Why can’t I share my screen in Google Meet?
There are several reasons why you might not be able to share your screen in Google Meet. For starters, the host might have disabled the ability for participants to share their screens, or maybe the browser needs permission to record your screen. You might need to restart the app and rejoin the meeting, use a different browser, or try joining the meeting in an incognito window.
Keep Your Audience Engaged
To create an excellent presentation on Google Meet, it’s important to engage your audience and invite questions or comments throughout the session. However, it isn’t easy to keep everyone engaged if you can’t see them while you present. Although Google Meet’s design for screen sharing doesn’t allow presenters to see other participants during the session, you can easily do so with an extra monitor, a compatible device, or the Dualless Chrome extension.
Have you tried using any of the tools discussed in this guide during your presentations? How did it go?
Let us know in the comments section below.
Disclaimer: Some pages on this site may include an affiliate link. This does not effect our editorial in any way.