KineMaster is a popular video editing app, even amongst users who don’t know a lot about video editing. People love it because they can do everything on their phones and still get decent results.
Whilst not difficult to use, there aren’t many tutorials explaining how the app itself works. If you don’t know how to use the green screen effect, for instance, don’t worry. We’ve got you covered. In this article, we’ll explain how this effect works and also show you some awesome tips and tricks that you probably didn’t know about before.
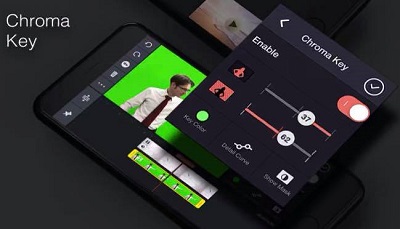
How to Activate Green Screen
As with any new function, activating the green screen can be a bit complicated at first. But by following our step-by-step guide, you’ll soon get the hang of things.
Before we start, however, there’s one thing you should know: It’s not possible to activate the chroma key effect in the top layer. Therefore, you’ll have to add a background layer over the top of it. When you’ve done that, you’re ready to begin:
- Add the green screen clips under the background layer.
- Click on the clips to select them.
- Then, go to the right side of the Menu and activate the chroma key.
There you have it! If you want to adjust the settings, this is the right time to do it. KineMaster allows you to customize every single detail to make your video more personal and unique. You can even experiment with different tones. For example, you can customize the brightness or darkness of your green color, so it perfectly matches your images.
How to Prevent Ghost Face Effect
If you’ve been using KineMaster for a while, you may’ve noticed that strange things happen when you want to merge two or more clips together. If your clips overlap even for a millisecond, it can cause the so-called “ghost face” effect. This means that for a fleeting moment, your audience see a double image of you.
Although it may cause some laugher, it’s definitely not an ideal situation. You certainly don’t want people to see your fading shadow following your head while you’re talking about an important topic. Therefore, you should try to avoid this at any cost.
You can do so by creating a slightly longer gap between your clips. But that’s not a foolproof solution, by any means. As it may cause the image to disappear altogether, if only for a couple of seconds. As we all know, those pauses can be very annoying and turn viewers off. But what can you do?
Thankfully, the solution’s simple enough. All you have to do is create a new project for your green screen clips only. You can then edit them and add the transitions. You can even try out various transition effects, such as a split mirror or a channel cut. This is a perfect way to express your creativity and make unique or funny videos that’ll help you stand out from the crowd.
When you’re satisfied with your clips, export the file and save it on your PC or laptop. It’s now time to create the final project that’ll have the background layer as the top layer, as outlined above. Now you can put the exported file below the top layer. That’ll prevent both the “ghost face” effect and disappearing images, thus making your video all the more polished and professional.
Another Option
There are so many video editing apps currently available, it’s sometimes difficult to choose between them. Of course, not all are suitable for people with limited editing knowledge, but there are some pretty convenient options nonetheless.
If you’re still struggling with KineMaster, we’d recommend Filmora Go. Although KineMaster may be more powerful, Filmora Go has everything a beginner needs. It’s very easy to use with a pretty simple interface. What’s more, it’ll never leave you searching for a certain feature more than a couple of seconds.
In terms of specifics, you can edit your videos, add over-layers, adjust the aspect ratio, and prepare them for publishing. It also allows you to add subtitles or voice-overs to your video. Plus, if you don’t have a lot of storage space on your phone, Filmora Go only takes up around 80 MB, half the space of KineMaster.
Once you polish your video-editing skills on Filmora Go, you can switch back to KineMaster and take those skills to an even higher level.

Green Is More Fun
Now you know how to use the green screen effect, a feature which will hopefully help improve the overall quality of your videos. You can play with this effect and create unique, eye-catching content. Just make sure you’re not trying to use it while you’re in the top layer!
What kinds of videos do you usually use KineMaster for? Have you ever had any problems with the green screen effect? Do you know any other tips or tricks on this app? Feel free to share them with other users in the comments section below.
Disclaimer: Some pages on this site may include an affiliate link. This does not effect our editorial in any way.


