Obsidian has multiple plugins that let you format your notes and use graphs and images to make them more meaningful. While formatting options are limited, you can still resize pictures to make them fit the according text appropriately. Minimizing images in Obsidian is important if you need to fit many of them into one file or note.
Here, you’ll learn how to make images smaller in Obsidian.
How to Resize Your Image in Obsidian
Obsidian is specific regarding image formatting. While you can do basic text functions with a few symbols, image formatting requires CSS and HTML. This system might take more time than other traditional note-taking apps. However, it does have these benefits, such as privacy, backlinking, and versatility.
- Before resizing an image, you’ll need to place it in the vault. Here’s how to do so:
- Open your desired vault on the left side of the interface after launching Obsidian.

- Copy the image you want to add to your notes by right-clicking on it and selecting “Copy image.” Also, make sure it has a well-recognizable name.

- Right-click on a space within the vault and then click on “Paste.”


Now that your image is stored within the vault, you can use it with your notes:
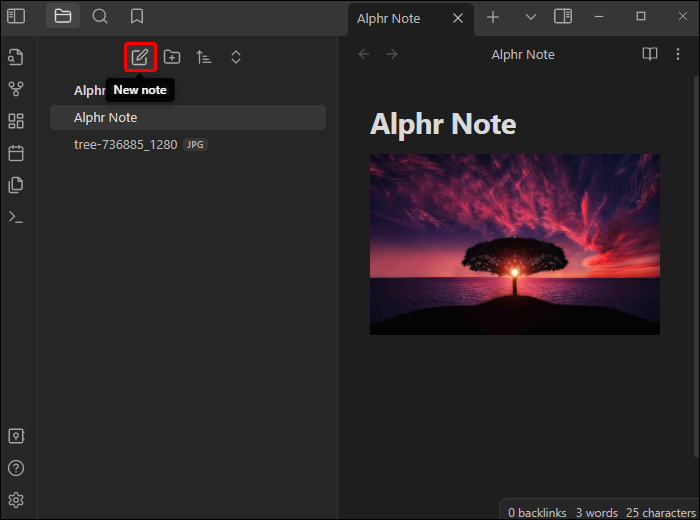
- Create a new note or open up an old note where you want to place the image.
- Then use markdown syntax to embed the image within the note properly:
- Resize the image using the HTML code:
<img src="[your_image_name.jpg]" width="500" height="400" />

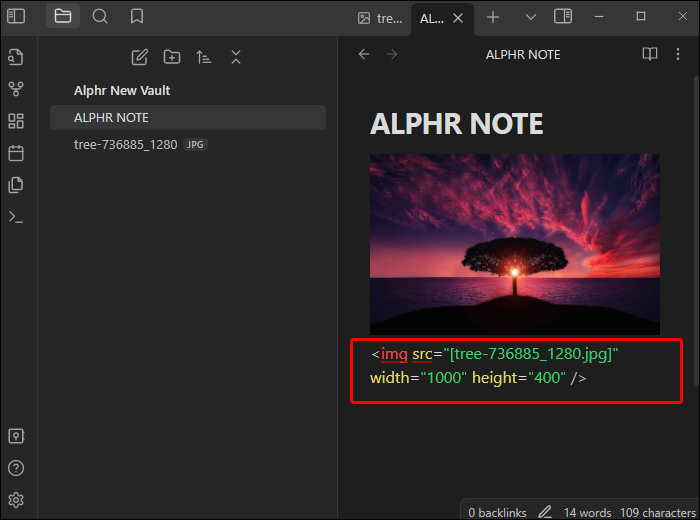
It’s as simple as that! Your image will be resized according to your parameters. You can customize the height and width of the image by tinkering with the numbers.
This method can be confusing if you don’t understand what pixel dimensions can look like on a screen. You might need to experiment with the correct size. Here’s a general frame of reference that can help you:
- Thumbnail: If you want small images, check the width and height to be 32 x 32 to 128 x 125 pixels. This dimension won’t take up a lot of sizes and works excellent for analyzing smaller elements like web button pages, profile pictures, and illustrations.
- Smaller images: The standard small image format is 200 x 200 megapixels to 500 x 500 pixels. Social media profiles are frequently this size. If you need a lot of images in your notes, this option will leave ample space for more.
- Medium-size images: Most medium-size images use 500 x 500 to 1200 x 1200 dimensions. With this size, you can incorporate highly detailed graph pictures, infographics, and diagrams. The medium size image is typically the exact size you’ll find on blog posts.
- Large images: For large images that are highly important for your notes, you can use dimensions between 1200 x 1200 and 2500 x 2500. This dimension is about the same size as photography portfolio images.
Some other valuable dimensions include:
- Full HD image: 1920 x 1080
- Banner image: 1920 x 600
- 4K images: 3840 x 2160
However, the best dimensions for your picture will also depend on the image quality. If your saved image has a low resolution, it won’t be clear if you stretch it. Always evaluate the aspect ratio of your original images to avoid the Obsidian format becoming distorted.
How to Embed Links Using Obsidian
Obsidian is a unique note-taking system because it doesn’t function as a traditional database. Instead, you can create a graph of your knowledge by linking notes. This means you can easily switch between related subject matters. To do so effectively, you’ll need to embed links. You can do this for ordinary text, headings, and other note contents.
Here’s how to embed links to other notes through ordinary text:
- While in your desired Obsidian notes, type in the double bracket [[.
- Obsidian will open up all your notes through a dropdown menu. Select one of the note names offered or continue to type in the note name.
- Use double closed brackets ]] to finalize the link.


Once complete, click on the link to go to your desired note. Next to connecting notes through normal text, you can also do it through headers by typing in:
[[Note Name#Header Name]]
Simply substitute the note name for your desired note’s name and the text name for your header.
You might also want to embed the entirety of another note’s contents. Obsidian also supports this function:
![[Note Name]]
By using embedded links to other notes, you’ll be able to make large knowledge systems conveniently interlinked.
How to Make Knowledge Systems Using Obsidian
Now that you’ve learned the basic linking tools, you can make comprehensive knowledge systems using Obsidian. You’ll most likely need to use a web-like structure instead of a hierarchy like in other note-taking programs (like Notion).
There are guidelines to consider for connecting notes as effectively as possible:
- Link whenever you can – Once you mention a subject or concept you already have a note for, link it to that appropriate note. This ensures all your knowledge is connected comprehensively, giving you the big picture of your subject matter.
- Divide per subject matter – Each note should represent one idea or concept you’re exploring. Doing so keeps the note files uncluttered and makes it easy to reference for the whole system.
- Utilize Plugins- Obsidian has a vast community, constantly making new plugins to make the experience easier. These might include tables or specific graphs.
- Use a map of content for the bigger picture – A map of content outlines all your interlinked notes within one interface, showing you exactly how your concepts connect. Create a new note and type all the relevant topics while linking them to their specific notes.
You can continuously create and update a dynamic knowledge system using this method.
Preparing Your Vault in Obsidian
Before you can link notes together in Obsidian, you’ll need to know how to create vaults and notes in the first place. This system works a little differently than typical file creation systems on Windows computers and other more traditional note-taking systems. With Obsidian, all your notes and files will be saved in a “vault.” This acts as a large folder compiling all your texts together. The platform uses plain text files, so you’ll be able to access the notes from other programs too.
To make a vault and note in Obsidian, follow these instructions:
- After launching Obsidian, click on the “Create New Vault” option and designate where you want it stored before typing in the name.
- Click on the “Create” option.


Once the vault is ready, you can continue by making a note:
- After opening Obsidian, click on the “+” option located on the sidebar. You can also use the command “CTRL +N.”
- Type in a name for your note and press the ENTER key.
Once the note is created, you can start editing and begin linking other notes. They will automatically be saved to the vault.
FAQs
Can you put links into images in Obsidian?
Unfortunately not. Obsidian allows you to embed links through text and not images. However, you can always use the above commands to link the note underneath the image.
Both Minimalist and Expansive
Obsidian is a powerful note-taking and learning tool that helps you link together concepts and ideas through different text files. You can also use images to make the process more detailed. However, changing the image size includes using the HTML codes mentioned above. Once you’ve adjusted the image, you can connect your notes together by using Obsidian’s simple functions and formula. This maps out your ideas, concepts, and overall learning process.
Did you find it easy to resize images in Obsidian? How about linking notes together? Let us know in the comment section below.
Disclaimer: Some pages on this site may include an affiliate link. This does not effect our editorial in any way.