Switch not connecting to the internet can be aggravating. It means you can’t play certain games online, and neither can you connect with the gamers you love playing with. There are various reasons why Switch might refuse to connect to the internet. The most common ones include wrong internet settings, a faulty router, or being too far from the router, just to mention a few.
If you’re having trouble connecting your Switch to the internet, we’re here to help. In this article, we will go through some quick fixes you can try to get reconnected to the internet so you can keep enjoying your games. Continue reading to find out more.
Fixing a Switch Not Connecting to the Internet
If your Switch device doesn’t connect to the internet, you won’t be able to access essential features such as voice chat, multiplayer modes, or download games. While you’ll still be able to play most games, it doesn’t make it any less of an inconvenience. There are a few fixes you can try to resolve the problem. Here are some of them.
Restart Your Switch Device
A quick restart is known to solve many network glitches, and Switch isn’t an exception. Restarting the device allows it to resolve any temporary issues and form new network connections. To restart your Switch, follow these steps.
- Hold down the power button.
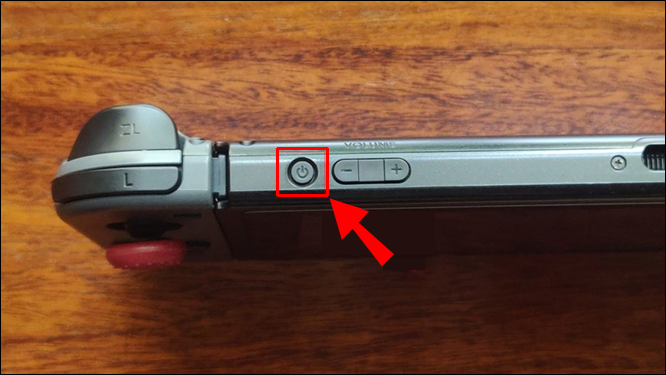
- Select “Power Options” from the menu.

- Click on “Restart.”
- After a few seconds, the device should reboot.


Once the device is powered up, try connecting to the internet and see if the issue is resolved. If it’s not, try the fixes listed below.
Restart Your Modem and Router
If restarting your Switch device doesn’t work, reconsider doing the same with your network equipment. To reboot the devices, press the power button for at least a minute. If you can’t see the power button, just unplug the cables and plug them back in. Then, wait for your devices to power and try to connect to the internet again.
Ensure you’re close to your router so the distance between you isn’t long, as that may cause connection issues. Wireless connections are bound by distance, and the closer you are to the signal source, the stronger the connection you get from it.
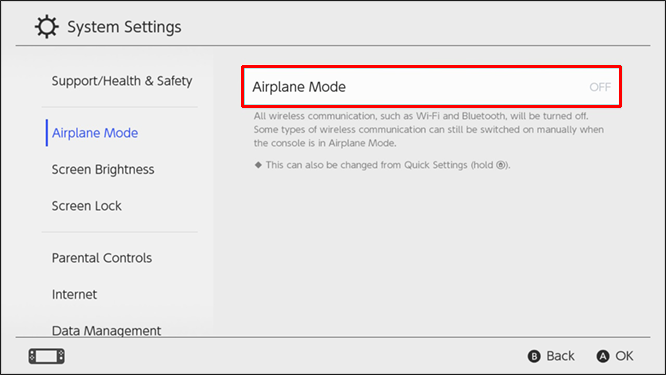
Disable the Airplane Mode
All wireless communication is disabled once a device is switched to airplane mode. To rule out this possibility, check if there is an airplane icon in the top-right corner of your screen. If there is, follow these steps to disable it.
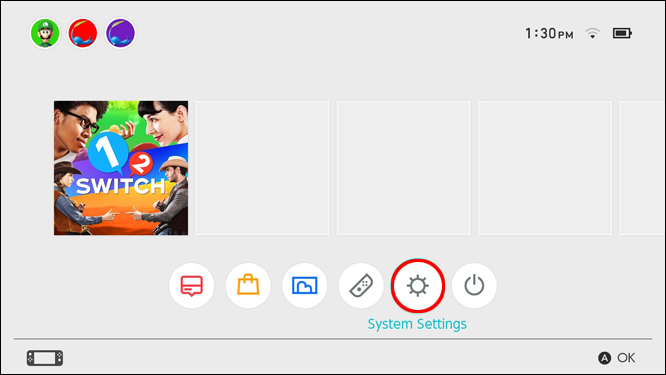
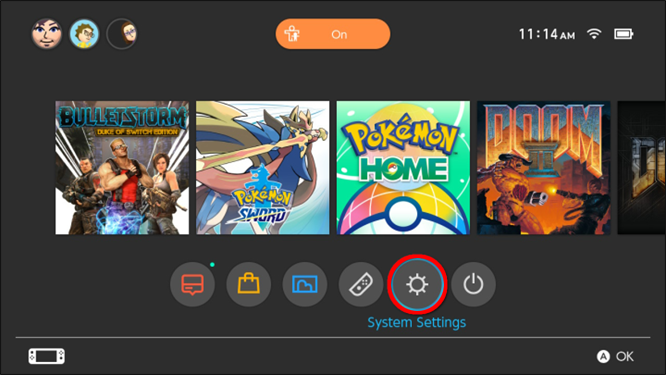
- Open settings by holding the gear icon to open the “System Settings”.
- Switch off the “Airplane mode.”
Change Your Internet Settings
Many users have reported success after changing their internet settings. Here’s how to change yours.
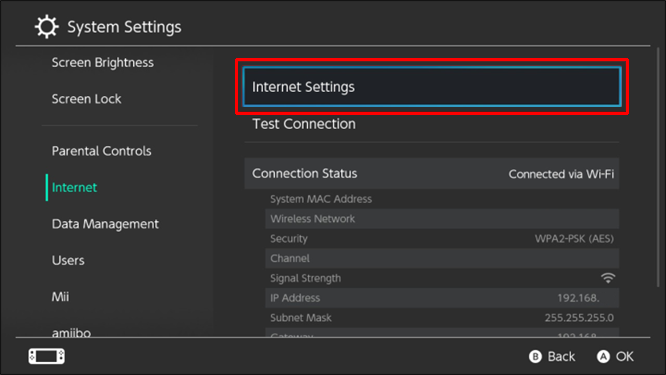
- On your Switch device, open “System Settings.”
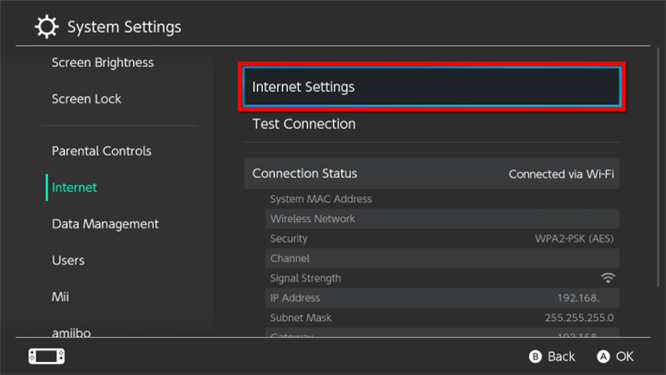
- Navigate to “Internet,” then select “Internet Settings.”
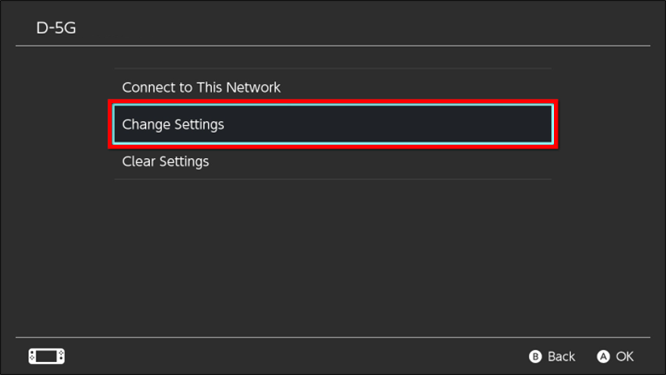
- Choose the network you’re trying to connect with and scroll down to “Change Settings.”
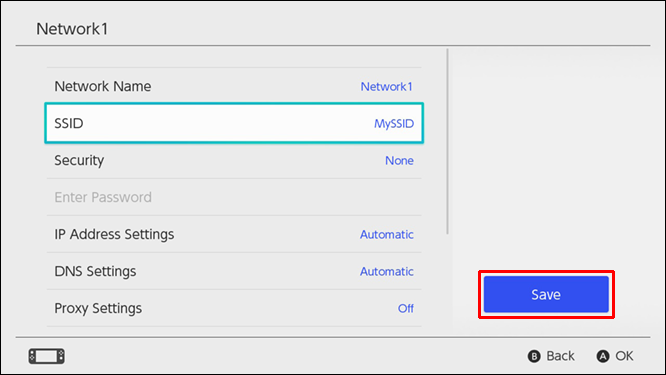
- From the menu, select “Security” and switch to any security protocol on the list except “None.”
- Enter your password and click on “Save.”

See if your device can now connect to the internet. If the problem persists, consider changing your DNS settings instead.
- Go to “Settings” and navigate to “Internet.”
- From the options, select “Internet Settings.”
- Choose your Wi-Fi network and select “Change Settings.”
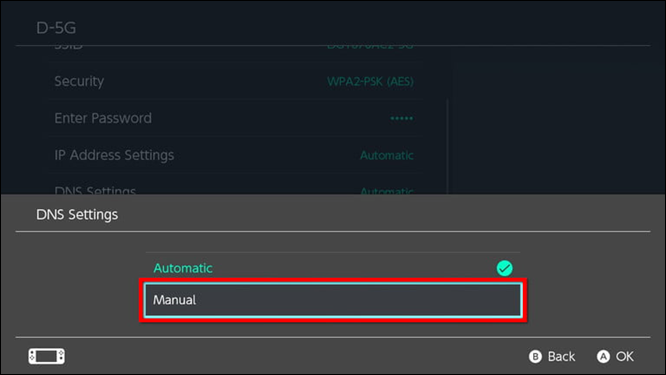
- Scroll down to “DNS Settings” and switch to “Manual.”
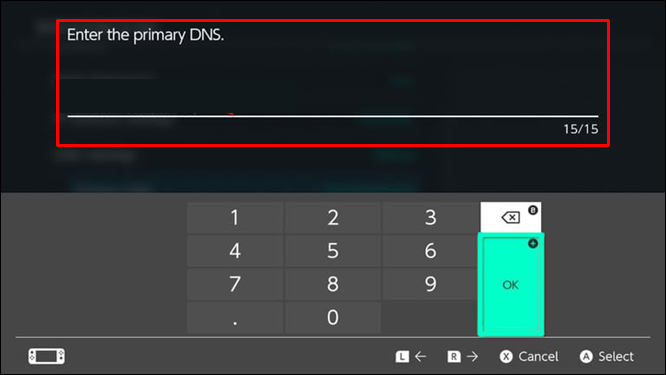
- From the options, select “Primary DNS” and enter the code “1.1.1.1” or “8.8.8.8.”
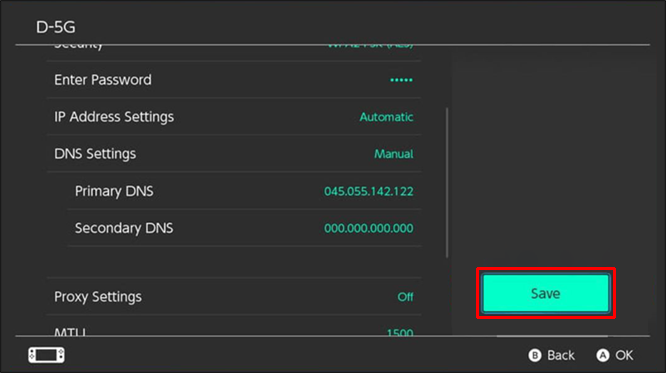
- Go to “Secondary DNS” and enter “1.0.0.1” or “8.8.8.4.”
- Once you’re done with these changes, press the “Save” button.
- Try connecting to the internet again and see if that resolves the problem.


If the DNS servers you just changed to still won’t let you connect to the internet, consider switching between the two server codes provided. For example, if you initially filled in 1.1.1.1 as the Primary DNS, consider using 8.8.8.8 instead. Then, do the same for the Secondary DNS and see if that works.
If you still have issues connecting to the internet after changing the servers, check that you’re filling in the correct Wi-Fi password. While this might sound obvious, filling in the wrong Wi-Fi password won’t let you get connected to the internet. If you’re confident that the Wi-Fi password you’re using is correct, try restarting your Switch device by following these steps.
- Long-press the physical power button.
- Go to Power Options and select “Restart.”
- Give your device a few minutes to reboot.
- After the system reboot, try connecting to your Wi-Fi network again.

Please note that the above DNS servers might not work in your country because they are based on the region where you live. However, they should work and resolve your connection problems in most cases.
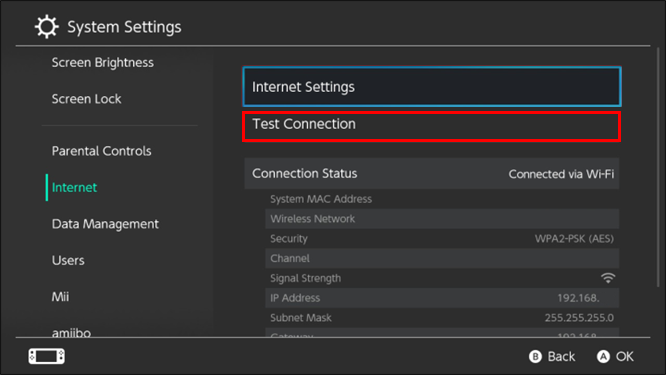
Test the Connection
If your Switch device still doesn’t connect to the internet, try running an automatic network repair by testing the connection.
- Open the “System Settings.”
- Go to “Internet” and navigate to “Test Connection.”
- Run the tests to verify that everything is working accordingly.
Install the Available System Updates
If you can’t connect to the internet, it means you can’t download any updates. However, there’s a chance your device has already downloaded new updates but hasn’t installed them yet. Installing these updates might help resolve the issue by replacing the corrupted files with fresh ones.
- On your Switch device, go to “System Settings.”
- From the left sidebar, select “System.”
- Click on “System Updates” and install any available updates.


Check the Switch Status Page
Sometimes you might think the problem is your device when in fact, it’s coming from the Switch side. To be sure, go to Switch’s online status page and double-check that all the servers are online and in good health. You can also get a clue on when the team will be repairing their services by navigating to the Future maintenance schedule tab so you are not ambushed.
Purchase a New Router
If you’ve tried the above fixes, but your Switch device still isn’t connecting to the internet, your router is likely faulty. If you still have an active warranty for the equipment, you can ask the seller to replace it. You might need to buy a new router if the warranty is expired.
Switch Not Connect After an Update
If you’ve recently updated your system or games and are having trouble connecting to the internet, try the following fixes.
- Restart your Switch device
- Double-check that you’re using the correct Wi-Fi password
- Restart your router and modem
- Change the DNS servers of your Switch device
- Move closer to the router
- Test the connection of the network
- Ensure the Airplane mode is turned off
- Roll back to the previous versions of the games you just updated
Get Connected Again
Switch not connecting to the internet can be quite an inconvenience. As you have seen, several ways to fix the problem exist. Many users have reported that the Switch internet connection problems were resolved when they changed their internet settings. We hope that the fixes we’ve highlighted in this article were able to resolve your issue.
Have you ever experienced your Switch not connecting to the internet? How did you resolve the issue? Please let us know in the comments section below.
Disclaimer: Some pages on this site may include an affiliate link. This does not effect our editorial in any way.