Need to add an image or text to the background of a document? For example, to indicate that it’s only a draft or to insert your company logo? Well, if you’re on the Mac and using Microsoft Word, adding a watermark is quick and easy!
Now you too can add ASAP or URGENT in screaming red letters to everything you send to your coworkers! Wait, don’t do that. Let’s all agree to only add a watermark to a Word document for good, not evil.
To get started, open or create your document in Microsoft Word. We’re referencing Word for Mac 2016 in this article. With your document open or created, click the Design tab in the toolbar at the top of the window.
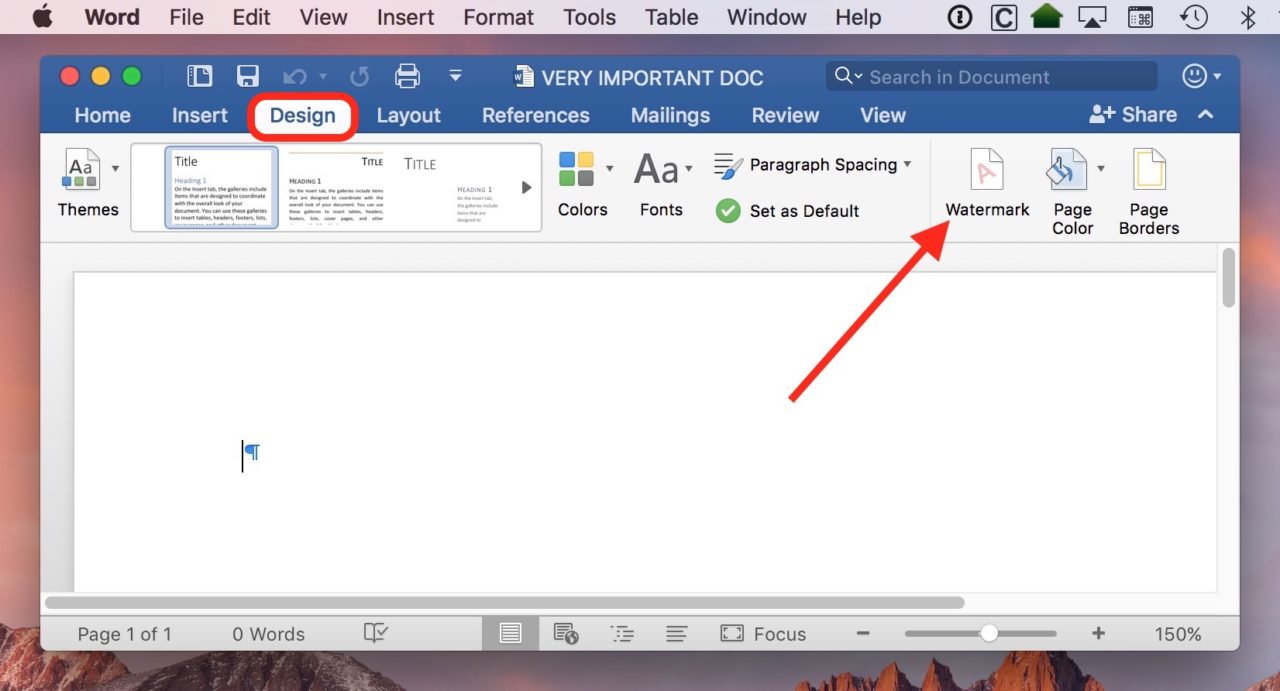
From the Design tab, find and click on the Watermark button, identified by the red arrow in the screenshot above. Alternatively, you could select Insert > Watermark from the menu bar at the top of the screen:

Whichever way you choose to get there, you’ll next see the choices for how you can configure your watermark.

Word for Mac gives you the choice to use either a Picture or Text watermark. With the Text watermark option, you can enter any word or phrase, adjust its font and color, and set its orientation and opacity. Feel free to play around with these settings to get the result you desire. You can see a preview of your watermark on the right side of the screen to help you as you adjust the settings. In my example, I’ve added a watermark that says “DRAFT” diagonally across the page.
For a picture watermark, you’ll need an image: your company’s logo, a certification badge, etc. Click Select Picture and choose your image from the familiar open/save dialog window.

Once you’ve selected your image, you can change its size with the Scale option.

The Washout option dims your picture so that it doesn’t interfere with the readability of your text. In our example, the Washout option is checked in the screenshot above, and unchecked in the screenshot below. The decision to use the Washout option will depend on your image, so play around with it a bit and use the preview window to decide.

When you’re happy with your text or picture watermark, click “OK,” and you’ll see your watermark appear within your Word document.

You can of course turn this off at any point by coming back to the Design > Watermark options or by choosing Insert > Watermark.
Finally, be aware that this isn’t intended as a security measure. If you pass along your unencrypted Word document to someone, he or she could easily remove whatever watermark you inserted, even if it says “DO NOT REMOVE” in big scary letters. If you’d like to do something more secure, you might consider exporting your watermarked document as a PDF before you send it. You’d do that by choosing File > Save As from Word’s menus…

…and then picking “PDF” from the “File Format” drop-down before you click “Save.”

That still won’t make it impossible for someone to clear out your watermark, but it’ll at least make it a touch more difficult! Maybe that’ll deter a few nefarious people. The lazy ones, anyhow.
Disclaimer: Some pages on this site may include an affiliate link. This does not effect our editorial in any way.


