Now you know how your teacher felt when you were in school! They needed to manage too many students and probably wished they could have a co-teacher to help them out.
Luckily, now that you get to hold meetings via Zoom, you can have a co-host. From time to time, there will simply be too many participants for you to handle on your own. That’s why this useful software enables users to make another person a co-host and give them control over the meeting.
Would you like to know how to do this? We’ve got you covered with this article.
How to Make a Co-Host on Zoom
This Zoom feature doesn’t only come in handy when you need help managing your meeting. Are you planning an online presentation or a speaking event? When you enable a co-host, you can invite a guest speaker to your show and make it even better.
The greatest thing about this feature is that it doesn’t require too many clicks – it’s relatively easy to find it and make another person a co-host.
However, you need to have a Pro, Business, Education, or an API Partner Zoom plan if you want to co-host your online meetings.
Here’s how to name co-hosts in Zoom on various devices and operating systems.
How to Make a Zoom Co-Host on Mac
Do you have a Mac? Follow our instructions to enable someone to co-host your meeting.
Before sharing your hosting privileges with this person, you need to enable this feature in your Zoom account. It isn’t a default setting in the software.
To do this, do the following:
- Open the official Zoom website.

- Log in to your account, but make sure it’s as an admin so you can edit your Account Settings.

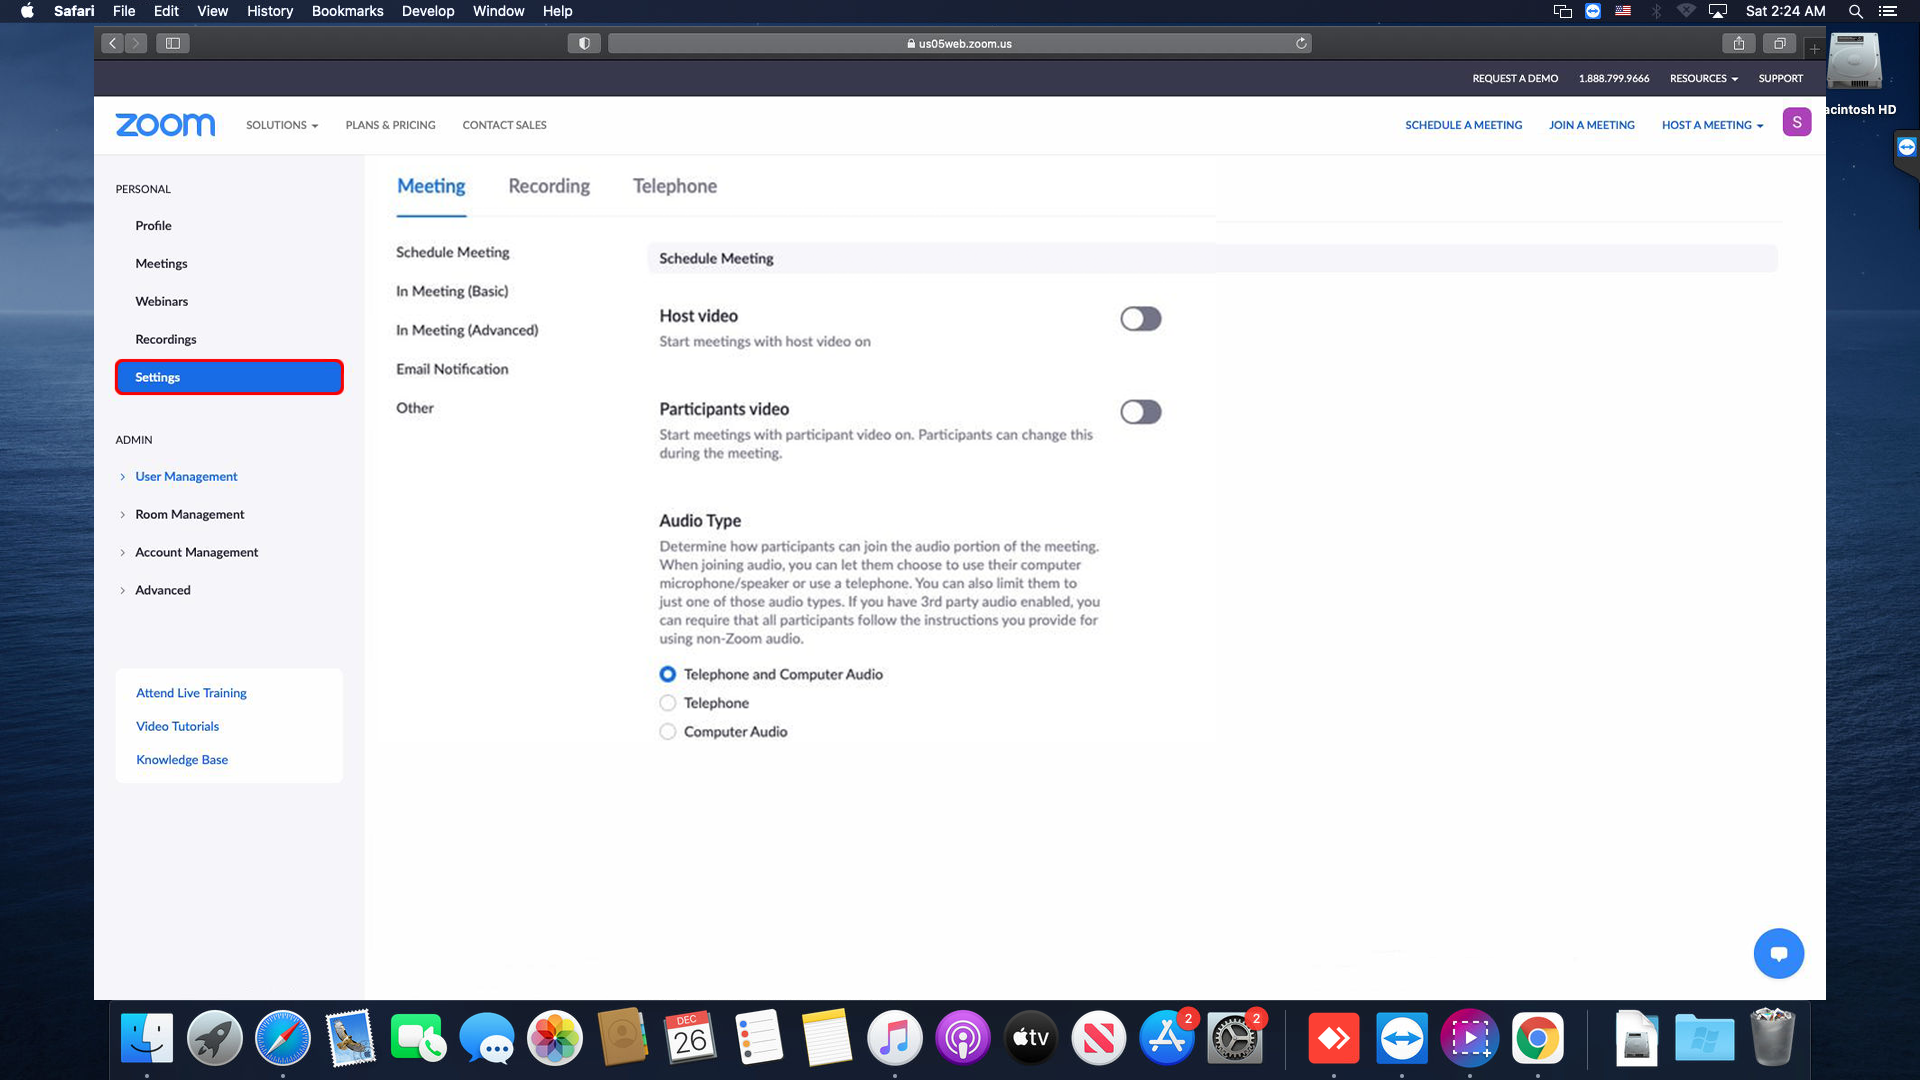
- Select Account Settings from the taskbar.
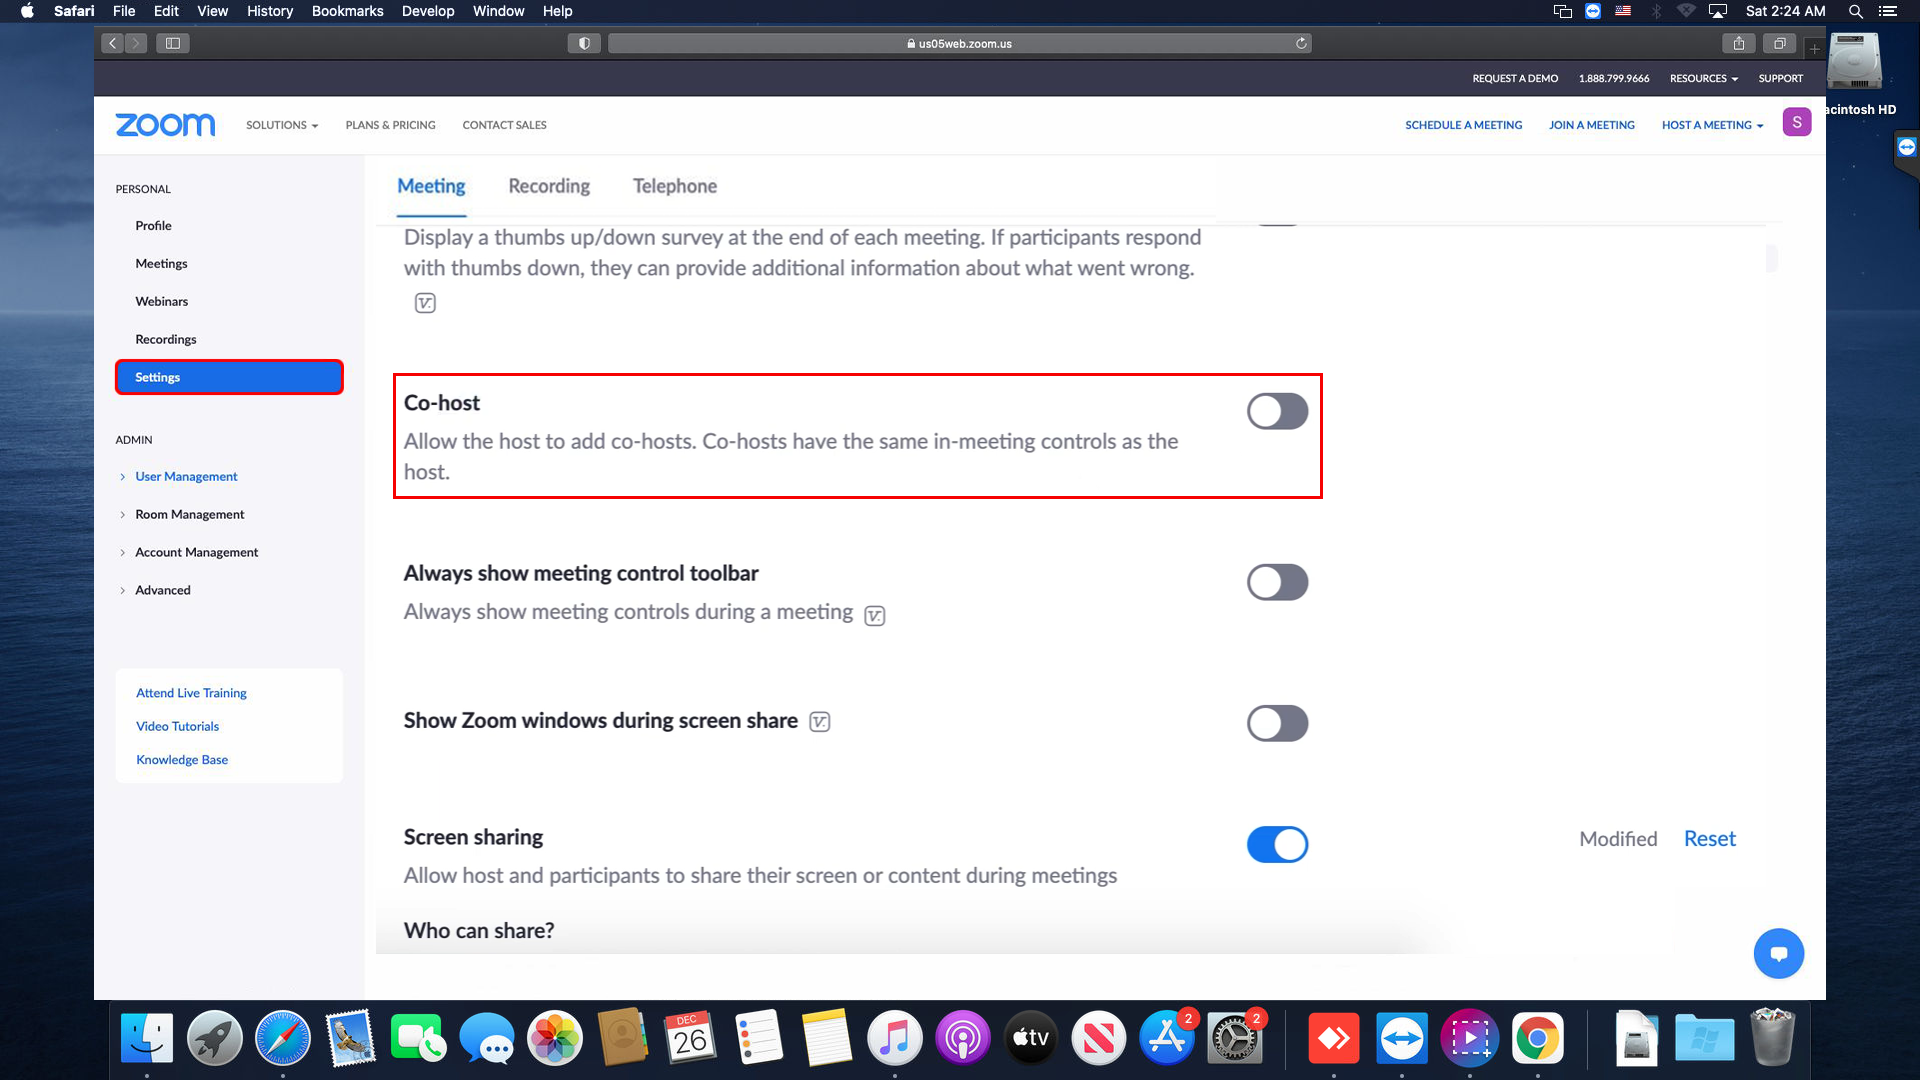
- Scroll through the Meeting tab to find the Co-host section, to allow co-hosts to be added to the meeting. They’ll have almost the same controls as you. If you don’t feel like scrolling, you can use the keyboard shortcut: press CMD and then F to open the search field, then start typing co-host.
- When you’ve found the feature, switch the toggle to turn it on.


Once you’ve performed these steps, you can start adding call participants as co-hosts in your next meeting. Follow the instructions below to do so:
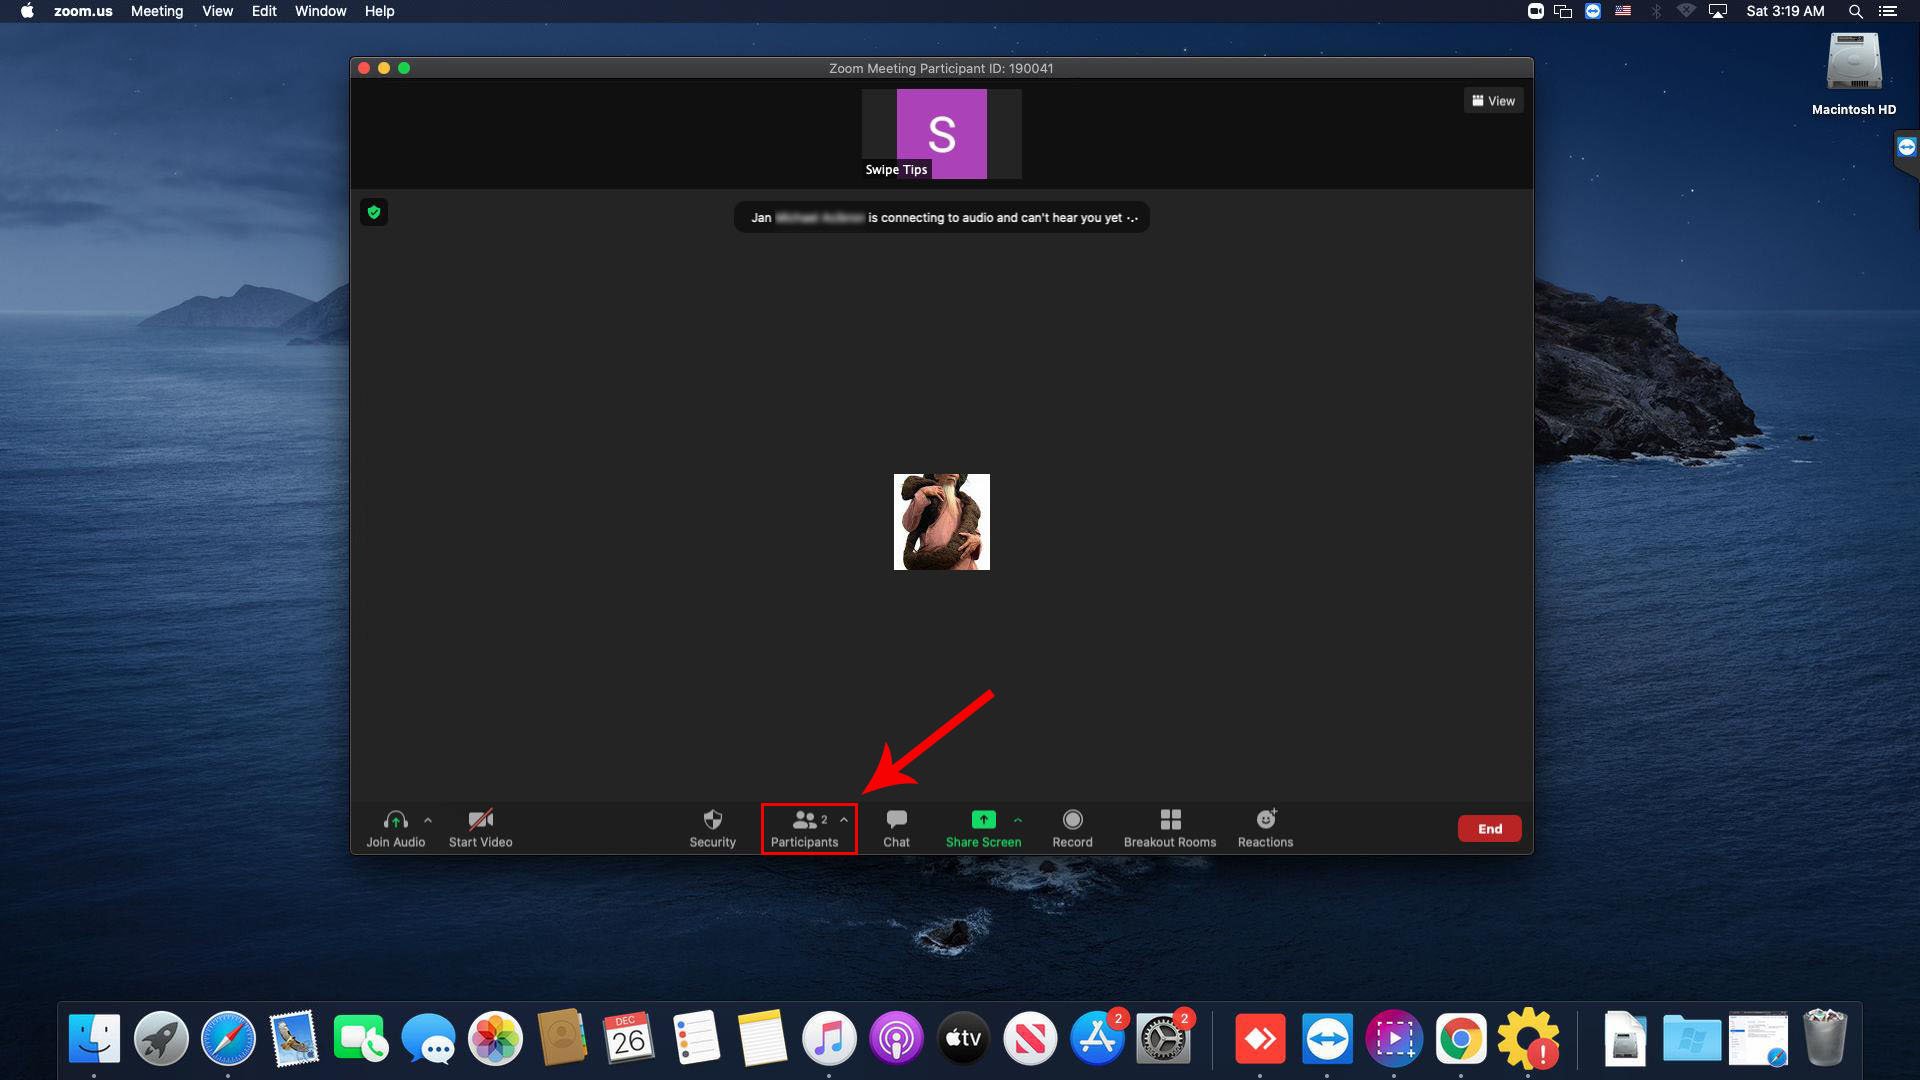
- In your meeting window, navigate to the bottom and select the Manage Participants button.
- A list of all the participants’ names will be displayed.
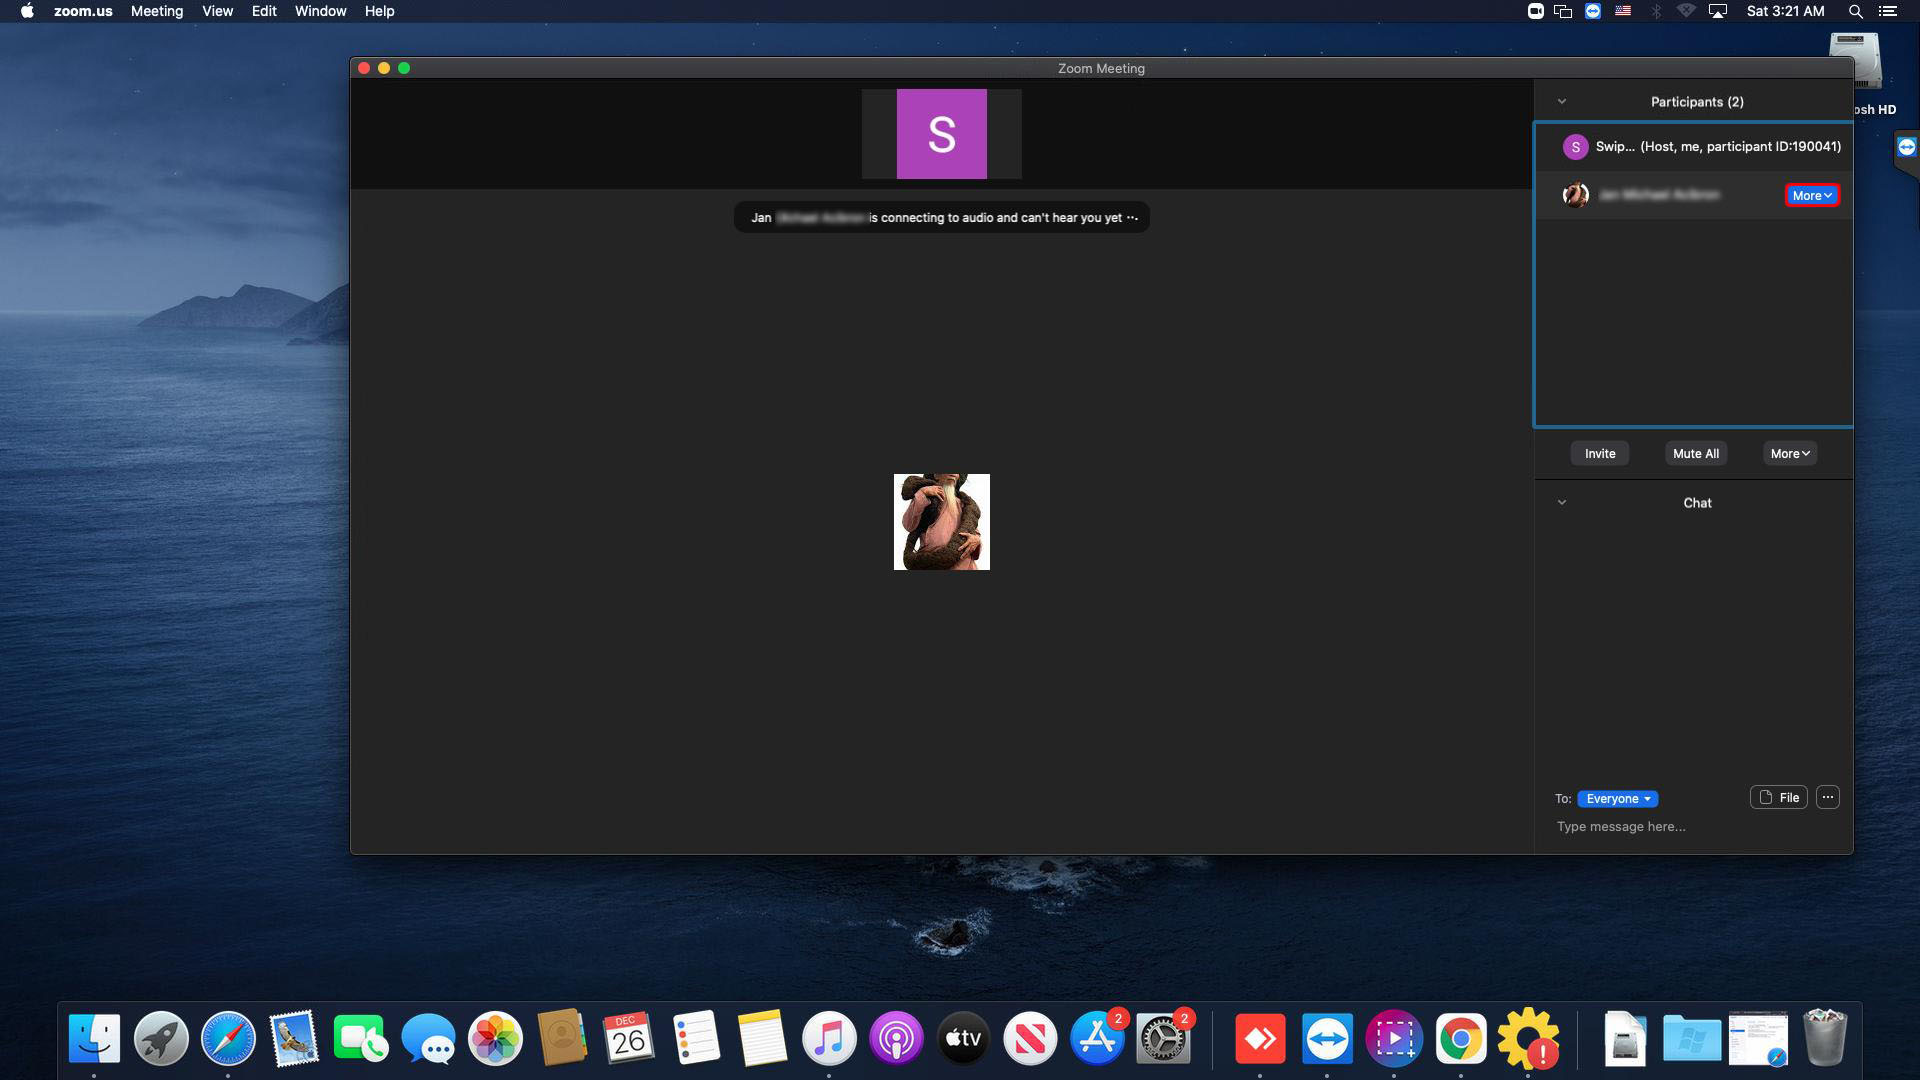
- Hover over the name of the person you want to make your co-host.
- When the More option shows up, click on it.
- Select Make Co-host from the drop-down menu.
- Click Yes in the confirmation window.


That’s it! This person is now a co-host, and you’ll see this title next to their name. If you change your mind about making a meeting participant a co-host, you can also remove their privileges again. Follow the same instructions from above and choose the Withdraw Co-Host Permission option that will now appear in the More menu.
You can make this option mandatory for everyone in your account. If you wish to do this, select the lock icon and then confirm your choice on the next screen.
Note: Your Mac should be running the 3.5.24604.0824 or higher version of the operating system for this feature to work.
How to Make a Zoom Co-Host on iPhone
If you’re using an iPhone to host a meeting on Zoom, here are the steps to follow if you want to assign a co-host.
- Launch the Zoom app on your iPhone.
- Tap Start a meeting.
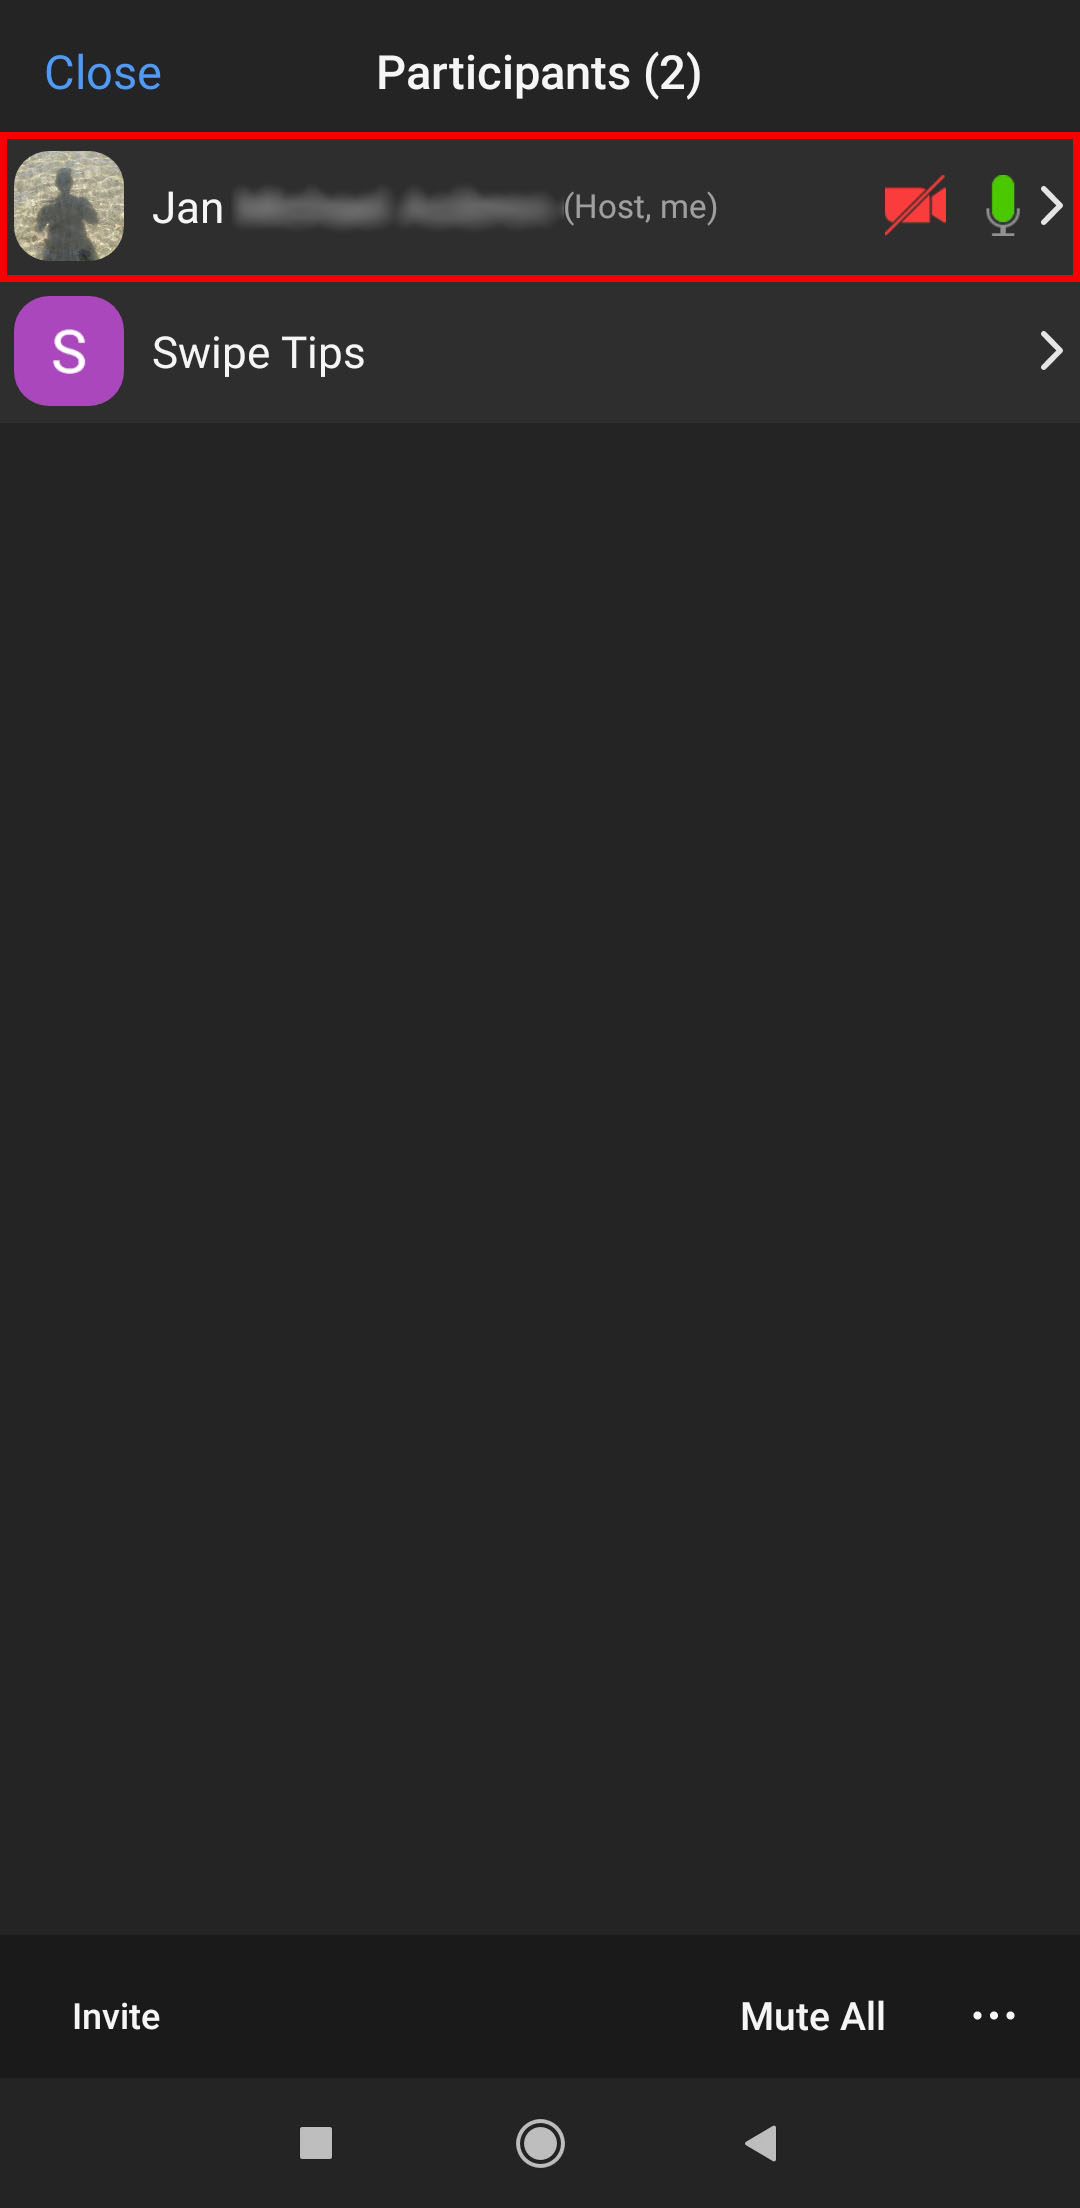
- Tap the Participants button at the bottom of your screen.
- Now that you can see the list of all participants, find the one you want to make your co-host.
- When you tap on the desired participant’s name, a menu will appear. Choose Make Co-Host.
- Select OK to save your choice.


Note that a prerequisite for this to work is that your smartphone is running the 3.5.24989.0826 version of the software.
How to Make a Zoom Co-Host on Android
Android users can also share their hosting privileges with other meeting participants. But first, they need to ensure that their phone is running the 3.5.24989.0826 or higher version of the software. If that’s true for you, follow the instructions below to assign a co-host.
- Log in to your account using the Zoom app.
- Start your meeting and wait until other participants join you.
- From the menu at the bottom, choose Participants.
- Find the desired participant on the list that’ll appear on your screen. Tap on their name.
- Choose the Make Co-Host option from the pop-up menu.
- Select Yes to confirm.


Note that these are also the steps to take if you want to leave the meeting and make another person the host. Just choose Make Host from the menu in step five.
How to Make a Zoom Co-Host on Windows
A Windows computer needs a 3.5.24604.0824 or later version of this operating system to support this feature. If that’s the case for you, here’s how to enable the co-hosting option and give someone this privilege during a meeting.
- From Zoom’s main page, sign in to your account as an admin.
- After you do so, you will be able to open and change Account Settings.
- In the Meeting tab, find the Co-host section. If this feature isn’t enabled, click on the toggle to turn it on. If necessary, confirm your choice in a pop-up window.


After you start a meeting, you can make someone a co-host in one of these two ways:
- Hover over their video and click on the three-dot More icon when it shows up.
- Select Make Co-Host from the menu.


Or you can select the Manage Participants option at the bottom and hover your cursor over the desired participant. When the More option appears, click on it and select Make Co-Host.
By doing that, you’re giving another person all the privileges you have. Be aware of it before you decide to make someone a co-host.
How to Make a Co-Host Permanent on Zoom
You can’t make someone a co-host permanently, but you can give them a more powerful role instead. What if your internet connection lets you down or something happens, so you need to leave? The meeting doesn’t need to end if you assign an alternative host.
Here are the steps to follow if you want to make sure the meeting’s covered even if you’re not there.
- Sign in to your Zoom account and look for the Schedule icon.
- Click on it and wait for a new window to open.
- Select Advanced Options.
- Type in the name of your alternative host in the Alternative Host field. If they don’t appear in the search field, type in their email address instead.
- Make sure the Enable join before the host option is ticked.
- Select Schedule, and you’re done. The person assigned as an alternative host will be notified by email.


Additional FAQs
Device Links
-paragraph">Do you have more questions about hosting Zoom meetings? Here are the most common ones.
How to Set up a Zoom Meeting?
You’ve downloaded Zoom and created an account, but you don’t know how to get started. No worries. We’re here to explain how to set up your first Zoom meeting.
• Start your Zoom app and log in to your account.
• Choose the New Meeting option on the home screen when you sign in.
• A video conference room will open. Navigate to the bottom of the screen, where you’ll see different options available.
• Select the Invite icon.
• In the pop-up window, decide how you want to invite people to the meeting.
Here, you can select the Email option and add the email addresses of people you’d like to invite to the meeting. You will need to pick one app to invite people through (like Gmail). You’ll be taken to an email containing meeting details, such as the Meeting ID, that people need to access the video once you get started.
You can also choose Contacts if you’ve already added people to your contact list. Select the desired people from the list and then click on Invite to confirm.
• Once the participants receive their invitation, they can follow the on-screen instructions to join the meeting.
You can also invite people via Slack, for example. Just copy either the video conference invitation URL or the email and send the link to people via Slack’s direct messages.
What Can a Co-Host Do on Zoom?
Although co-hosts receive almost all privileges when you give them this title, you remain the “ultimate” host of the meeting.
Here’s what they can and can’t do.
Can do:
• Manage meeting participants
• Start a poll or edit one
• Start or stop a recording
• Share their screen
Cannot do:
• Start or end a meeting
• Give someone else co-hosting privileges
• Start a waiting or breakout room
• Start live streaming
• Start closed captioning or assign someone to do it
How Many Co-Hosts Can You Have in Zoom?
While only one person can be a Zoom meeting host, you can assign an unlimited number of participants to be co-hosts of your meeting.
Before you make too many people co-hosts, think about it carefully – that may turn the meeting into a mess, especially if you don’t know participants very well.
However, this feature can help you include multiple guest speakers in your online event.
I don’t see the option to enable the Co-Host setting. What’s happening?
If you’ve followed the steps above to toggle on the switch for Co-Host in the account settings and don’t see the option, it’s likely because you don’t have a Pro account. Users who have only the free Zoom service are unable to add a co-host to their meetings.
Make the Most Out of Co-Hosting
Are live shows out of the question right now? No problem. Co-hosting on Zoom can fix this issue and let you talk to your guest speaker in front of an audience. Are you holding a meeting for the whole department, and you need help? Zoom is your friend here since the co-hosting feature can make your job easier.
You can use this option on any device and operating system, anywhere you are, without having to cancel your plans. It’s set up in a few easy steps, and the event will be ready to start!
Have you already tried Zoom meetings? What will you use the co-hosting feature for? Let us know in the comments section below.
Disclaimer: Some pages on this site may include an affiliate link. This does not effect our editorial in any way.