Webflow is widely marketed as a no-code development platform, which is seen as its biggest advantage. However, this doesn’t mean you can’t add codes to your design.
While Webflow offers a wide array of design options, you might want to customize your website further. This is where custom codes come into play, as adding them allows for more functionality.
Keep reading to learn how to add a custom code in Webflow.
Limitations To Adding Custom Code
Before learning how to add custom codes in Webflow, it’s important to go over some ground rules.
Keep in mind that custom codes are advanced modifications. As such, they may cause conflicts with Webflow’s functionality, resulting in unexpected behavior on your site. Therefore, there’s no guarantee that every custom code will be fully compatible or functional.
In general, Webflow supports the following types of codes:
- HTML
- CSS
- JavaScript
Adding custom JavaScript codes can add a lot of functionality to your website. For that reason, Webflow is also equipped with a simpler version of JavaScript called jQuery. You can use it together with JavaScript to make the writing process easier.
When importing jQuery, it’s essential to pay attention to its version. The version should match the currently imported Webflow version to avoid conflicts and unexpected behavior. In addition, scripts like onClick and onHover that affect DOM events can also cause unexpected behavior on your site.
When integrating a custom code, you can’t use any server-side languages, including:
- Perl
- Python
- PHP
- Ruby
Another critical aspect to consider is the length of the custom code. Webflow imposes the following character limitations:
- 10,000 characters for embedded elements
- 10,000 characters for codes about a single page
- 20,000 characters for codes about the entire website
If the code you’d like to embed exceeds these character limits, you can’t embed it directly. However, you can store the code on another server and then reference the script in your code. Alternatively, you can use a third-party tool to minify your custom code.
Most custom codes won’t affect elements in the Designer mode to avoid any unexpected behavior. Therefore, you’ll see the results only after you publish your website.
Unfortunately, if your custom code isn’t working, the Webflow support team won’t be of much assistance because custom coding falls outside the scope of their Customer Support Policy. Try double-checking your code and visiting the Webflow Forum for additional help, if needed.
Webflow How to Add Custom Code
Custom codes enable you to tailor your website to your specific needs. Webflow made sure to accommodate a range of scenarios, allowing users to add custom codes to the entire site or individual pages only. What’s more, you can also customize specific posts. The best part is that you can add your custom code in a few clicks, regardless of the location.
How to Add Custom Code to an Entire Website
If your custom code needs to apply to every page on your website, “Site Settings” is the place to be. Adding the custom code there will ensure a seamless experience across all elements of your website.
Codes about the entire website can go in the Head or Footer code section. To add a custom code in the Head code section, do the following:
- Open the “Site Settings.”

- Navigate to the “Custom Code” tab.

- Add the custom code to the “Head Code” field.
- Press “Save Changes.”


This section allows you to use custom styles, link to external resources, and add metadata.
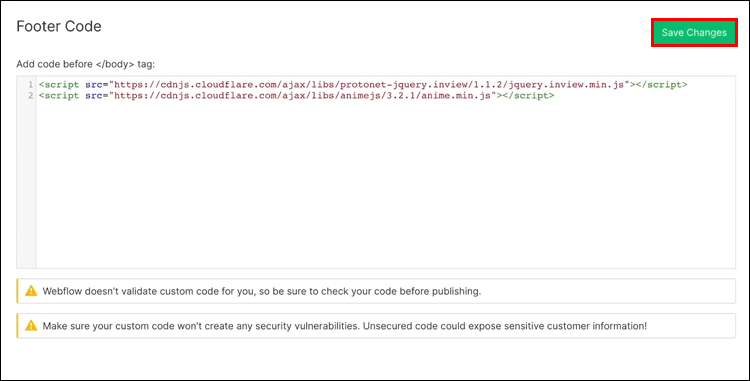
If you want to add a custom code to the Footer code section, go to the “Custom Code” tab again and then follow these steps:
- Add the custom code to the “Footer Code” field.
- Tap “Save Changes.”

How to Add Custom Code to a Single Page
Sometimes you might want to customize only one or few specific pages on your website. Webflow made this process reasonably simple. After adding the code, it will follow any site-wide code in your website’s markup.
When adding a custom code to a single page, you can choose where to place it.
You should always place HTML and CSS codes inside the <head> tag. However, JavaScript codes should go in the <body> tag section, before the </body> tag. Typically, this will improve the website’s performance, as <script> links added to the <head> tag section will run before the item.
To add a custom code within the <head> tag, do the following:
- Open your website using the Designer mode.
- Go to the page you’d like to customize and open “Page Settings.”
- Locate the “Inside <head> tag” section under the “Custom Code” tab.
- Add your custom code.
- Click “Save Changes.”


Repeat the first two steps when adding a code before the </body> tag. After that, do as follows:
- Find the “Before </body> tag” section under the “Custom Code” tab.
- Add the custom code to the section.
- Tap “Save Changes.”


How to Add Custom Code to a Single Post
Suppose you don’t need to customize the entire website or page. In that case, you can add custom codes to particular posts you’d like to spruce up. For single posts, embedding is the name of the game.
You can embed your custom code anywhere in the website’s design or a rich text element. Apart from custom codes, this option is also great for embedding third-party elements, such as live chat apps, Google Docs, and social media feeds.
When adding a code to a rich text element, the first step is to go to the Collection item you’d like to customize.
- Open the “Editor.”
- Tap the “Collections tab.”
- Choose “Collection with a Rich text.”
- Select your desired Collection item.
Next, you need to open the Rich text field. There are various options for content that you can add to a Rich text field. You can choose one of the given options or type in your text.
To add a custom code, you’ll need to display the available options. You can do this by clicking anywhere in the blank field. From there, do the following:
- Tap the “plus” icon.
- Choose the “Custom Code” option.
- Paste your code in the “HTML Embed Code Editor” pop-up.
- Click “Save & Close” in the bottom-left corner of the window.


If you’d like to directly add a custom code to the design of your website, here’s what to do:
- Copy the custom code you want to embed.
- Go to the “Add panel” option.
- Select the “Embed Element” option.
- Paste your custom code into the embed element on your Webflow canvas.
- Tap “Save & Close.”
When writing a custom code, you shouldn’t include the <body>, <head>, or <html> tags. Otherwise, your website will break. However, don’t forget to include the opening and closing tags, if there are any.
Coding Made Easy
You don’t need to be an experienced web developer to use custom codes when working with Webflow. If you’re not sure how to write a code, you can usually find one tailored to your needs in a quick Google search. After that, just follow our guide to implement the code wherever you want. The result will be the customized website of your dreams.
Have you tried adding a custom code to a Webflow site? Which element did you want to customize? Let us know in the comments section below.
Disclaimer: Some pages on this site may include an affiliate link. This does not effect our editorial in any way.