Device Links
Although smartphones have replaced the need for a separate mp3/mp4 player, the iPods are simply something else. Even the iPod Classic can still be found among the users, as Apple sold a ton of iPods in the United States back when we had no problem paying for each download. It also helps that iPods in general offer longer battery life and fantastic audio quality that has yet to be exceeded.
Of course, all good things often come with a catch. Much like the iPhone, you need iTunes to store music on any iPod. Or do you not?
Why Not iTunes?
There are ways to add music to iPods without iTunes, which this guide will cover soon enough. But why would you not want to use iTunes in the first place? It is intuitive (the essence of every Apple product) and the iOS and macOS interaction is seamless.
But there’s the rub. It’s not as optimized for use with PC devices. It can be clunky and slow here and there. Plus, an Android user only has to drag and drop to load their device full of music. You’ll be happy to know that you can do this with your iPod, too!
Items that You’ll Need
Fortunately, you won’t need any extra items to add music to your iPod without iTunes, unless you need to transfer the music from somewhere else to your PC first.
You’ll only need:
- Your iPod
- An iPod USB charging cable
Adding Music to iPod without iTunes
All it takes is a one-off session of tweaking. Here we go.
1. Plug it In
As you might have guessed, the first step would be to plug your iPod into your PC. One end of the cable goes to your iPod and the other to one of the free USB ports on your PC. Your computer will automatically install a driver for your Apple device. Once installed, a notification will pop up in the bottom right corner.
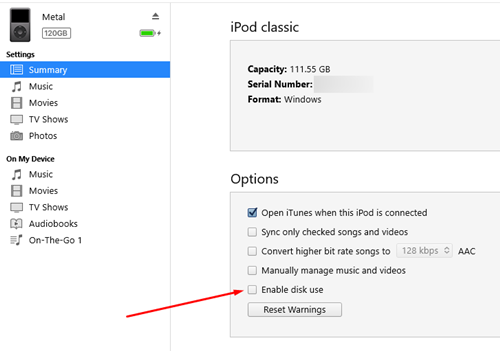
2. Disable Disk Use
If you’ve been using iTunes to transfer music to your iPod, you might’ve enabled disk use. Before proceeding to the other steps, make sure to open iTunes and uncheck “Enable disk use.”
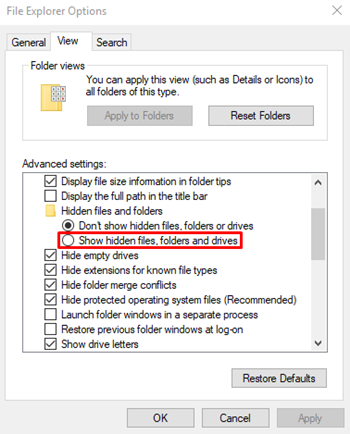
3. Hidden Files, Folders, and Drives
Go to Start, type Control Panel, and enter Control Panel. Find (you can search the Control Panel) File Explorer Options and once you’re there, select the View tab and scroll down until you see the “Show hidden files, folders and drives” option. Now click it, hit Apply and close the window.
4. This PC
Find the “This PC” (or “Computer,” or “My Computer” on pre-Windows 10 versions). Once you’ve entered This PC, double click on a drive titled “iPod” to enter.
5. Music
In the iPod folder, you’ll find another one titled “Music.” This is your iPod’s central music folder. If your iPod is empty, you won’t see anything in it, but if you’ve already transferred music with iTunes, you’ll see a bunch of random numbers and letters. Don’t worry, iTunes renames these songs during the transfer process.
6. Drag-n-Drop
All you need to do now is go to the folder where you store your music, choose what you want to transfer, and do a simple drag-n-drop to your iPod’s Music folder from the previous step. Make sure that all music that you want to transfer to your iPod is transferred directly to the Music folder, and not as a folder itself or into a new subfolder.
You Only Need to Do It Once
Once you’ve followed all these steps successfully, you should be able to seamlessly drag-n-drop music to your iPod device. The best part about this is that when you’ve set everything up like this, you don’t have to go through it again.
Other ways of doing this do exist, however. Do you know of another way to add music to your iPod without iTunes? If you do, remember to share it with the community down below, in the comments section!
Disclaimer: Some pages on this site may include an affiliate link. This does not effect our editorial in any way.


