One of the most powerful features available in modern computing is the use of local area networks that allow you to share movies or music files across all the devices in your home or office. You can use a network to set up a media server, to share printers and scanners, or just to share files between two machines.
Although, in principle, networking your computers is fairly simple, in practice, it can be a pain to get it running properly. A common problem is the inability of one machine to see shared folders on another machine. In Windows 10, this problem has been fixed to a great extent, but it does still occur.
Follow along in this article to learn how to fix your shared folder problems in Windows 10.
Shared Folders in Windows
Older versions of Windows supported local area networks, all the way back to Windows for Workgroups 3.11 in 1993. Up until Windows 8.1, in fact, networking in Windows could fairly be described as a nightmare, presenting problem after problem. If you got a network up and running on those earlier operating systems, in fact, you became really reluctant to change anything whatsoever for fear that your precariously-functioning network would fall apart again.
Fortunately, Windows 10 has greatly improved that process. There are still issues, but networking and sharing resources within a network isn’t quite the painful experience it once was. Windows 10 simplified the process of creating a network so that now all you have to do is set up a network share, and it works like a charm, in theory.
Setting up a Shared Network Folder in Windows 10
One of the most common causes of networking glitches in Windows 10 is incorrect setup. Despite being the simplest Windows network possible, it is still very easy to get things wrong.
Here is how a Windows network should be set up.
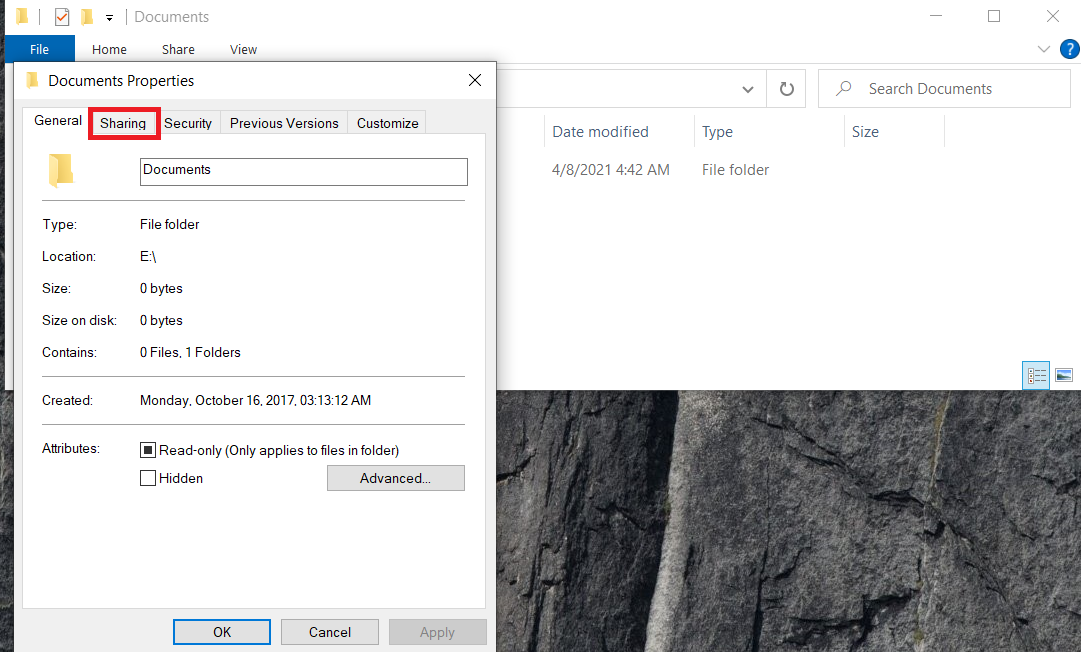
- Open Windows Explorer and right-click a folder you want to share, and select Properties.

- Next, select the Sharing tab.

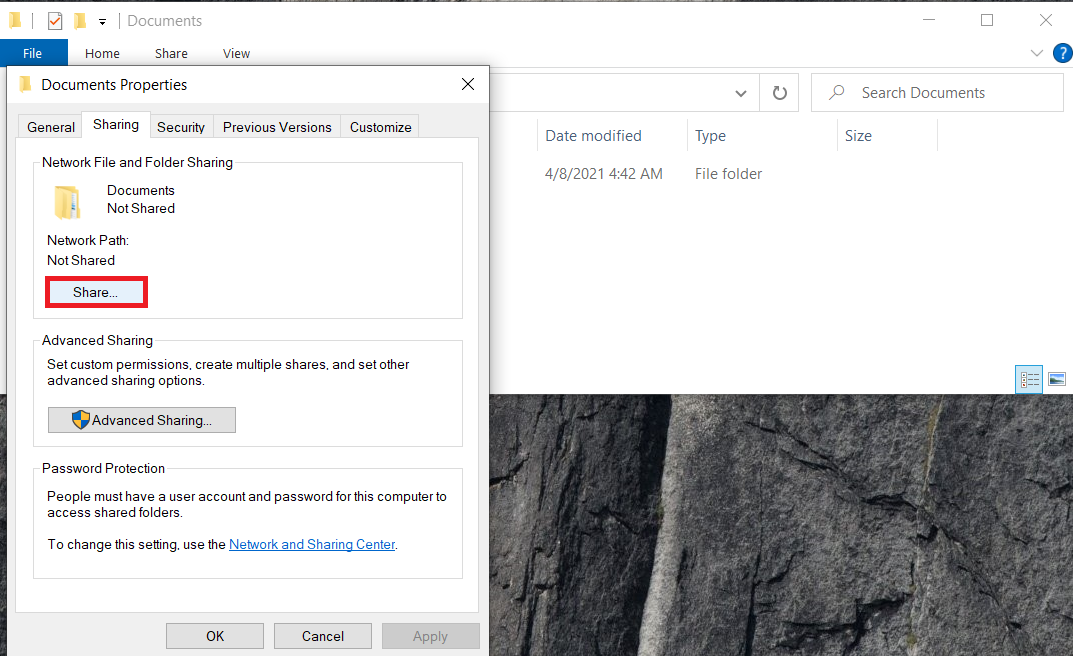
- Now, click on the Share… button.
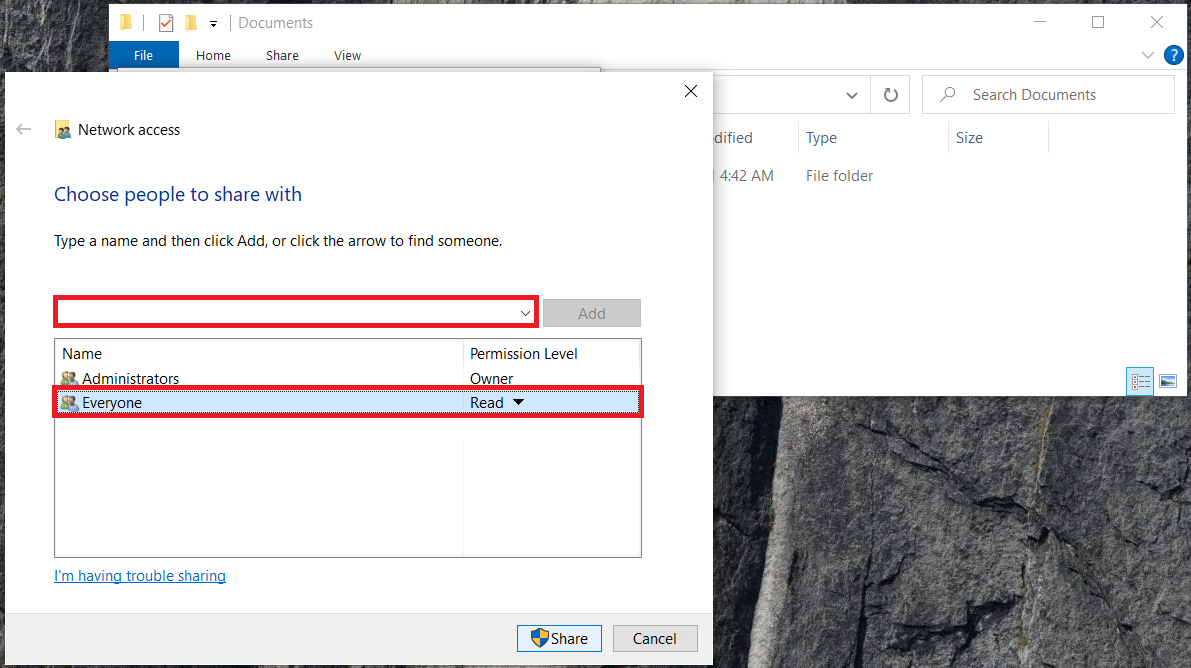
- Enter the people you want to allow access to your files in the popup box that appears, or you can select Everyone from the drop-down menu if you don’t have specific users on your home network. Click Add when done.
- Modify the permissions level within the window if you need to. Read will give users the ability to read files; Read/Write will let them modify or delete files.
- Click Share when finished.
- Make a note of the links provided to the shared directories; you’ll need these to access the folders on the network. Click Done after you’ve completed everything and copied the link(s).


Once the share has been set up, you should be able to access it from another computer. Open Windows Explorer, select Network from the left pane, select the file, and log in using your credentials. That’s it!
PC Cannot See Shared Folders in Windows 10
If you set up sharing correctly, your PC should see shared folders in Windows 10. If you cannot see them, perform these checks.
- Make sure your computers are using the same network and IP version, i.e., IPv4 or IPv6. Most home networks use IPv4, so you’ll most likely want to check that.
- Make sure Network discovery is enabled on all computers.
- Make sure File and printer sharing is enabled on all computers.
- Toggle Turn on password protected sharing to off and retest.
- Make sure you are logging in using the same account you entered when you added users to Share with.
- If you use Windows Defender Firewall, open the Firewall app, select Allowed apps and ensure File and Printer Sharing is allowed to pass.

If none of those work, make sure all networking services are running. The following services should all be set to Automatic and be currently running:
- DNS Client
- Function Discovery Provider Host
- Function Discovery Resource Publication
- HomeGroup Provider
- HomeGroup Listener
- Peer Networking Grouping
- SSDP Discovery
- UPnP Device Host
Even though Homegroup has now been removed from Windows 10, it is still mentioned throughout the operating system.
If your PC still cannot see shared folders in Windows 10, check the credentials in the computer you are trying to access files from.
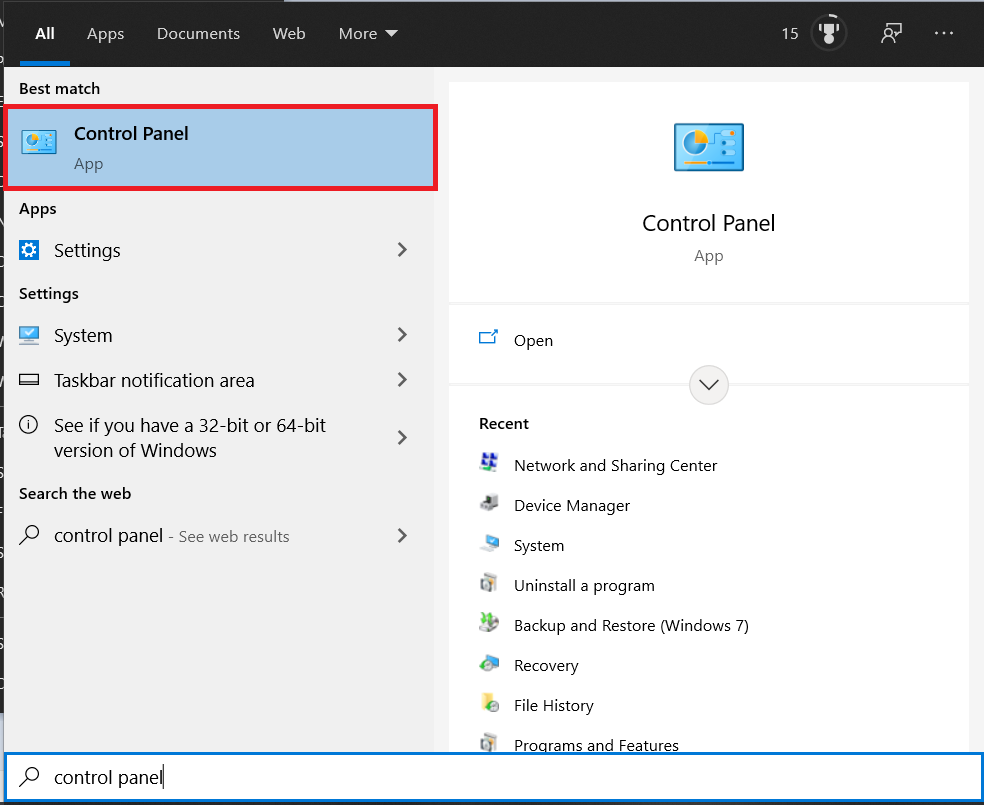
- Open Control Panel.
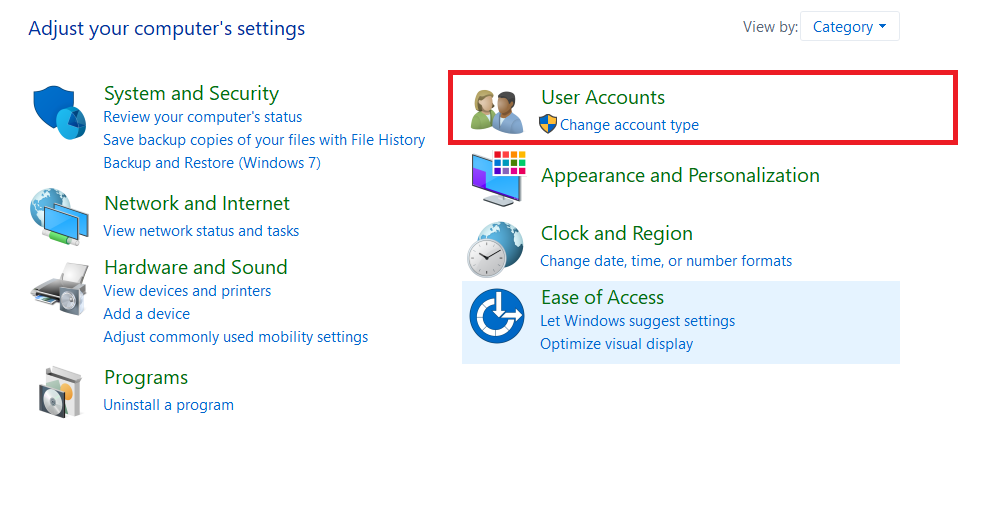
- Now, select User Accounts from the menu.
- Next, click on Credential Manager.
- Then, select Windows Credentials > Add a Windows credential.
- Add the IP address of the PC hosting the file and the admin username and password of that PC, and then select OK to save.

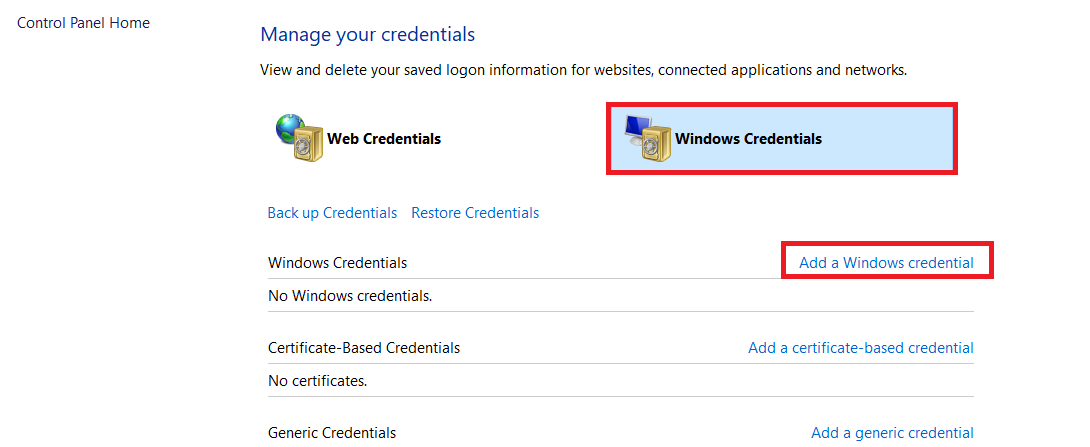
Make sure you add the IP address and admin username and password of the computer hosting the files. You can then theoretically access the share by typing the network address in Explorer on other computers, e.g., \192.168.0.52AdminAdminpassword.
Failing all of that, there is always the Shared Folders troubleshooter. Select Settings, Update & Security, Troubleshoot, and Shared Folders. Run the troubleshooter from there.
Accessing a Shared Folder That Isn’t Password Protected
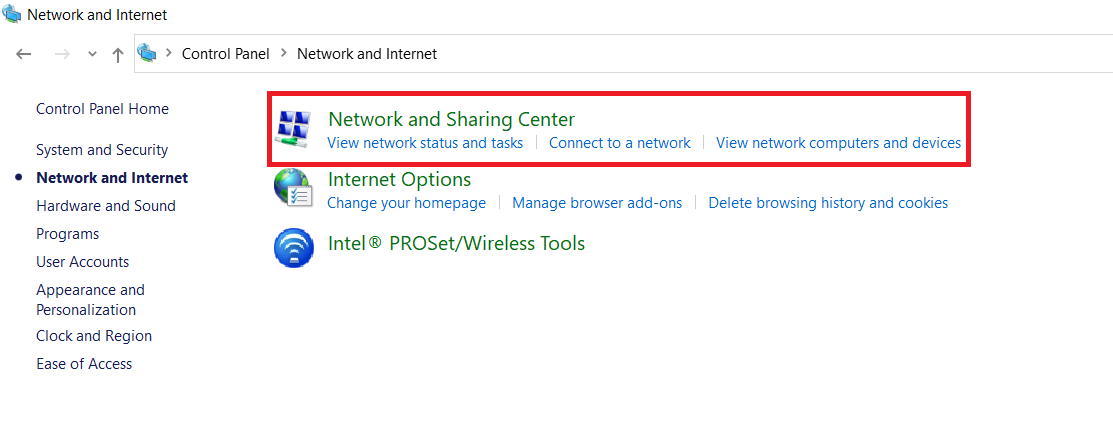
- Type control into the Windows Search bar and select Control Panel, or you can go to the Settings page.
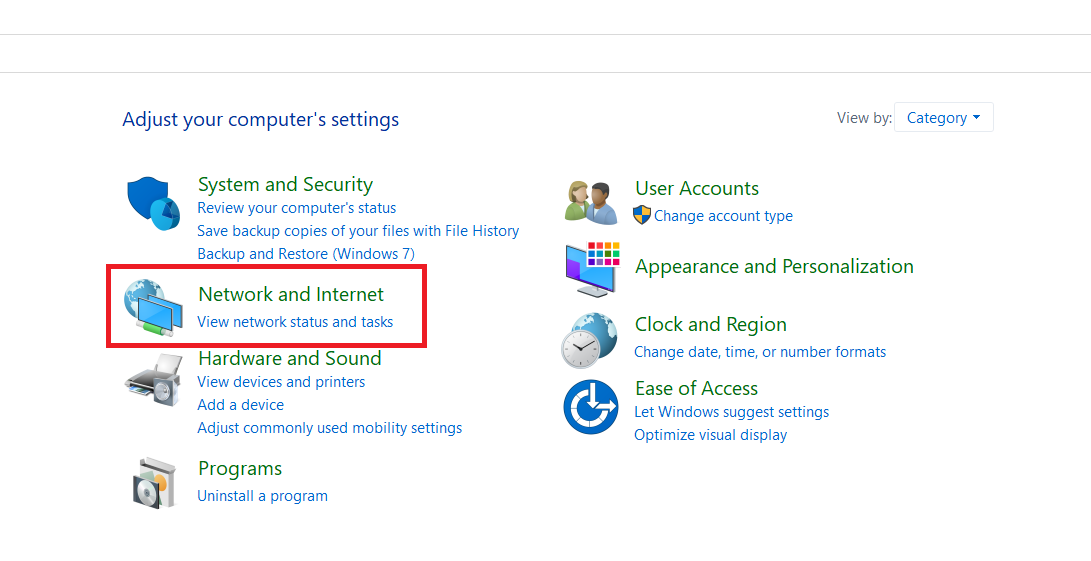
- Next, select Network and Internet.
- Now, select Network and Sharing Center.
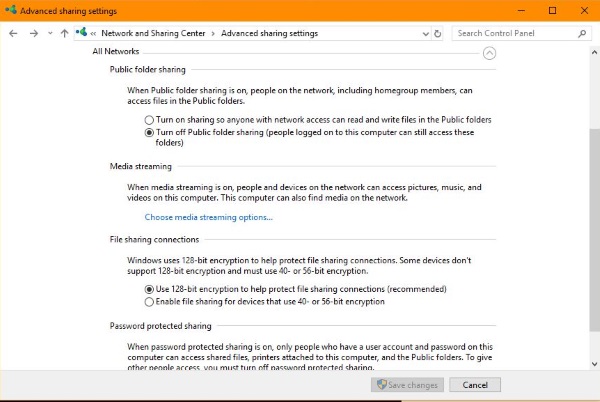
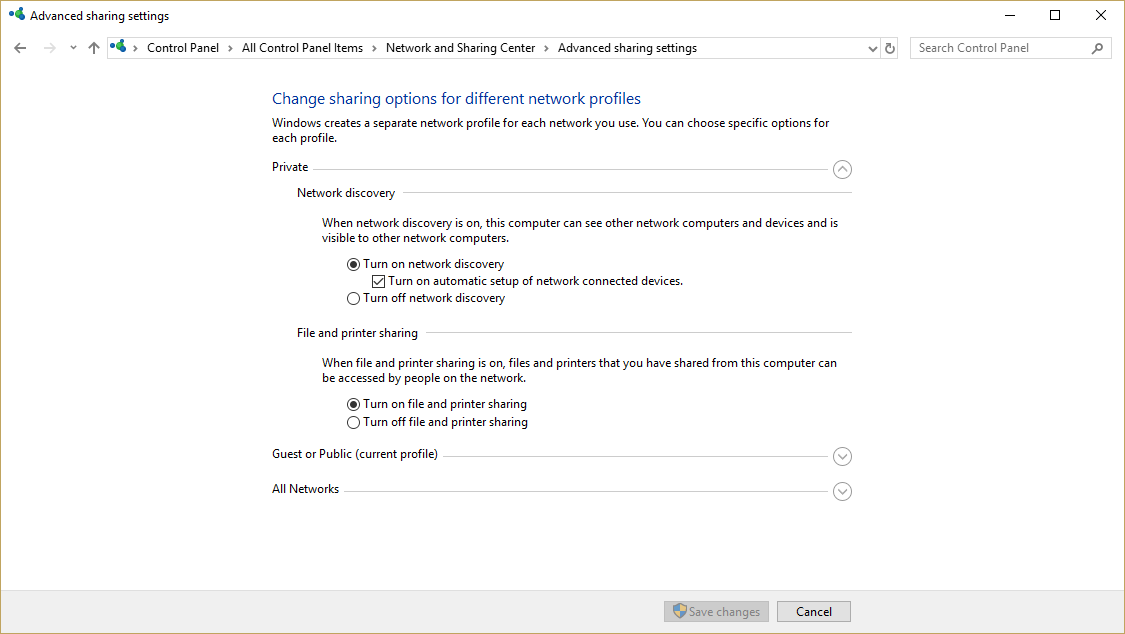
- From Network and Sharing Center, select Change advanced sharing settings.
- Ensure Network discovery and File and printer sharing are enabled for the Private, Guest or Public, and All Networks.
- Check the box next to Turn on automatic setup of network connected devices where applicable.
- Now, under All Networks, toggle Turn off password protected sharing.
- Under All Networks, make sure to turn on Public Folder sharing.
- Click the Save changes button to apply the new settings.


Shared Folders in Windows 10
Networking in Windows 10 is just much more difficult than it should be. If your PC cannot see shared folders in Windows 10, one of these fixes should have you up and running. They have all worked for me.
We have more networking resources available for you!
Wondering what kind of router you should get? Check out our guide to the right wireless router for your needs.
Having problems with your WiFi network? Here’s our troubleshooting guide to wireless networks.
Wondering about network security? Here’s a guide to what WPS means in your network.
Want a more secure network? Here’s how to set up WPA2 Enterprise security on your network.
We’ve also got an explanation about custom firmware.
Did the suggestions help solve your dilemma? Have any other suggestions or tips for helping with Windows 10 networking? Feel free to share them with the community in the comments below!
Disclaimer: Some pages on this site may include an affiliate link. This does not effect our editorial in any way.


