Voicemails are an American thing. If you stay in some foreign countries in other regions for a bit, you will find that many people are not fond of leaving voicemails. Heck, it is their loss, maybe? From the old answering machines to the latest cell phones, we can’t do without voicemails.
If you are an iPhone user in these United States, you know that voicemails tend to pile up and your voicemail service may only allow so many voicemails before it is full. If you do not want people to worry when they hear that your voice mailbox is full – people who disappear off the face of the earth tend to end up with full voicemails – you might want to do something about it.
Thankfully, there are a few ways to go about it.
Deleting Voicemails with Visual Voicemail
Nowadays, many carriers support visual voicemail. This is very convenient as it lets you manage your voicemails directly from the menu without having to call the voicemail number.
If you have visual voicemail, deleting voicemails is pretty simple. Here are the steps you need to take:
- Tap the Phone App and tap on Voicemail.

- Find the voicemail that you wish to delete and swipe left.

- Tap the red Delete button to remove it.


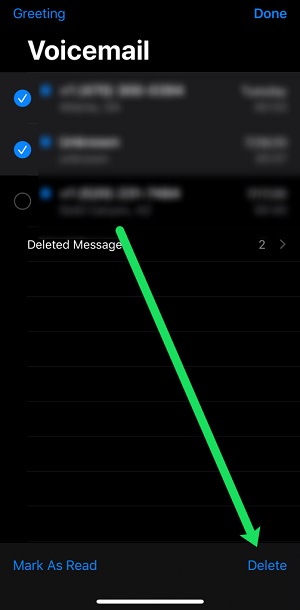
If you want to delete multiple voicemails at once, the process is slightly different but still very straightforward. Here’s what to do:
- Go to Phone then Voicemail.
- Tap the Edit button at the top right corner of the screen.
- Select all the voicemails that you want to delete.
- Tap the Delete button at the bottom right corner of the screen.


Currently, there is not a mass delete option so you will have to manually tap on each voicemail. Of course, this is not a big deal as we usually do not have as many voicemails as emails.
Deleting All Voicemails Permanently
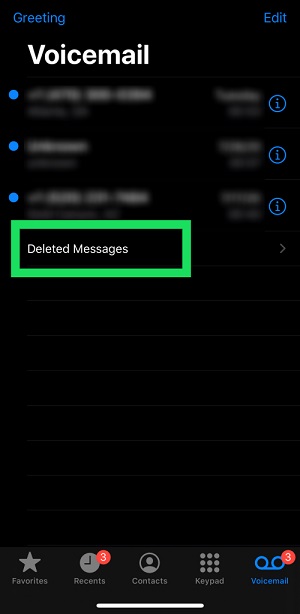
The above methods do not get rid of your voicemails for good. Instead, they just move them to the Deleted Messages folder. This does free up some storage space, but the issue of privacy leaks still persists since all the voicemails can be restored within 30 days.
To make sure this does not happen, take the following steps to permanently delete all your voicemails:
- Open the Phone app and tap Voicemail.
- Tap on the Deleted Messages Folder.
- Tap the Clear All button at the top right corner.
- Confirm the deletion by tapping Clear All.

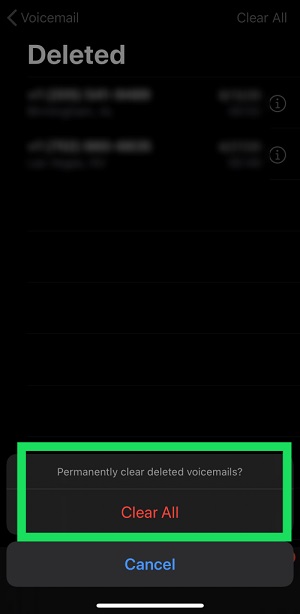
After you have done this, all your voicemails will be deleted for good. This process is irreversible so make sure that you will not need the deleted voicemails anymore.
Deleting Voicemails without Visual Voicemail
In case your carrier does not support visual voicemail, the above steps do not apply to you. Luckily, there is another method for getting rid of them. Sure, it might not be the most convenient one, but it is really the only one you have if there is no visual voicemail. In fact, it has been around so long that you should already know about it.
Each carrier’s voicemail number is different so you will need to know what number to call first. Here’s a list of the most common carriers in the U.S. and they are voicemail number:
- Verizon – ‘*86’ or call your phone number from another phone and press ‘#’
- AT&T – Press and hold ‘1’ or call your ten-digit phone number and press ‘*’
- T-Mobile – Press and hold the ‘1’ key or call 1-805-637-7249 and enter your ten-digit phone number then tap ‘*’ to hear your messages.
- Sprint- Press and hold ‘1’ or call your number and tap ‘*’
- Straight Talk – Call ‘*86’
When ready listen for the prompts to delete the message. Some carriers use three, while others use 7 or 8.
This is of course the old-fashioned method that has been around since the early days of cell phones. There is a tiny hack that can help you speed up this process. After the first voice message has been read, tap the delete option multiple times, depending on how many voicemails you have. This should delete them without you having to listen to each one of them.
Can I recover a deleted voicemail?
Not if you have permanently deleted it. Most carriers do store your deleted voicemails for a very short amount of time and you will know if yours were saved by calling your Voicemail and going through the prompts.
My mailbox says it’s full but there are no voicemails. What’s happening?
This has been a common issue with iPhones for some time now. If you have checked your Deleted Messages folder and there is nothing there but when someone calls they get the Mailbox Full message, there is another issue.
You can contact the carrier to reset your voicemail or if you have deleted them and they have returned try using Airplane Mode. By placing your phone in Airplane Mode then deleting your voicemails they should disappear finally.
How can I save a voicemail forever?
If you have a really important voicemail it is not a good idea to save it with the carrier. If you ever get a new phone number, your account is canceled, or you move carriers that voicemail will be gone forever.
The best way to save a voicemail is to play and record it on a cloud compatible device (for example, Apple’s Voice Memo). Ensure there is no background noise interference while recording.
Then you can head over to the cloud service and ensure that the voicemail is saved forever.
All of my voicemails are gone. What happened?
Although your voicemails should travel perfectly fine to a new device, they are actually attached to your phone number. If you have made any changes to your phone number or carrier your voicemail will disappear.
The same can happen if you have the carrier reset your Voicemail box or password.
The Final Word
If you are blessed with visual voicemail, deleting all your voice messages should be a breeze.
On the other hand, if you have to call the voicemail number to go through this process, things get a bit tougher. Keep in mind that you can always disable voicemail altogether. You might even save some money if your carrier charges for voicemail service.
If you know someone that needs to declutter their voice message inbox, feel free to share this tutorial with them. And if there are more iPhone-related questions you need answers to, post them in the comments section below.
Disclaimer: Some pages on this site may include an affiliate link. This does not effect our editorial in any way.


