Microsoft is known for cross-marketing and bundling their services together. This is a smart move and usually, it makes sense. However, there are some parts of their system integration that are not helpful. On the contrary, they are potentially harmful to their users.
Windows 10 users have complained for a while that they see performance drops for no apparent reason. These in-game stutters and frame losses often happen because of the Windows’ integrated recording service.
This service is called Game Bar, and it has additional features that take up considerable chunks of your RAM and CPU.
How to Disable Game Bar
You might be confused because the title of this article mentions the Xbox DVR. Actually, Game Bar and Xbox DVR are closely connected. You will soon get a clearer explanation of all these features and detailed guides for shutting them down.
Game Bar is a sleek feature for quickly recording your gameplay on the go. However, when you don’t need to record anything, it is only eating up your system resources. Here is how you can disable it entirely on a Windows 10 computer:
- Click the Start button, or press the Windows key on your keyboard.
- Select Settings, which the second icon on the bottom left, right above the Power button.

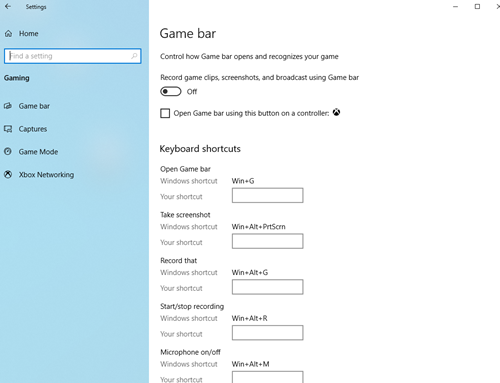
- On the Windows Setting screen, click on the Gaming menu.
- You will instantly land on the Game Bar screen. It’s the first option under the Gaming tab to the left of the window. Move the slider under Record game clips, screenshots and broadcasting to turn this option off.

How to Disable Xbox DVR
Game DVR or Xbox DVR is the next thing in line that requires disabling. This feature runs in the background, recording your gameplay on the go. You can use it to record a quick snap of your best moves, like the play of the game, a multi-kill, or a spectacular race victory.
This sounds great, but in reality, you mostly won’t need it and it’s gobbling precious resources. Here is how to disable Xbox DVR:
- Once more, click the Start button or tap the Windows key on the keyboard to bring the Start menu up.
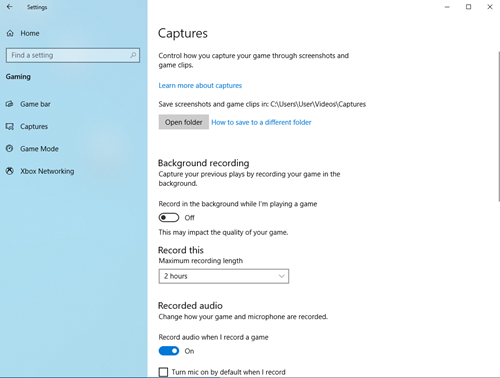
- Click on the Settings button and select the Gaming section.
- Once again, the Game bar window will open.
- Click on the Captures tab, right below the Game bar, on the left side of the window.
- Under the Background recording tab, click the slider below the Record in the background heading to turn it off.
How to Disable Xbox Game Monitoring
Unfortunately, there is another background process you should shut down. However, this won’t be as easy as the previous two features. The Xbox Game Monitoring feature monitors your gameplay in the background.
This is a particularly bad thing for your PC performance because it causes significant performance drops and it interferes with other third-party apps like the Blizzard and Steam clients. You will need to use the System Registry to disable this, so it is a smart idea to make a backup of registry files.
Do the following to disable Xbox Game Monitoring:
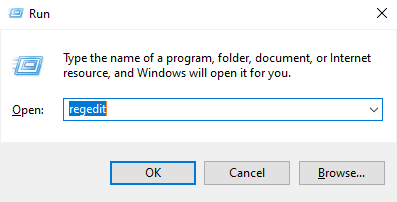
- Hold the Windows button and R button on your keyboard simultaneously. This will bring up the Run window.
- Type in regedit and confirm with Enter.
- Double-click on the HKEY_LOCAL_MACHINE folder to the left.
- Open the System folder.
- Double-click on CurrentControlSet.
- Double-click on Services.
- Select xbgm.
- Find Start REG_DWORD and right-click it.
- Select Modify.
- Switch the value from 3 to 4.
- Confirm changes with OK.
This will disable the Xbox Game Monitoring. If you want to turn it back on, use the same steps, but change the value from 4 back to 3.
Recording Terminated
These are the exact steps you need to take to disable Game Bar, Xbox DVR and Xbox Game Monitoring. In theory, they are all great features. However, in practice, they can clog your PC and hinder the in-game performance.
Do you keep Xbox DVR on or off on your system? What about Game Bar and Xbox Game Monitoring? Let us know in the comments.
Disclaimer: Some pages on this site may include an affiliate link. This does not effect our editorial in any way.