As a graphic artist — professional or novice — you’ll sometimes need to erase backgrounds from an image. Maybe you need to place a logo on top of a photo, but it’ll need a transparent background to look just right. Without it, your project won’t have the professional look you want.
With GIMP, you can erase backgrounds and make them transparent. Do you know how to do this? If not, then this article will show you how. We’ll discuss the process for simple and more detailed projects.
Erasing to Transparency
You might believe that all you need to do is use the erase tool to remove a background. Using the erase tool only paints with the selected background color and doesn’t make the background transparent. To erase to transparency, you’ll need to create an alpha channel.
Digital images are typically made of three color channels; red, green, and blue. The combination of these three channels gives us an RGB image, an image made of these three colors. An alpha channel, however, allows GIMP to track areas of an image that are transparent or opaque. By adding an alpha channel you’ll be able to erase to transparency.
To learn how to do this, follow the steps below:
- Open the GIMP file you want to remove the background from and make it transparent.
- Click the “Layer” menu from the top of the screen.

- Select “Transparency,” and then from its submenu, choose “Add Alpha Channel.”
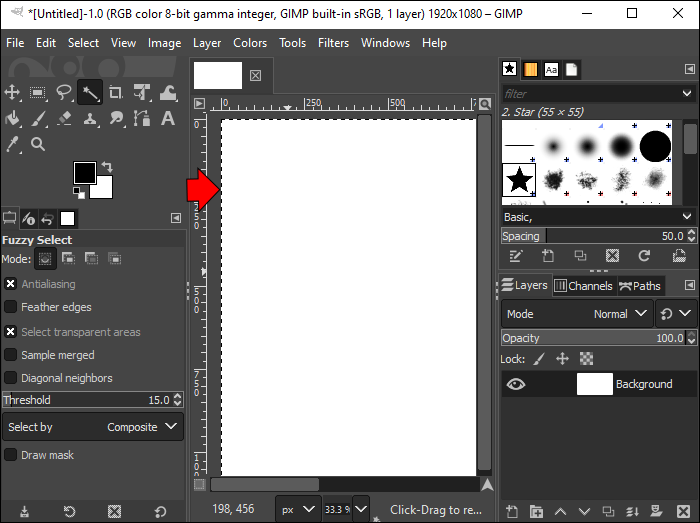
- Choose the “Fuzzy Select” tool from the toolbox on the right side of the screen.
- Next, click on the area you want to erase. For multiple areas, you can hold down the “Shift” key on your keyboard and tap to add other areas.
- Select “Edit” from the drop-down menu and then choose “Clear.”


Your image will now have a transparent background. What was previously there will have changed to a black and gray checkerboard denoting that it’s transparent. When saving this image, you’ll want to save it as a PNG file to preserve its transparent layer.
How To Erase to Transparency for More Detailed Objects
The above method works well with simple images like logos that are basic in design and have an easy-to-define background. But if you have a more detailed image and you’d like the background to be transparent, that will require more of an effort. Fortunately, this can be accomplished with methods similar to the one we explained above. If the above method didn’t work for your image, then use the method described below.
- Open the GIMP file that you want to have a transparent background.
- From the top menu, select “Layer.”
- Next, choose “Transparency,” then select “Add Alpha Channel” from the submenu.
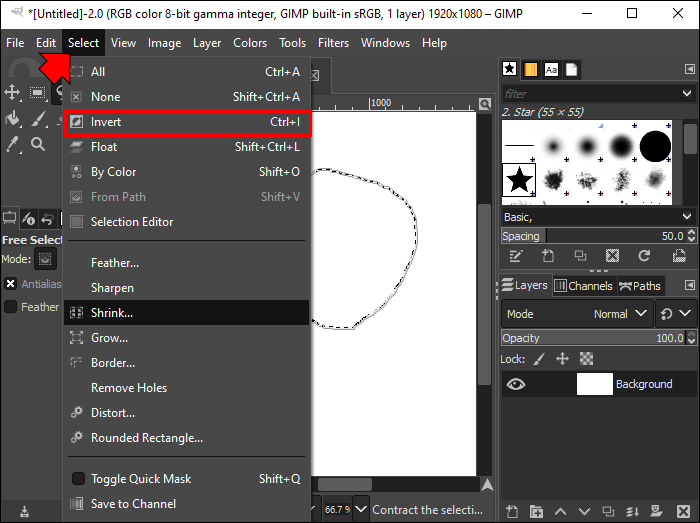
- Click the “Free Select” tool from the toolbox on the right side of the screen. It resembles a lasso.
- Tap on the border of the object you want to keep. Move your mouse around the object and tap when you need to change its angle.
- Continue until you have selected the entire object you want to keep.
- Next, choose “Select” from the top menu and then “Invert.” This will change the selection to the area you want to become transparent.
- Click “Edit” from the top menu and then select “Clear” from the drop-down menu.


The background will now display the black and gray checkerboard pattern meaning that it is now transparent. When using the Free Select tool, you may want to zoom in and add as many nodes as you need. A node is an anchor point for selecting an object, and you can set these anchor points around the object when you need to change the angle of the line.
Please note that in order to save the image’s transparency, you’ll need to save it as a PNG file.
FAQs
If the erase tool doesn’t make the background transparent, what is it used for?
On its most basic level, the GIMP Erase tool is used to remove an unwanted section of an image. It can also be used to blur objects or to fade sections, and can be used as a paintbrush. It is not, however, used to erase to transparency.
It also has a reverse function called Anti-erase. This is used to un-erase areas of an image, but can only be used on layers that have an alpha channel.
Use Alpha Channels to Erase to Transparency
No matter how complex or detailed an object is, you can always remove the background and make it transparent. By using the GIMP Fuzzy Select or Free Select tools, you can select areas and make them transparent. But the key is to first add an alpha channel. Using the Erase tool won’t accomplish what you need.
Have you used GIMP to erase to transparency? Did you follow the same methods outlined in this article? Let us know in the comments section below.
Disclaimer: Some pages on this site may include an affiliate link. This does not effect our editorial in any way.


