If you’re using Photoshop for work, or perhaps just a hobby, you might be pretty versed in it. However, you may have stumbled upon an error where you can’t open Photoshop due to your scratch disk.
In this article, we’ll tell you about your scratch disk, how to clear it, and any other options you could try with it.
More About the Scratch Disk
As you may know, a scratch disk is a local storage drive that Photoshop uses when it’s running. This virtual hard disk uses your computer’s storage (HDD or SSD) to store files that can’t fit in or don’t need to be in your RAM.
By default, Photoshop will use your boot drive as its scratch disk. Over time, your boot drive may accumulate temporary files from lots of programs on your PC, as most of these will use it one way or the other.
That can cause scratch disk errors.
How to Clear a Scratch Disk in Photoshop
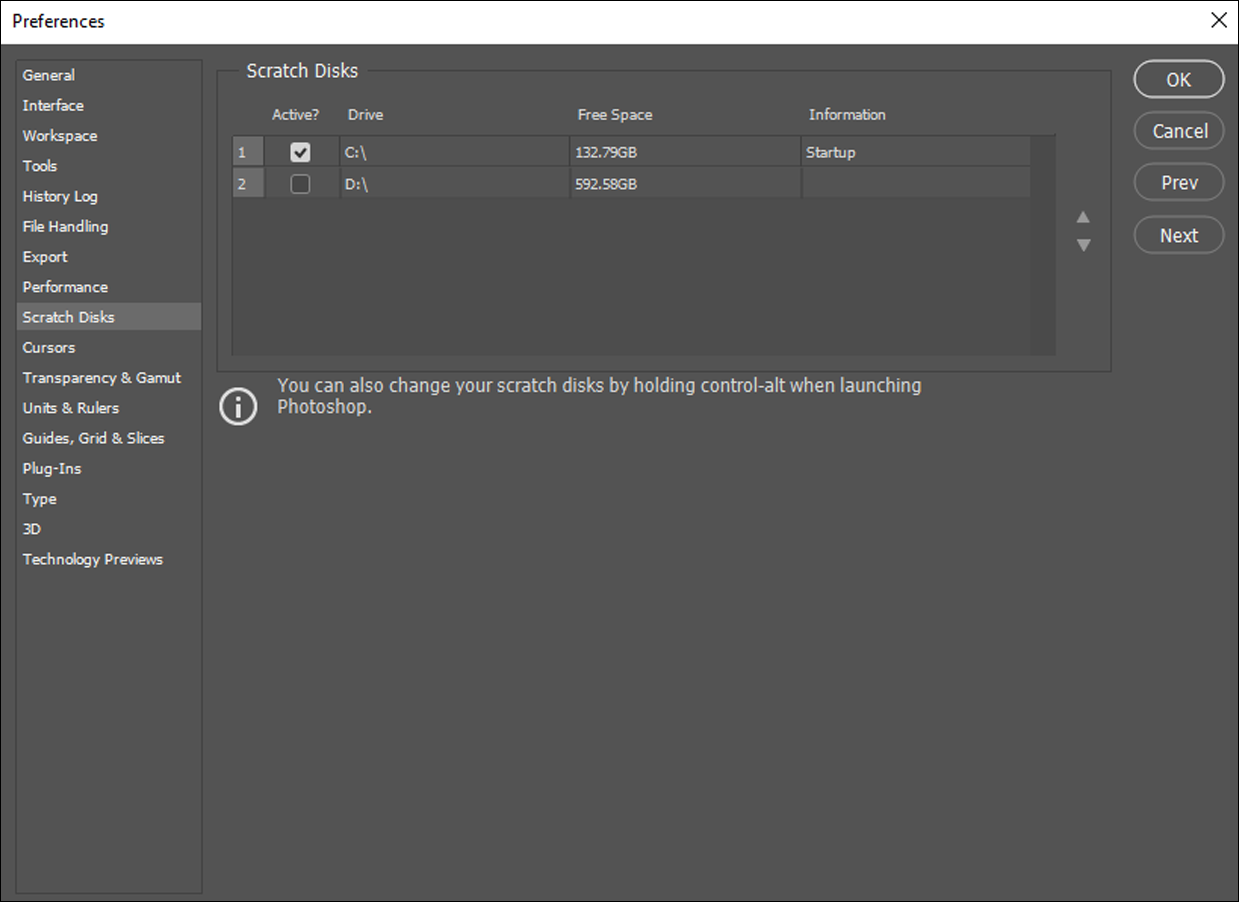
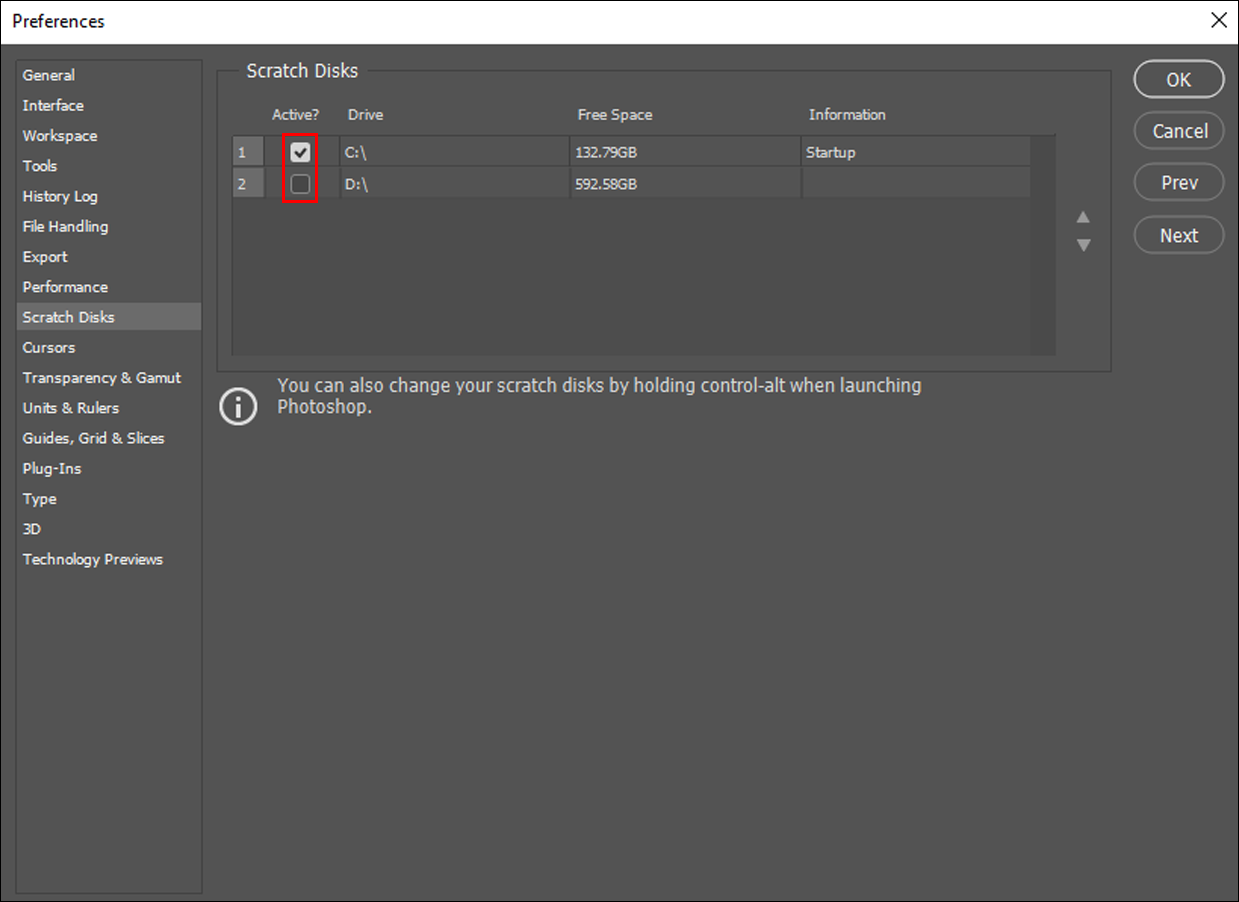
To locate where the scratch disk is, you can follow these steps:
- In Photoshop, open the Edit tab.

- Select the Preferences option at the bottom of the dropdown.

- Now, select the option Scratch Disks… from the side menu.
- Here, you’ll see a list of drives and checkmarks next to them. Each checkmark means that Photoshop is using that drive as a scratch disk.
- If you want to create a new scratch disk, check the box next to the drive you want to use.
- Photoshop will then allocate data to more locations, lowering the load on the boot drive.


If you want to clear a scratch disk from previous data altogether, you’ll need to find the files to remove manually.
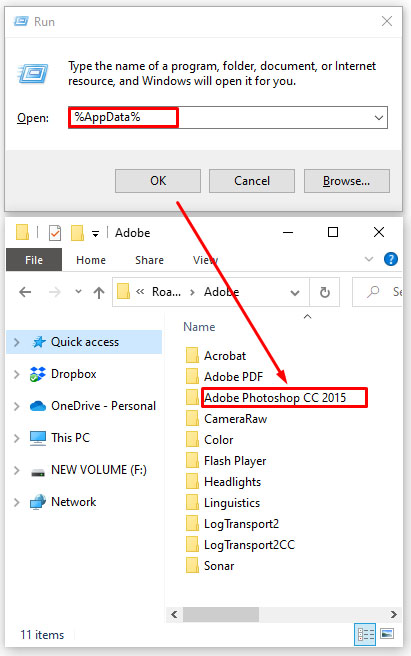
- If Photoshop is using your boot drive, then the following folder is where you’ll find its temporary files: C:\Users\[YourUsername]\AppData\Local\Temp
- Once there, find the file named Photoshop Temp followed by a string of numbers. This is the file that contains all the temporary data Photoshop uses when it boots up. Delete this file to clear it.
Do note that clearing the temporary files will also remove any progress on projects you haven’t saved, so make sure you have backed everything up beforehand.
If you’re not able to delete the file, then Adobe might be currently using them. Make sure that Photoshop and any other Adobe programs are correctly closed.
Alternatively, you clean Photoshop’s current cache for the project:
- Again, open the Edit tab.
- Next, select Purge > All.

Clearing the entire Photoshop cache will remove any past versions of the current project, leaving only the current version in its memory. If you’ve been making many sweeping changes, this can save a lot of memory, but you can’t go back to any previous versions.
How to Clear a Scratch Disk Without Opening Photoshop
If you’re receiving an error saying your scratch disk is full and Photoshop can’t open, follow these steps:
- Attempt to open Photoshop.
- While the application is opening, press Ctrl + Alt (on Windows) or Cmd + Options (on Mac). This command will bring up the scratch disk menu, as noted above.
- Add another drive to your scratch disk to add some space.
- Alternatively, locate the Temporary Files in the drives used for the scratch disk and delete them.


Clearing Scratch Disk in Premiere Pro
If you’re using Premiere Pro to process videos, you might be wondering how to clear its scratch disk as well. Premiere Pro uses a cache system to store temporary files. To locate and remove them, follow these steps:
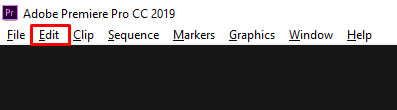
- Open the Edit tab.
- Open Preferences at the bottom of the dropdown menu.
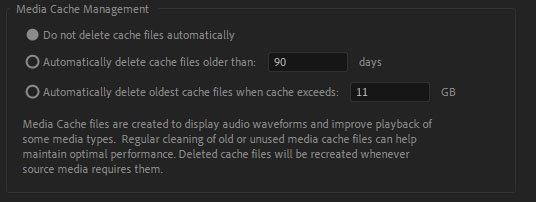
- Select the Media Cache… from the Preferences menu.
- In there, you’ll find the local path for the cache. You can select a new path, even on a different drive, if you want to change it.
- If you want to delete the contents of the cache, press Delete.
- You can also set up Premiere Pro to delete cache files automatically. There are two options for that.
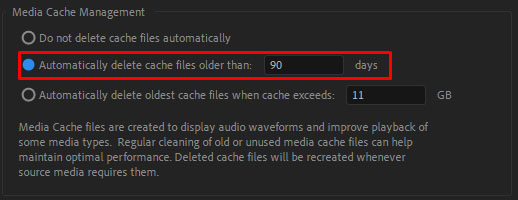
- If you want to remove old files, select the option Automatically delete cache files older than and then input the number of days. Your system will remove any files that are older than that number of days.
- If you want to keep your cache below a certain amount of memory usage, select the option Automatically delete oldest cache files when cache exceeds, then input the maximum GB amount you want to assign to your cache. If your cache ever exceeds that, it will remove the oldest files until it goes below the limit.


Premiere Pro can use multiple scratch disks for any of its project components. To access them, follow these steps:
- Open the Edit tab.
- Then, select Preferences > Scratch Disks.

Premiere Pro will list all scratch disks depending on the part of the current project. You can change where these scratch disks are by selecting which drives to use in the appropriate menu. By default, the scratch disk is the same as the project storage, but you can also use the My Documents folder or a custom path of your choice.
Optimizing Disk Space for Photoshop
If Photoshop is not using a lot of memory on its own, or you’ve already cleared your scratch disk, and you keep receiving an error that the disk is full, you’ll need to delete additional files on the drive.
Your first option for clearing some space is using the built-in Disk Defragmenter. To do so, follow these steps:
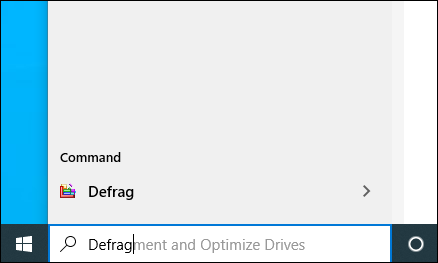
- Open the Start Menu.
- Type in Defrag.
- Disk Defragmenter should pop up as a result. Click on it to open.
- In the menu, select the drive you want to clear.
- Then, press Analyze.


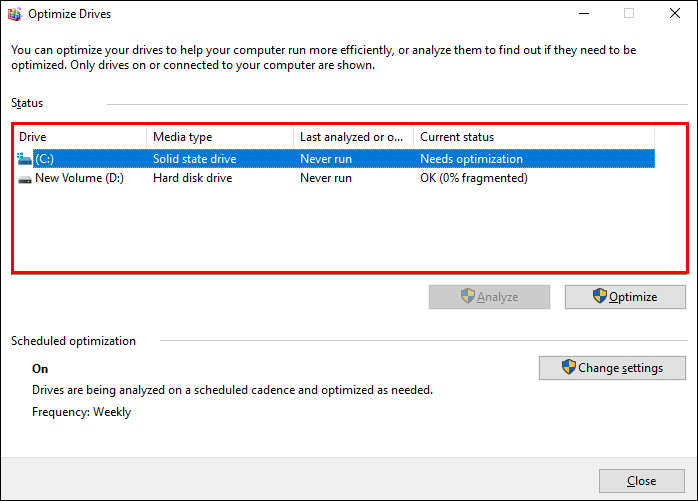
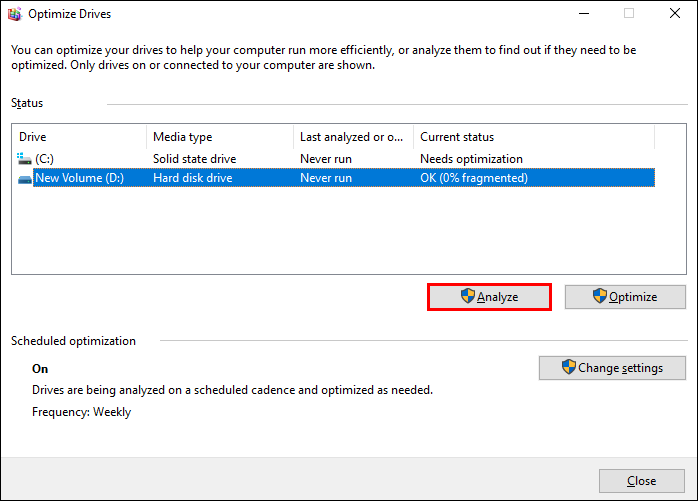
Disk Defragmenter doesn’t delete files, it only reallocates them, so you have more free space available. Having more linked free memory is essential for larger files. For example, Photoshop can have huge files for its cache, which won’t fit in a drive if the open space is segmented.
How to Use More RAM in Photoshop
If you’re using your device solely for Photoshop, it can be beneficial to improve its performance. One of the best ways to achieve that is to increase its RAM usage. By default, Photoshop will use 70% of your available RAM. To change that, follow these steps:
- Go to Edit, then to Preferences.
- Open Performance.
- A slider will show how much RAM Photoshop can use. You can adjust the slider or input the desired number directly.
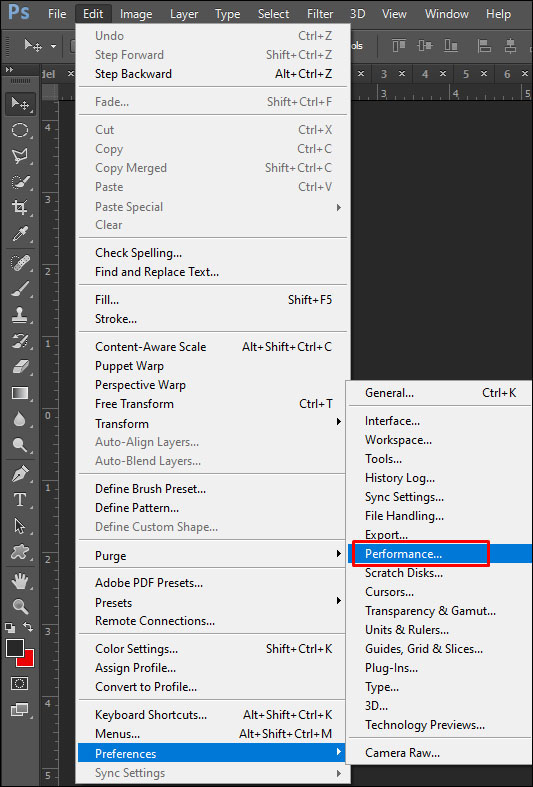

We don’t recommend allocating more than 85% of your RAM to Photoshop, as it can significantly slow down the rest of your processes.
Additional FAQ
Can I Add More Space to My Scratch Disk in Photoshop?
The easiest way to add more space to scratch disks is to distribute them across multiple drives. You can select any number of disk drives your device has for the scratch disks.
1. To create a new scratch disk, access the Scratch Disk menu and check the drive you intend to use. Photoshop can use four disk drives as scratch disks and 64 billion GB of storage to do so, but it is unlikely you’ll ever use or need that much.
2. Alternatively, you can add a new disk drive to your device and dedicate it as a primary scratch disk for Photoshop. We recommend using an SSD, as they read and write data faster. Scratch disks won’t easily reach terabytes of data usage, so you will be safe using a regular SSD. RAID disks, or disk arrays, are a great option to use for a scratch disk, but this will require a bit of Googling and tinkering on your part.
Additionally, you want to consistently clean other temporary files on your device to prevent your scratch disk from filling up.
What Should You Do When Your Scratch Disk Is Full?
If your drives are full, you have a few options.
1. To start, you can remove anything you’re not using. You can store past projects and data on an external drive, for example, to not take up active space. Make sure you defragment the drive after freeing up space to allow Photoshop to access the entirety of it.
2. Next, you can delete Photoshop’s temporary files. This will remove any remnants of past projects that you don’t want to keep and allow you to start fresh. Alternatively, clean Photoshop’s cache for current projects.
3. As a final option, you can install additional disk drives, then put the scratch disk there.
Your Disks, Clear as Day
Photoshop is an excellent tool for artists and, if you’re using it as a part of your job, can be an invaluable assistant. It’s vital that you take good care of your available memory so that you don’t run into the most unfortunate moments. If you’ve followed our advice, that shouldn’t be a problem. We hope you have a wonderful time creating great projects.
Have you ever had a full scratch disk? Which of these solutions worked for you? Let us know in the comment section below.
Disclaimer: Some pages on this site may include an affiliate link. This does not effect our editorial in any way.


