Do you experience unusual errors or crashes on your Windows 10 PC? Or have you noticed that something is taking away your PC’s storage space? Then, it might be time to clear the cache. The Windows operating system relies heavily on temporary files to perform its tasks. Cache files may become damaged or so huge that they affect your computer’s performance.
You can use several ways to clear the cache, which can be confusing. Luckily, in this article, you will learn the necessary steps to clear the cache using different methods. Keep on reading to find out!
How to Clear the Cache in Windows 10
There are a couple of basic methods that you can use to clear the cache on your Windows 10 PC.
Use Settings
In Windows, you have the option of clearing the cache or deleting temporary files through Settings. Here’s how:
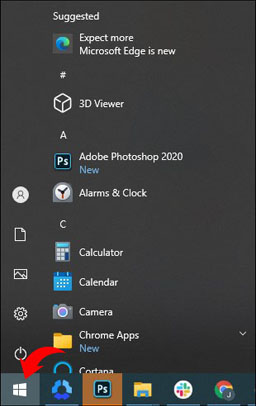
- In the bottom left corner of the desktop, select the Start menu (the Windows logo).
- Go to the Settings icon.

- Select the System option on the menu bar.
- Click on the Storage option.
- After the Storage option, click Configure Storage Sense or run it now.
- Go to the option that says, Free up space now and click clean.
- Wait until the scan has finished.
Disk Clean Up
The Disk Cleanup program can also clear cache or temporary data. Follow these steps to do so:
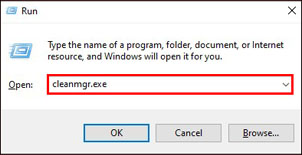
- Open the Run box by pressing the Windows key and the R key simultaneously on your keyboard.
- Enter
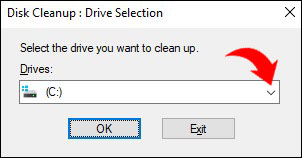
cleanmgr.exeinto the command line and press Enter. - Then choose a location where you want to proceed.
- After that, click Ok.
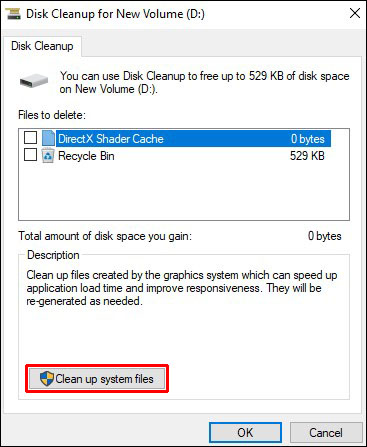
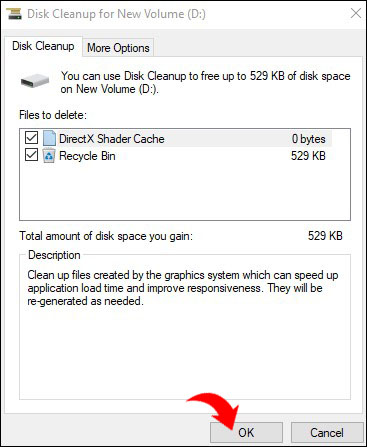
- Go to the Clean up system files option.
- Select All Items and click on OK.
- Click the Delete Files option.
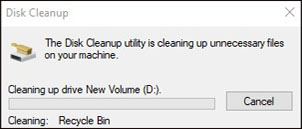
- Wait until the cleaning process is finished.


Use Third-Party Apps
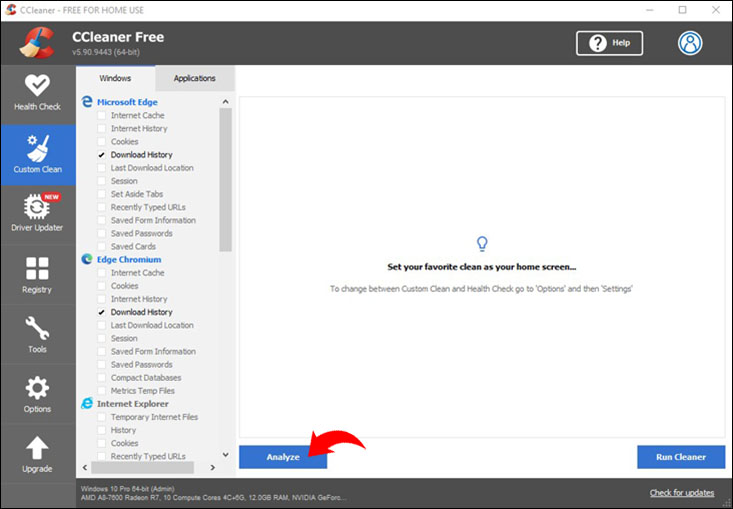
This is the simplest method for clearing your Windows 10 computer’s cache. Using software like CCleaner is as simple as clicking two buttons:
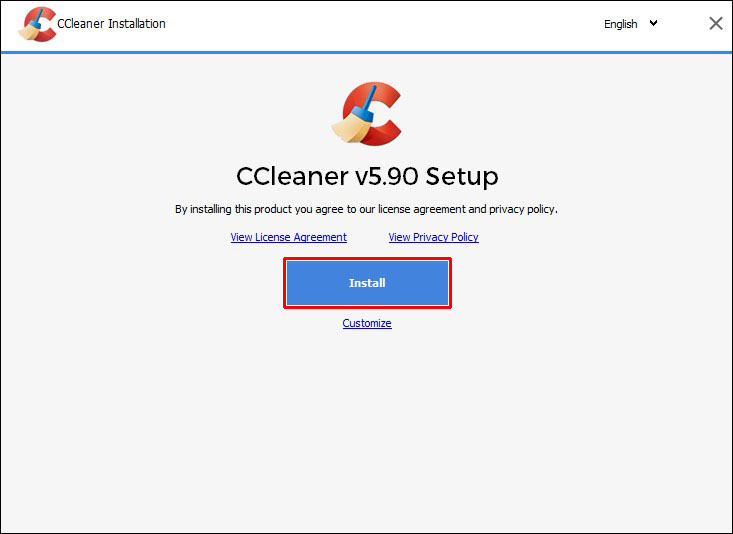
- Download and Install the CCleaner app.
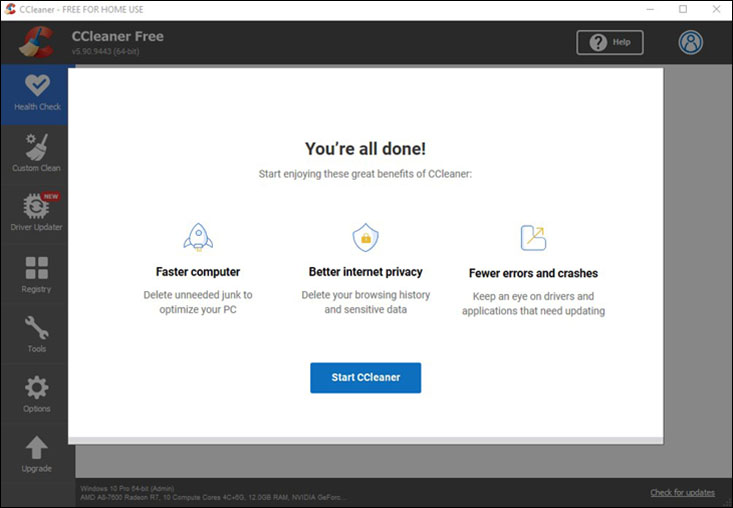
- Launch CCleaner
- Click on Analyze in CCleaner.
- Select Clean All from the drop-down menu.

How to Clear the Cache Memory in Windows 10
A long-standing and frequently reported method of clearing your Windows memory cache is to utilize a custom shortcut that “should” do so on Windows 10 and earlier Windows versions.
- Go to your desktop.
- Right-click and select Shortcut.
- Type the following and press Next:
%windir%\system32\rundll32.exe advapi32.dll,ProcessIdleTasks - Provide an appropriate name for the shortcut.
- Click on Finish.
Once generated, the shortcut will be available for use. Double-click the shortcut any time you wish to initiate the procedure.
How to Clear the DNS Cache in Windows 10
Microsoft Windows 10’s DNS cache can be flushed to fix DNS-related issues. Errors such as “404 – Page not found” or “Unable to access this page because it has changed” are examples of possible problems.
Again, you can do this in two ways. Windows Command Prompt is the first option.
- Click on Start, then put
cmdinto the search box. - Choose Run as Administrator from the context menu when you right-click Command Prompt.
- Enter the command ipconfig /flushdns (make sure a space precedes the slash).
- A command box will be displayed briefly, and the DNS cache will be flushed.
The second option is PowerShell in Windows. Here’s how:
- Click Start and type
powershellinto the search box. - Pick Windows PowerShell.
Type in the following command and hit Enter.Clear-DnsClientCache
How to Clear the Password Cache in Windows 10
Accessing secured file shares or starting RDP connections on the network will require that you preserve your credentials. Windows will remember your passwords for the next time you log in if you choose to do so. If you want to clear this password cache, you can do it in two ways.
You can use the control panel by following these steps:
- Open the Control Panel and select User Accounts.
- The Credential Manager option may be found at the center of the page.
- Choosing the Manage Windows Credentials type brings up a list of your stored credentials for network shares, remote desktop connections, or mapped drives.
- The Remove option may be found by expanding one of the entries in the list and clicking on it will delete the cache.
Or you can use the Run Command. Here’s how:
- Open the Run box by pressing the Windows key and R simultaneously.
- Press Enter to execute the following command,
rundll32.exe keymgr.dll, KRShowKeyMgr - Your stored usernames and passwords will be shown to you in a separate window. Choose one of the items and click Erase to remove a stored network credential.
How to Clear the Ram Cache in Windows 10
Running out of RAM isn’t a primary concern unless you’re using a high-end setup. It takes up more memory if you have a lot of apps on your device. Stopping programs can indeed help free up RAM, but this isn’t always the case, and in those situations, it’s required to delete cache memory and reclaim space in the RAM. Again, there are a couple of methods for doing so.
Restart Your PC
Your data is stored on a hard drive without the need for external power. When you shut down your computer, all of your files are stored and ready to be accessed when you restart.
Your computer’s memory capacity is unique. To keep things in order, it must be supplied with a steady stream of electricity at all times. Everything in your computer’s system memory gets erased each time you shut it down.
Turning your PC off is the fastest way to erase the Windows memory cache. Whether you restart it or shut it down and restart it manually, the small break in power will delete the data housed therein.
Deactivate the Windows Superfetch
In most cases, it’s okay to leave Superfetch on, but if you’re experiencing frequent slowdowns, excessive RAM utilization, or a delayed startup, you might want to disable Superfetch first.
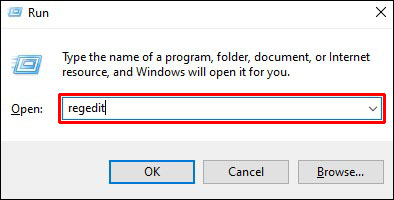
- Open the Register Editor by pressing Win + R on your keyboard, typing
regedit, and clicking OK. - Select Yes when prompted by the User Access Control dialog box.
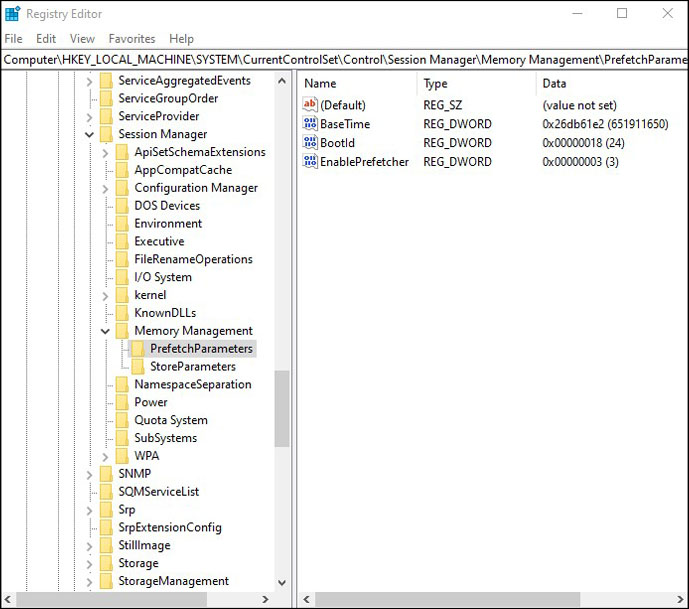
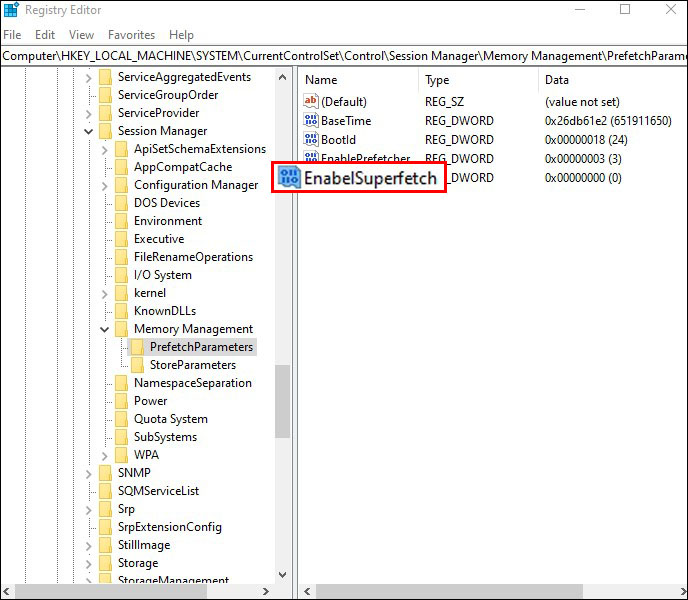
- In the Registry Editor, browse to HKLM\SYSTEM\CurrentControlSet\Control\Session Manager\Memory Management\PrefetchParameters.
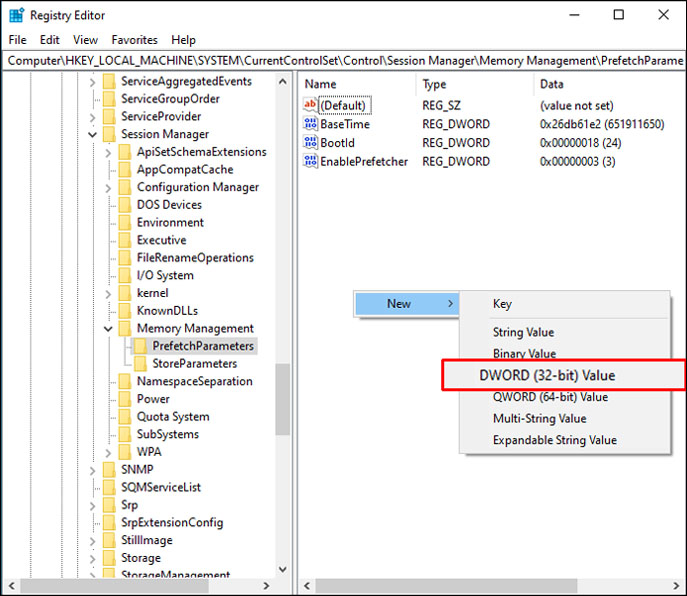
- Right-click in the open window, go to the New sub-menu, then pick D-WORD (32 bit) Value.
- Type
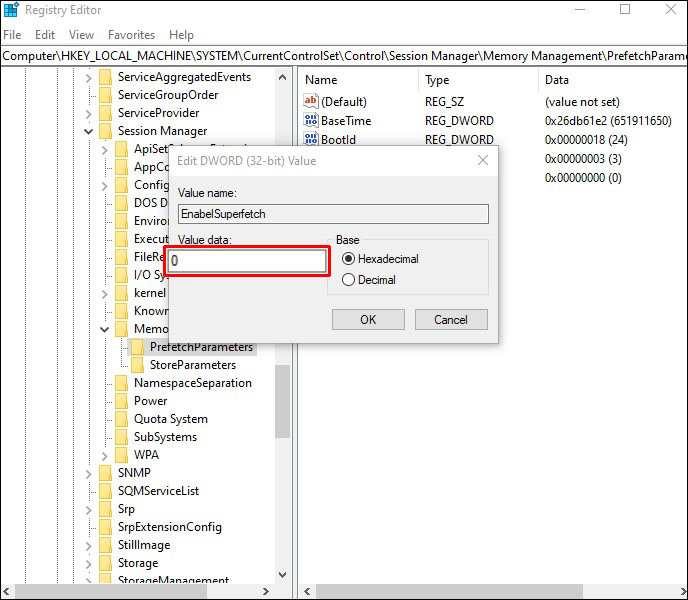
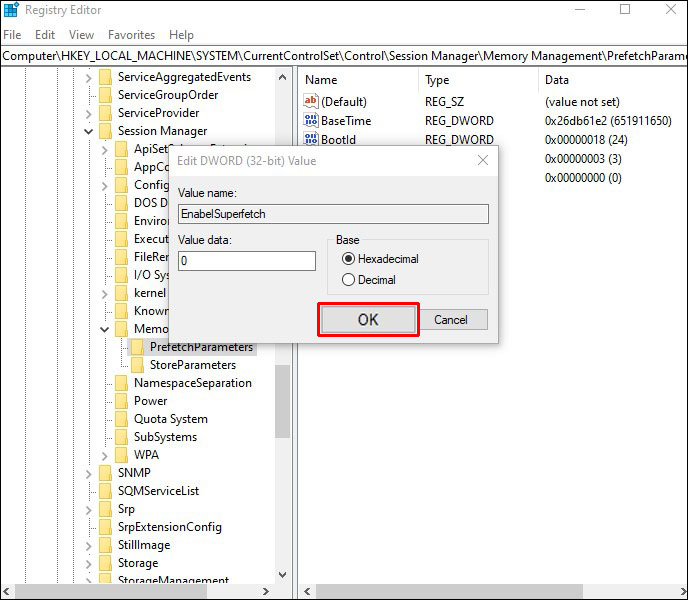
EnableSuperfetchas the new value. - EnableSuperfetch should be set to 0 if you wish to deactivate Superfetch entirely. Double-click the EnableSuperfetch value, then under Value data, adjust it to 1 to enable apps, 2 to enable it for booting (or 3 to enable it entirely) if you’d like to make changes.
- Click OK to confirm.
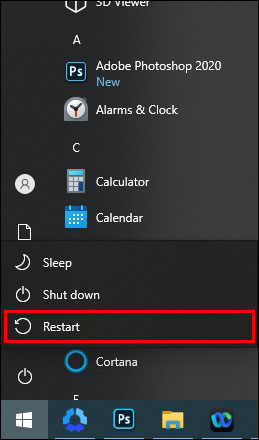
- Once the file has been saved, restart your computer.
How to Clear the Java Cache in Windows 10
- Open the Java Control Panel.
- Under the General tab, go to Settings, which is located in the Temporary Internet Files section.
- The dialog box titled Temporary Files Settings will display.
- Select Delete Files.
- The dialog box Delete Files and Applications will appear.
- Click on OK. This clears the cache of all downloaded applications and applets.
How to Clear the Icon Cache in Windows 10
To clear the icon cache database in Windows 10, shutdown any active applications and then perform the following steps:
- Open Start and type Command Prompt into the search box.w
- Select Run as administrator by right-clicking the result.
- To get to the location of the icon cache database location, use the following command and press Enter.
cd %homepath%\AppData\Local\Microsoft\Windows\Explorer - To close File Explorer, use the following command and press Enter:
taskkill /f /im explorer.exe
When you exit File Explorer, your desktop backdrop and taskbar will vanish, leaving you with a black screen, which is normal; the black screen is only temporary. Close File Explorer before deleting the icon cache files. Otherwise, you will be unable to complete the task. - To remove the icon cache files, type the following command and press Enter.
del iconcache*
How to Clear the ARP Cache in Windows 10
- Type
cmdin the Windows start bar, then right-click on the command prompt and select Run as administrator. - Open a command prompt with elevated privileges.
- To examine the ARP cache, type in
arp -a - To clear the ARP cache, type
arp -d. The -a parameter causes the program to show the ARP cache, whereas the -d flag causes it to delete it.
How to Clear Cache in Windows 10 Using Command Prompt
- In the Windows search bar, type
cmd. - Right-click on the Command Prompt and select Run as administrator.
When you launch cmd.exe as administrator, your commands will have elevated permissions and run from the system32 directory rather than as the currently logged-in user. - Now, you can type in a cleaning command to clear a specific cache type. You have numerous options for cleaning your PC’s hard disk or cache memory. One example is the method mentioned above to clear the DNS cache using the command prompt.
Clear All the Cache
Clearing the cache is a good solution if you’re experiencing different issues with your Windows PC. The reason Windows maintains a cache is to aid in the performance of your computer, but if it is overflowing, it may be causing problems. Along with decelerating your hard disk, cache files can create program incompatibilities, which could result in crashes.
Have you ever cleared the cache? What is your preferred method? Comment below!
Disclaimer: Some pages on this site may include an affiliate link. This does not effect our editorial in any way.


