Screenshotting is a super useful tool for transmitting to others exactly what you see on your screen. Furthermore, it’s a painless and fast way to save information that is difficult to save via other methods. Fortunately, all Dell computers come fitted with screenshot capabilities. So, you can instantly grab a picture of your screen whenever the moment arises.
If you want to learn how to screenshot on your Dell device, this article is for you. Read on to find out everything you need to know.
How to Screenshot on a Dell Using Hotkeys
The digital revolution has ushered in a new era – the digital age, and it’s showing no signs of slowing or changing course. As a result, the time you spend in front of your screen is most likely increasing. Hence, the power to snap and share your screen with friends and colleagues has never been more useful and in demand. Furthermore, saving and sharing a screenshot can be done almost instantly, and as the saying goes, “a picture says a thousand words.”
There are a couple of different methods for taking a screenshot on your Dell device. Firstly, you can utilize keyboard shortcuts to grab a screenshot quickly. Alternatively, you can use the Windows screenshot utility – Snipping Tool.
Here are the steps to screenshot on your Dell device using hotkeys:
- Open the screen you want to screenshot on your Dell laptop or computer.
- Press and hold the “Windows” and “PrtSc” keys simultaneously to take an instant screenshot.

- Your computer will then save your screenshot to the “Screenshots” folder in your “Pictures” folder.


Depending on what keyboard you’re using, you may be able to action a screenshot by just hitting the “PrtSc” key. But, if this doesn’t work, use the above steps instead.
How to Screenshot on Dell Using Snipping Tool
Every Dell computer and laptop comes fitted with Windows preinstalled. Therefore, if you own one, you’ll be able to use the entire suite of Windows tools, including Snipping Tool. The Windows Snipping Tool is an application that has been specifically designed for taking and editing screenshots.
This is the method for screenshotting on your Dell device using the Snipping Tool:
- Open the screen that you want to screenshot.
- Press and hold the “Windows,” “Shift,” and “S” keys simultaneously to open the Snipping Tool on the page.
- Using your mouse or trackpad, select the area that you wish to screenshot.
- Let go of the mouse/trackpad button to save the screenshot to your clipboard. This will prompt a thumbnail of the screenshot to appear.
- Select the thumbnail to edit or save the screenshot to another location.


How to Edit Screenshots on Your Dell Device Using Snipping Tool
Windows Snipping Tool is not only useful for grabbing an image of any part of your screen. It’s also equipped with a variety of editing tools that you can use to enhance, adjust, or clarify your screenshot.
- Open the screen you want to screenshot on your Dell laptop or computer.
- Press and hold the “Windows + Shift + S” shortcut to open the Snipping Tool on the page.
- Select the area that you wish to screenshot.
- Automatically save the screenshot to the clipboard by releasing the mouse or trackpad.
- Click on the thumbnail in the bottom right of your screen to open the screenshot in the Snipping Tool.
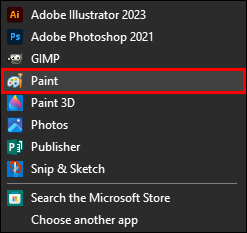
- Select the “Paint” icon from the toolbar to open the screenshot in Microsoft Paint.
- Once you’ve finished editing, Select “File.”
- From the drop-down menu, select “Save” or “Save As” to save your edited screenshot.


The Snipping Tool itself does have basic editing tools. Thus, you don’t have to use Paint. However, the tools offered in Paint are more diverse.
What Editing Features Does Snipping Tool Have?
The range of editing features offered in the Snipping Tool are quite basic. However, basic doesn’t mean they’re useless. The suite of editing options available in Snipping Tool may be limited, but they’ve also been designed to meet the specific needs of screenshot editing. Therefore, you may find that it has everything you need to amend your screenshot as desired.
- Pen: This feature allows you to mark specific areas of your screenshot as you would with a pen. It’s helpful for making short notes or underscoring parts of your screenshot.
- Highlighter: You can literally highlight passages or sections of your screenshot to draw attention to something you deem important.
- Eraser: If you make any mistakes during the editing process, you will always have your trusty eraser to make them disappear.
- Ruler: The ruler feature is used in conjunction with other editing tools. For instance, if you want to highlight a certain section in a professional manner, the ruler can be used to ensure that it’s straight.
- Crop: The crop function lets you cut out any unwanted or unnecessary areas of your screenshot.
- Save: The snipping tool allows you to save the screenshot to any location on your Dell device, making it easier to find when needed.
- Text Actions: The Snipping Tool can perform some unique text actions. For example, you can redact personal information or copy the text.
- Paint: The Snipping Tool allows you to open your screenshot in Microsoft Paint, giving you access to a host of additional editing tools.
How to Locate Your Screenshots if You Can’t Find Them
There is nothing worse than saving your screenshot only to lose it in the jungle of files stored on your computer. Furthermore, while the Snipping Tool does allow you to save your screenshot to any location, the hotkey method doesn’t. If you’re unsure where to find the screenshots you’ve saved using the keyboard shortcut, don’t fear because you can always retrieve them.
Here are the steps to locate screenshots on your Dell laptop or computer:
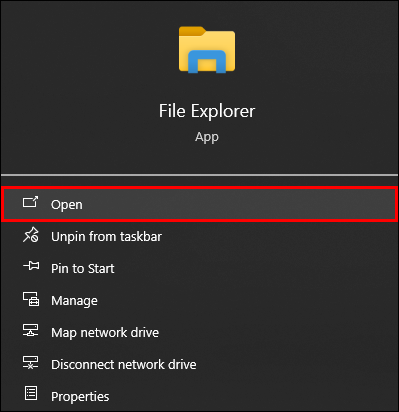
- Open “File Explorer” by clicking on the icon located in your taskbar. Alternatively, if it’s not visible on your taskbar. Select the “Windows” button and type “File Explorer” into the search box.
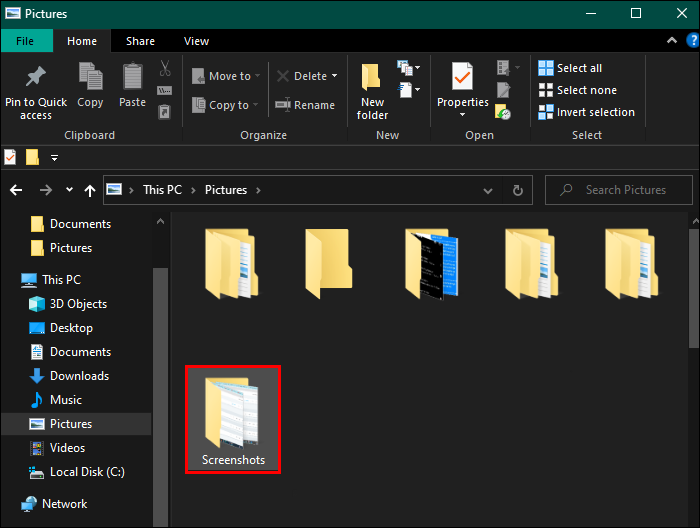
- Scroll down and select “This PC” from the panel of location options on the left of your screen.
- Double-click on the “Pictures” folder from the options.
- Locate and select “Screenshots” to gain access to all of the screenshots you’ve saved using hotkeys.


How to Change Where Screenshots Are Saved by Default
You may want to change the location where your screenshots are saved when using hotkeys. Fortunately, it’s a relatively simple process to make this happen.
Here are the steps:
- Open “File Explorer” by clicking on the icon located in your taskbar. Select the “Windows” button and type “File Explorer” into the search box if it’s not visible on your taskbar.
- Go to the location where you want your screenshots to be saved and create a new folder in that location named “Screenshots.”
- Select “This PC” from the panel of location options on the left of your screen.
- Double-click on the “Pictures” folder.
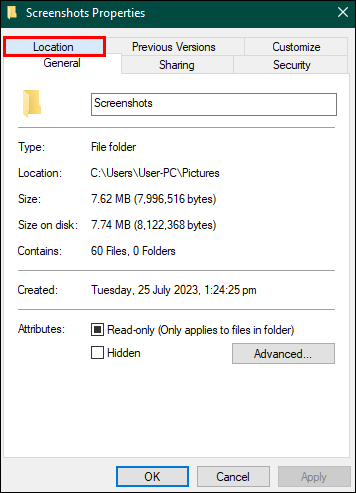
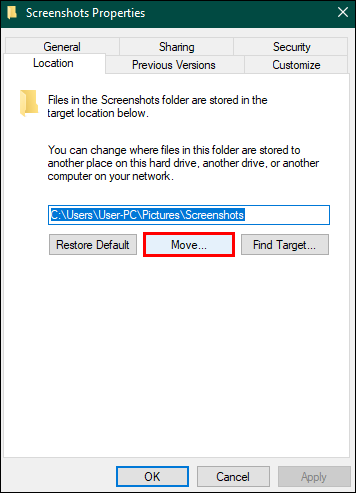
- Right-click on the default “Screenshots” folder and select “Properties.” This will prompt a window to appear on your screen.
- Select the “Location” tab at the top of the window.
- Click on the “Move” button to open a window to select a new save location.
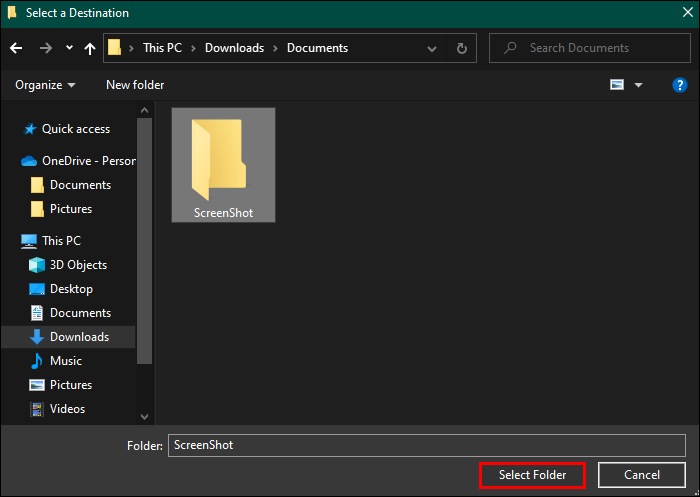
- Navigate your way to the new “Screenshots” folder you made and hit “Select Folder.”
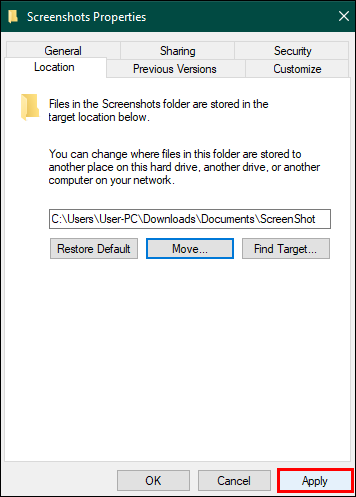
- On the screen that appears, select “Apply” and then “OK” to finalize your change to the default screenshot save location.


Screenshots Your Way
Screenshots are an invaluable way to save and share information quickly, saving your most precious resource – time. Hence, that’s why every operating system on the market has a built-in mechanism for capturing an image of your screen.
Have you used screenshots on your Dell laptop or computer? If so, did you make use of any of the tips and tricks covered in this article? Let us know in the comments section.
Disclaimer: Some pages on this site may include an affiliate link. This does not effect our editorial in any way.