In the sea of Instagram Reels posted every day, your videos have to be of the highest quality. The competition is fierce and users need to stand out from the crowd. Even if you’re making the most creative and ambitious content, great video quality is crucial for your Reels.
To get the most out of your videos, here’s a list of Instagram Reels quality settings.
Upload at the Highest Quality
The first thing you can do is to make sure that Instagram is uploading your content at the highest quality possible. By default, this setting is turned off and many users might not be aware of it. Turning this option on works for all of your posts, including photos, videos, Stories, and Reels. It’s a quick and simple solution for your quality issues.
Note that every time you delete the app, this setting will go to its default option, which is off.
This is how you can turn on high quality uploads:
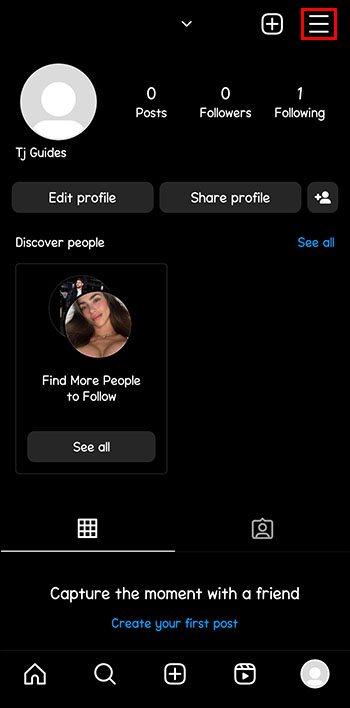
- Go to your profile.

- Tap the “Menu” button on the top right.

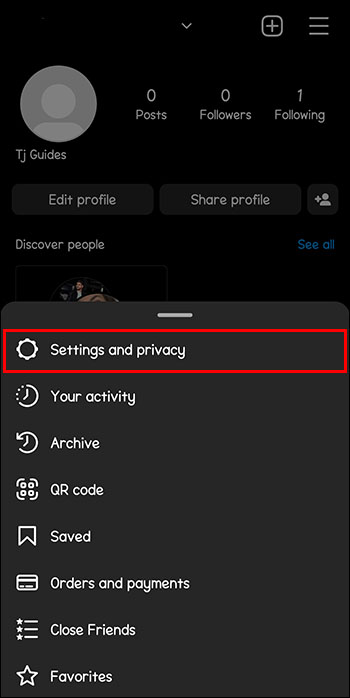
- Go to “Settings and privacy.”
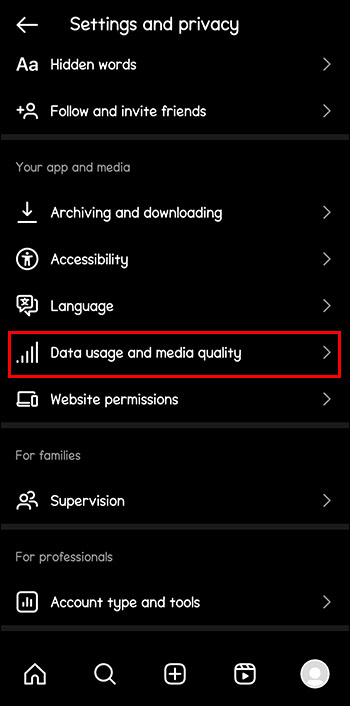
- Scroll down and tap “Data usage and media quality.”
- Turn on the “Upload at highest quality” setting.

Have a Good Internet Connection When Posting
If you’re posting your Reels while you’re out and about and you use mobile data or public Wi-Fi, your Reels won’t turn out very well. They may appear blurry when posted, and the effort you’ve put in while creating them might go to waste.
Whenever you have a slow internet connection, Instagram will automatically reduce the quality of your Reels to upload them faster. Make sure your internet connection is stable, by connecting to your Wi-Fi.
Upload at the Highest Quality While Posting Reels
Using this option when you’re done shooting and editing your Reels is a simple step you can take to make sure you have the best results possible. By doing this, you can avoid Instagram’s compression of videos used to upload your content faster.
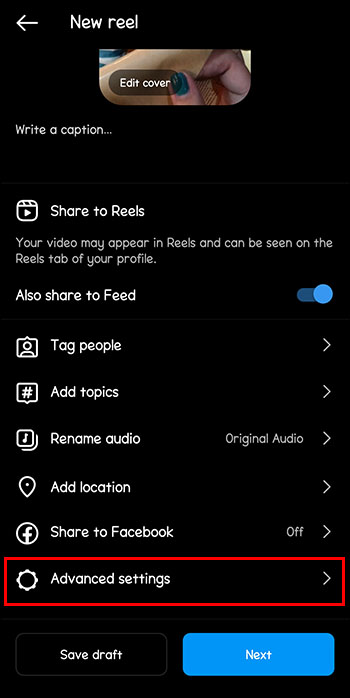
This way, uploading may take more time, but has the best outcome. Here’s how to turn on high quality uploads in the Reels section:
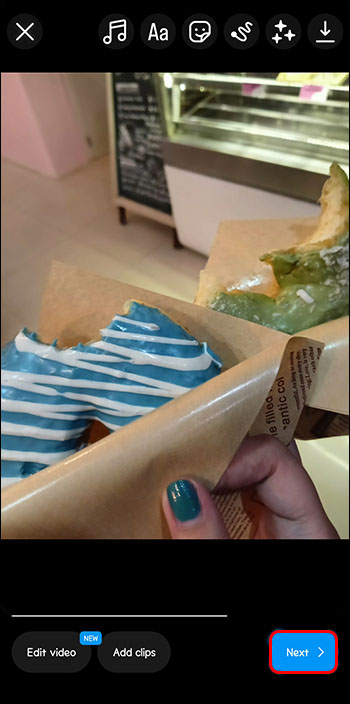
- Go to the “Reels”taband upload or shoot your video.
- Edit your video, add music, GIFs, text, and stickers and tap “Next.”
- Go to “Advancedsettings.”
- Scroll down and switch the button “Uploadathighestquality” on.

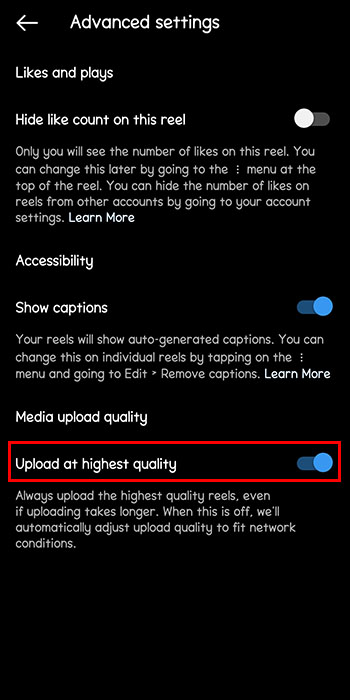
Each time you upload a Reel, make sure to follow these steps and turn on the highest quality upload. This will ensure you don’t have issues with blurry and pixelated reels.
Reels Aspect Ratio, Resolution, and Size
To ensure your Reels are as perfect as they can be, you need to follow Instagram’s size, ratio, and resolution requirements. Using low-resolution and horizontal clips may not work in your favor. You can always check your camera’s settings to see if they fit these requirements.
These are the recommended settings for your videos:
- The aspect ratio should be between 1.91:1 and 9:16.
- The minimum frame rate should be at least 30 frames per second.
- The resolution should be 720 pixels or higher.
- Video file size should be under 50 Mb.
- Maximum video length is 90 seconds.
Transfer Videos to Your Phone
If you love shooting videos on a professional camera instead of your phone, you might want to be careful when transferring your files. You can easily lose quality when you send clips that you want to use for your Reels.
Make sure you’re not using messaging apps, like WhatsApp, as they do the same thing as Instagram when you send files. They compress your videos to send them faster, resulting in lower quality. While this may work for chats and sharing funny videos, you should avoid this while editing your Reels. Opt for sending clips as documents, using email, or transferring and cloud websites.
Use Instagram for Editing
It’s probably best to stay in the app when editing your videos. Instagram lets you choose templates, effects, layouts, and music for your Reels. There’s a lot you can do just by using their editing tool, that allows you to trim, zoom, and add clips.
The more you import and export your videos through other apps, the more quality you lose. Just think of those Reels you’ve seen that look like they’ve been made years ago, only to find out they were posted just a few days before. Use other apps when needed, but explore Instagram’s built-in editor as much as you can.
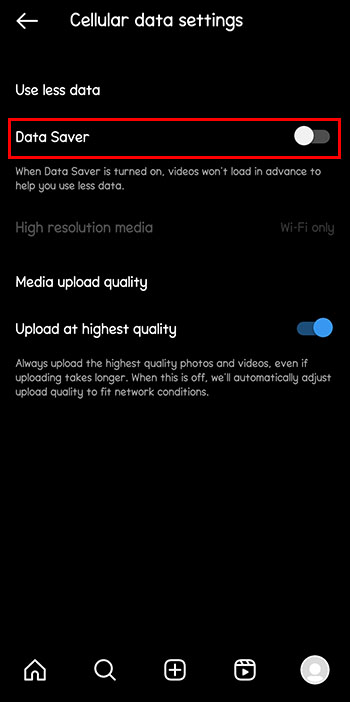
Turn Off the Use Less Mobile Data
Using less mobile data can result in worse Reel quality when turned on. With this setting, Instagram alters the content which results in Reels that have lower resolution and quality.
Here’s how you can turn off this setting:
- Go to your profile.
- Tap on the “Menu” button.
- Go to “Settings and privacy.”
- Click “Data usage and media quality.”
- Turn off the “Use less mobile data” option.
Update the App
This may sound like an obvious option, but bugs can make your Reels creation a lot more difficult. You may be doing everything in your power to ensure your video quality is high and sometimes it’s the app update that’s the problem. New features and updates are added to the app constantly.
Make sure you check the Play or App store and use the latest version of the Instagram app. This way, you can keep up with the changes and avoid issues when posting.
Improve Your Video Material
Doing your best when shooting your videos can make the process of editing and posting Reels much easier. A good foundation is key, and improving your video material gives you better results.
Here are some tips on how you can shoot better videos:
- Make sure your lens camera is clean.
- Avoid zooming in, as this lowers the quality of your videos.
- Shoot without filters and effects that can lower the quality.
- Use good lighting, like daylight.
- Explore your camera settings to get the most out of it.
Use the Instagram Camera
The Reels’ built-in camera is probably your best choice to ensure quality of videos. It works in coordination with Instagram’s requirements. This way you don’t have to worry about blurry, compressed Reels. The result will be the same in your drafts and when you post on your account.
The format, resolution, and frames per second parameters are all automatically set and you don’t have to bother with adjusting them. By doing this, you avoid using additional ads that can lower the quality of your videos.
Getting the Best Results Possible
When you put a lot of effort into creating a Reel and the final post’s quality is ruined, it can be pretty disappointing. If you implement some simple changes to your Instagram settings, however, you can significantly improve your Reels. This way, you can keep having fun during the creative process and get the outcome you were hoping for.
Do you post Instagram reels? Have you had issues with their quality after posting? Let us know in the comments section below.
Disclaimer: Some pages on this site may include an affiliate link. This does not effect our editorial in any way.