Stuff happens sometimes, so it’s a good idea to back up your information regularly. If you have an iPhone X, backing up your info is easy. Plus, there are a couple of ways to do it.
Take a look at the steps below to find the right method for you.
Back Up to iCloud
As an Apple user, you can back up a variety of information to their dedicated cloud, iCloud. Backing up your information to iCloud requires a Wi-Fi connection and an iCloud account.
Step 1 – Access iCloud on Your iPhone X
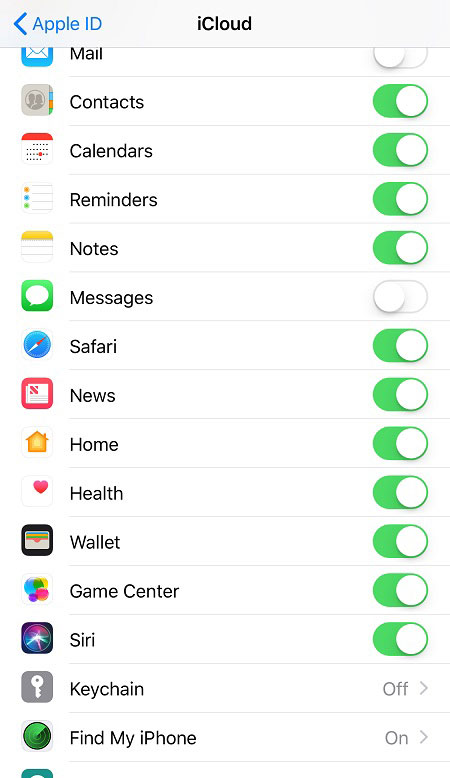
First, go to Settings from your Home screen. You will see your Apple ID at the top of the screen. Tap on your ID and sign into your account if prompted. Next, tap on iCloud.
Step 2 – Back Up Apps
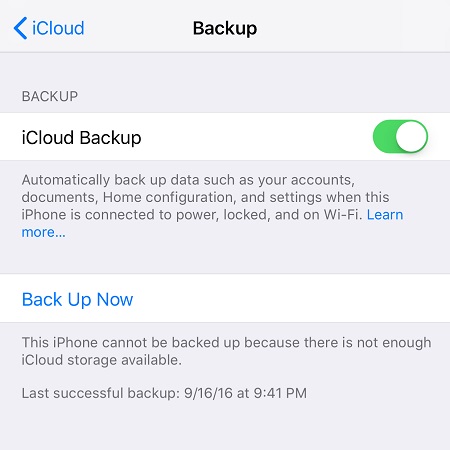
Tap the slider next to your desired apps, to back up your apps. Go to iCloud Backup near the bottom of the list to make sure that it is enabled. Lastly, tap on “Back Up Now” to back up your app info and wait for your phone to complete the backup.
Step 3 – Back Up Contacts
If you want to back up your contacts, tap Contacts to make sure the slider is switched to On. Next, select Merge contacts with iCloud if you’re prompted.
From there, go to iCloud Backup at the bottom of the app list and tap on it. If iCloud Backup is disabled, tap on it to enable your phone to back up information. When you’re ready, tap “Back Up Now” and wait for your phone to complete backing up your information.
Step 4 – Back Up Media and Pictures
Back up your media files and pictures using iCloud the same way. From iCloud on your phone, tap on Photos. Your iCloud Photo Library slider needs to be switched to On, so turn it on if it isn’t already.
Next, return to your previous screen by tapping iCloud again. Scroll down to iCloud Backup at the bottom of the app list and tap on it. Tap “Back Up Now” and wait for the backup to complete. Remember to make sure that iCloud Backup is on before you back up your information.
Back Up to Computer with iTunes
If you prefer to back up your phone to your computer, you can use iTunes to do it.
Step 1 – Connect and Open iTunes
First, grab your USB cable and connect your iPhone X to your computer. After your device is connected, open iTunes on your computer.
Step 2 – Back Up on iTunes
Next, click on the Device icon in iTunes. It’s located on the left side of the iTunes window next to the category drop-down menu.

Pick Summary in the sidebar. From there, go to “This computer” under the Automatically Back Up category.
Make sure that the Encrypt iPhone backup box is ticked. This ensures that passwords, health, and HomeKit data are all backed up. Encrypted backups are protected by a password you create, which will be stored in Keychain.
Lastly, click on Done when you are finished backing up your data. You can also manually back up your information to iTunes at any time. Simply go to Summary from the sidebar and pick “Back Up Now” from the Manually Back Up and Restore category.
Final Word
If you don’t want to worry about manually backing up your information, you can always choose automatic backup for either iCloud or iTunes. However, iTunes only backs up your data when you plug your device into your computer.
Disclaimer: Some pages on this site may include an affiliate link. This does not effect our editorial in any way.