Gimp is one of the most popular open-source photo editing software. It also happens to be free. Due to its customizability, it would be strange if it didn’t offer you a chance to make a unique photo collage.
Making a photo collage in Gimp is a thorough process. There are no apps or plug-ins that would make it easier, so you will have to do it manually.
However, if you want to create beautiful images, go through this guide and you’ll be able to create your personal mosaic in no time.
How to Make a Grid Photo Collage in Gimp?
To make a photo collage in Gimp, you should follow these steps:
Creating a Blank Canvas
- Open Gimp.
- Click on ‘File’ on the top-left of the screen.
- Select ‘New’. A ‘Create a New Image’ window should appear.
- In the ‘Image Size’ section, set both ‘Height’ and ‘Width’ to 1350 pixels.

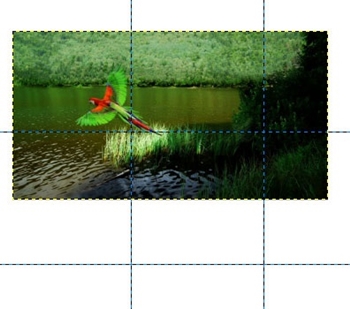
This will create a blank square within which you can place a lot of small pictures. The best way to do this precisely is to use ‘Guides’. With this tool, you’ll be able to position and center your images evenly in collage squares. You’ll have to create 2 horizontal and 2 vertical guides.
Creating the Guidelines
- Click ‘View’ on the top of the screen and then ‘Show Guides’ and ‘Snap to Guides’.
- Go to ‘Image’ > ‘Guide’ > ‘New Guide’. A new window will open.
- Select the ‘Horizontal’ direction and enter 450 for position.
- Click OK.
- For the second guide, repeat steps 5-7, and choose 900 for position

- For the first vertical guide, repeat steps 5-7, but select ‘Vertical’ direction and 450 position.
- For the second vertical guide, repeat steps 5-7, but select’ Vertical’ direction and 900 position.

Adding the First Image
It’s time to insert the first image into these guides:
- Click ‘File’ on the top-left.
- Select ‘Open as Layers’.
- Find the image and select ‘Open’. The image should appear on the screen with guides over it.
- Adjust the image to one of the squares in the guide.
- Go to ‘Tools’> ‘Transform Tools’ > ‘Scale’ to resize the image.
- Click on ‘Tools’
- Go to ‘Selection Tools’ and then choose ‘Rectangle Select’.
- Click and drag the selection over the part of the image that’s in the square.
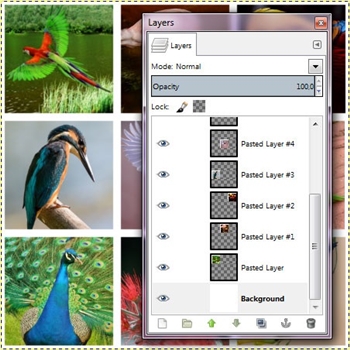
- Select ‘Edit’, and then ‘Copy’.
- Then go to ‘Edit’ > ‘Paste’.
- Select ‘Layer’ and then ‘To New Layer’.


This will now create the first part of your collage. You should remove the original image’s layer by selecting it in the layer window and pressing the ‘Delete’ key.

Adding a Border
What’s left is to add a border to your image and insert the rest of the pictures.
- Go to ‘Tools’, and click ‘Default Colors’. This will make the background of your collage white. If you want a different background color, select ‘Tools’> ’Swap Colors’.
- Right-click on the new, modified layer.
- Click ‘Alpha’ and go to ‘Section’. This will select the image.
- While the image is selected, go to ‘Edit’ and click on ‘Stroke Selection’. A ‘Stroke Selection’ window will pop up.
- Select ‘Stroke line’, and click on ‘Solid color’ button.
- Choose the line width, for example, 30px.
- Select the ‘Stroke’ button.

This will create the white border for the first image in your collage.
Adding the Rest of The Images
Now that you know how to add parts of the collage, it is time to complete it.
Repeat the previous steps for each image that you add. Remember to adjust them to the guides to maintain the perfect square shape.
After you finish your collage, you should remove the guides and save the image. To do this, follow these steps:
- Go to ‘Image’ on the top of the screen.
- Select ‘Guides’.
- Click on the ‘Remove all Guides’ button. Now you’ll be able to see your collage clearly.
- Click ‘File’ on the top-left.
- Select ‘Save’.
- Choose the save destination and the name of your document.
- Click ‘OK’.

This will save the collage to your hard drive.
Time to Experiment with Collage
At first glance, this process seems long and exhausting. But after you get the hang of it, it will all go quick and smooth.
One of the best parts of making a photo collage is that you can customize it any way that you want. In this article, we used 1350px squares. However, you can adjust the guides to form smaller squares while choosing an even bigger canvas.
You can also modify some guides to be bigger than others, and experiment with sizes and shapes of your collage. So, what are you waiting for? That beautiful collage will not form itself.
Disclaimer: Some pages on this site may include an affiliate link. This does not effect our editorial in any way.