Minecraft was first released in 2009, and its grassroots origins have made it a target for modders. Today, many players enjoy using Forge, a free mod loader that lets them add entirely new content to the game. It does come with problems, however.
Some players report crashes and aren’t sure how to fix them. The good news is that many solutions are available. Read about them below.
Minecraft Forge Keeps Crashing with Exit Code 1
Exit Code 1 in Minecraft Forge often refers to a Java issue, but that doesn’t necessarily mean that Java is the problem. It could be the mod in use that creates Java errors.
If the problem is a mod, Exit Code 1 generally occurs because you are using the wrong version of Minecraft for your mod or you have an outdated mod.
If Exit Code 1 occurs due to a Java issue, it is usually caused by using the wrong Java version for your current Minecraft version.
Regardless, some users even received this error without mods or Forge installed, so it often makes sense that a corrupted or incorrect Java version is in use.
Here are some possible solutions that may help solve your Minecraft Forge Exit Code 1 Error problem.
Solution 1: Modify the Executable Path
The executable path refers to a chain of files and folders that Forge and the Minecraft Launcher run. If you received exit code 1, it’s likely the fault of the Java path, especially if you installed Java rather than using the pre-included Minecraft version.
However, the exit code should disappear once you change the file name. If not, you should try a different solution displayed below. Here’s how you can change the name.
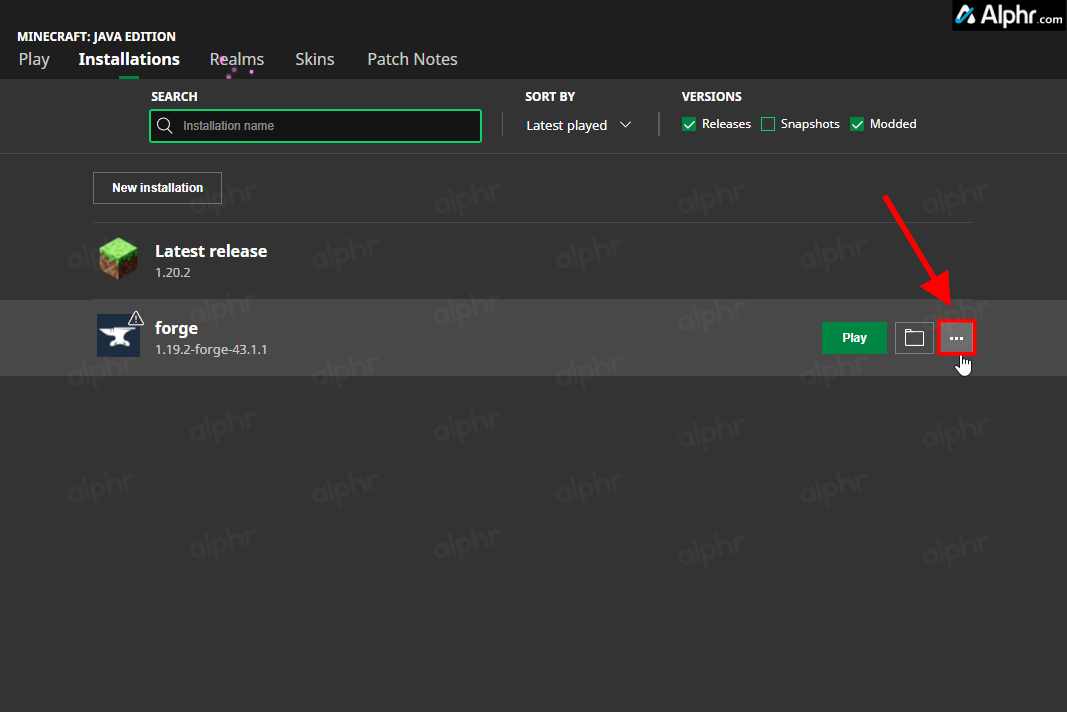
- Open your original “Minecraft Launcher” and ensure you have “Minecraft Java Edition” selected in the left pane.

- Click on the “Installations” tab in the right pane.

- Highlight your “Forge” version and click on the “vertical ellipsis” (three vertical dots) to the right.
- Choose “Edit” from the dropdown options.
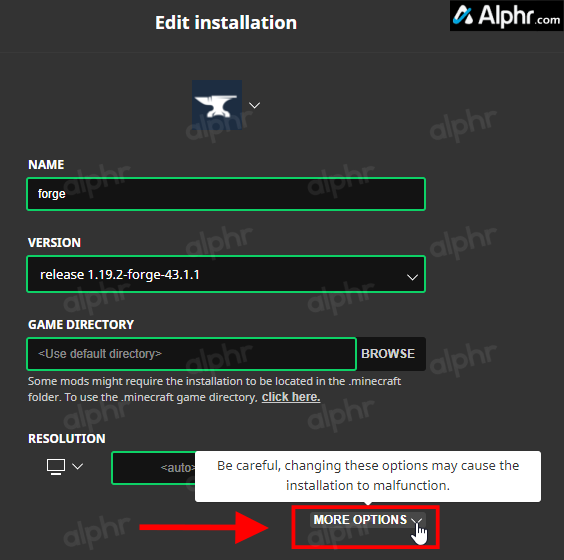
- Select “More Options” in the “Edit Installation” window.
- Revert to the pre-included Minecraft Java version by typing “<Use bundled Java runtime>” in the executable box or click “Browse” and navigate to and select your Java executable file.
- Click “Save” in the lower-right corner of the “Edit Installation” window.
- Relaunch the game and see if the exit code returns.


If the above steps do not solve your Exit Code 1 problem, move on to the next process.
Solution 2: Reinstall Java
Sometimes, you either have the wrong Java version or have an outdated build. Some mods may require a specific Java version, but they usually require specific Minecraft builds. Of course, Minecraft builds also require a specific version of Java or the latest one. To fix this, you should reinstall Java, just in case you have a corrupted or incorrect version.
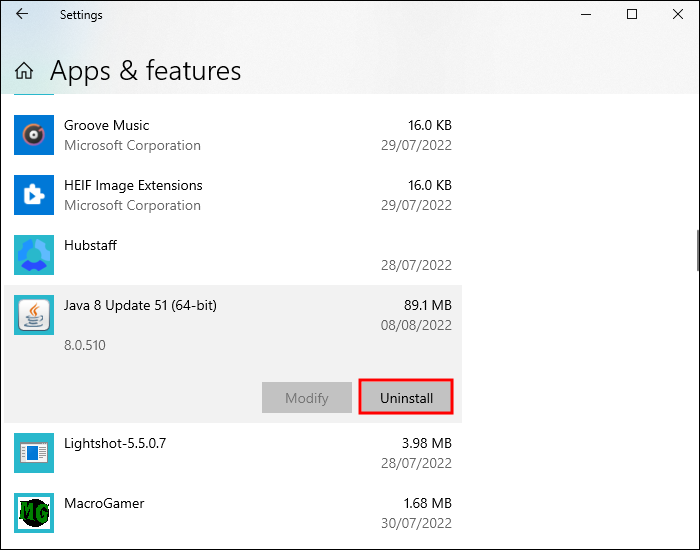
- Type “Apps And Features” in the “Cortana Search Bar.”
- Go to the menu and scroll down to “Java.”
- Click on the “Java” app, then choose “Uninstall.”
- Go to the official Java download page and download the newest version.
- Install this new Java copy and try rerunning Minecraft.


A new copy of Java tends to smooth out most problems. But there’s one exception to this rule. Minecraft versions before 1.16 must use Java 8, as newer versions aren’t compatible with these ancient builds.
To address the issue, do the following:
- Look for the “Apps And Features” section on Windows.
- Uninstall your current “Java” build.
- Go to this page and download Java 8.
- Install Java 8.
- Test Minecraft and see if it works now.


If everything goes well, Java 8 will work with older versions of Minecraft.
Reinstall Minecraft
While this isn’t everyone’s favorite solution, there are times when reinstalling everything is more straightforward than finding the error source. Once you reinstall Minecraft, ensure you follow the proper methods of installing Forge.
- Go to “Apps And Features” and locate Minecraft.
- Uninstall the game.
- Install Minecraft again.
- Do the same for Minecraft Forge, and make sure you have the corresponding Forge Minecraft version that matches your current Minecraft build.
- Download and Install Forge.
- Open your original “Minecraft Launcher” and ensure you have “Minecraft Java Edition” selected in the left pane.
- Click on the dropdown to the left of the “Play” button and select your version of Forge.
- Relaunch the game by clicking the “Play” button and see if the exit code returns.


Hopefully, the uninstall process removes whatever bugs are plaguing your game client. It should remove Exit Code 1 and perhaps the others.
Minecraft Forge Keeps Crashing with Exit Code 0
Exit code 0 is another known error Minecraft players encounter when trying to play with mods. While the fixes above can also fix it, here are some alternative solutions that are proven to work.
Remove or Disable Mods
Minecraft Forge mods are usually only compatible with a single version, such as 1.18. Therefore, mods designed for older versions won’t run and may cause errors like exit code 0.
Here’s how to check your mod error logs:
- Press Windows Key + R.
- Type “
%AppData%” in the text box. - Go to the “.minecraft” folder.
- Locate the “logs” folder.
- Open “latest.txt” and read it.
- If a mod is causing issues, remove it from the mod folder.


A handy trick is to create a shortcut to the %AppData% file. Many Minecraft veterans will tell you how much time they’ve saved. In addition, you can also make a shortcut to your mods folder for instant access.
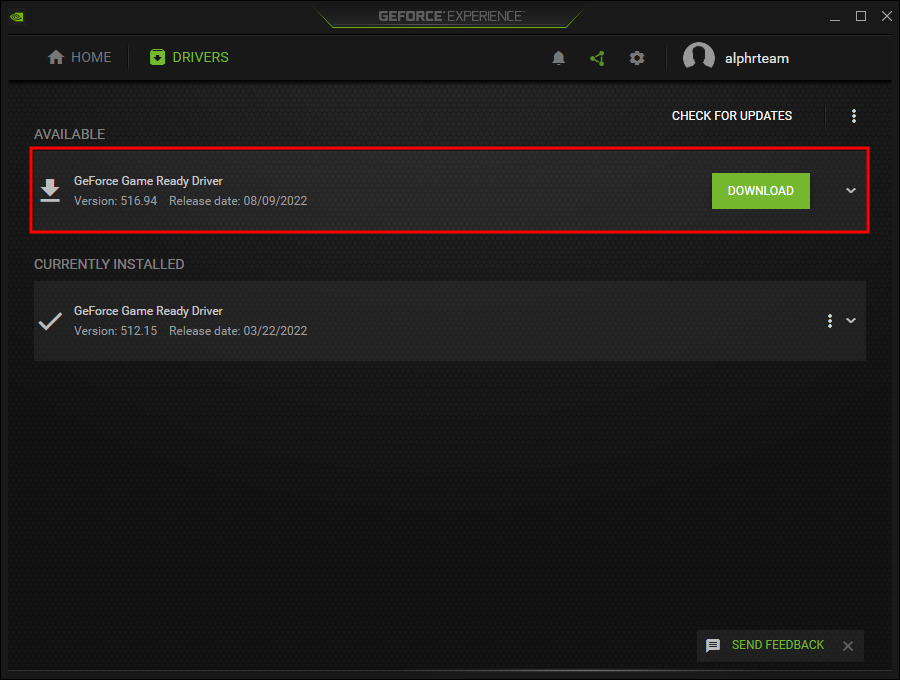
Update Your GPU Drivers
Sometimes, outdated graphics drivers are the cause of errors like code 0. This is especially true with AMD drivers. Here’s how you can update your drivers.
NVIDIA users can consult these instructions.
- Open the NVIDIA GeForce Experience app
. - Click on “Check For Updates.”
- Pick “Game Ready Driver.”
- Wait for the driver to be downloaded and installed.
- Try Minecraft again.


These are the steps for AMD owners.
- Go to the AMD support page.
- Find your GPU model.
- Download the latest drivers.
- Run the installer.
- Follow the on-screen instructions.


Alternatively, try this method.
- Launch the AMD Radeon Settings app.
- Go to “Drivers and Software.”
- Download the drivers.
- Test Minecraft.
- If the problem persists, try rolling back the GPU driver, as many users claim it worked for them when they have AMD graphics drivers.


Hopefully, these solutions will eliminate exit code 0.
Get Rid of Incompatible Software
Minecraft isn’t the most compatible game. Here’s a list of known software you should eliminate if you wish to play.
Situation Normal
Minecraft still hasn’t addressed some of these problems directly, but the developers constantly check user feedback and support tickets.
Which method worked for your game? What do you think Mojang should do about these crashes? Let us know in the comments section below.
Disclaimer: Some pages on this site may include an affiliate link. This does not effect our editorial in any way.