Snapchat presents its users with a unique social experience, one that takes the idea of permanence that often comes with social networking, and tears it to shreds. Snapchat is based entirely on the idea of fading memories, photos and videos that don’t last forever and are designed to be temporary. When created with this source of time constraints, Snapchat often becomes an art form. Selfies and embarrassing videos of you and your friends become instant shares instead of being tossed away for fear of repercussions. Capturing the moment around you becomes instinctual and instantaneous instead of feeling forced or manufactured, and considering the fleeting nature of it all, Snapchat feels effortless in its everyday use.
Of course, sending a snap without using the arsenal of tools Snapchat delivers you is really missing the point. A snap filled with filters, drawings, stickers, and text can be a true work of art—a snapsterpiece, if you will. Let’s explore the options for changing the color of Snapchat’s paintbrush too.
Accessing Basic Snapchat Color Tools
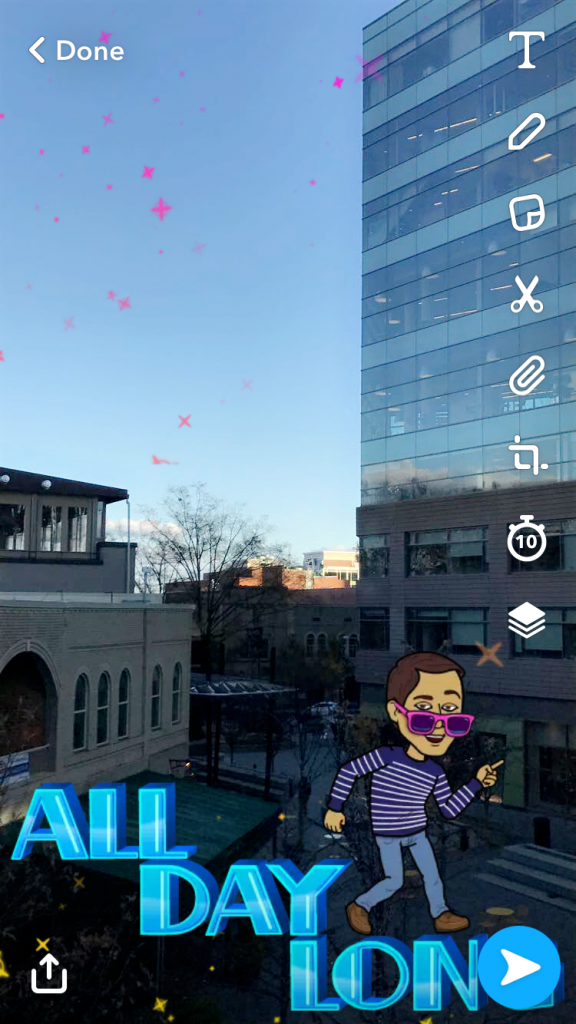
Let’s start with the basics. When you take a snap, a few photo editing tools will appear on the right side of your screen.

From the top down, you will see the following tools:
-
- Text – Add colorful and bold text.
- Pencil – Draw using your finger.
- Clip Art – Add a sticker or emoji.
- Scissors – Cut and paste portions of the image, or save for later.
- Paperclip – Attach a link.
- Crop – Crop or rotate the image.
- Timer – Set a timer for how long the snap can be viewed.
We’ll focus on the first two–adding text and drawing. To access the colors for either of these tools, tap the corresponding icon. A small color bar will appear below the icon. Tap on this bar and drag your finger up and down to select the color you want.

These are the basic Snapchat color tools. If you are having trouble getting the exact color you want, don’t worry. There are more options–if you know how to find them. First, try dragging your finger all the way to the bottom. When you get there, keep dragging down. The color bar will expand to about twice its regular size, allowing you to more easily hone in on colors.

But that’s not all! Once you have selected a color, hold it and drag left into the picture. Then, keeping your finger on the screen, you can drag from left to right to adjust the darkness of that color. If you’re in a more emoji mood, you can also paint with emoji. Just tap the icon below the color stick, and select the emoji you want to paint with. From there, you can use it as a regular pencil on your masterpiece.
Using Filters to Change Photo Colors
All of these options help you find the perfect color to draw or write on your image. But sometimes, your image still won’t match. In that case, you might want to change the lighting in the image to a specific color. For that, Snapchat has a few very limited built-in filter options. Swipe left on your image to access them. Continue swiping to view more options for filters, including personalized recommendations, geofilters, speed filters, and various frames and stickers.

Adding Multiple Filters to Your Snapchat
One little-known feature of Snapchat filters is the ability to stack them on top of each other. Snapchat has three categories: color, filter, and decoration. If you know the method, you can stack all three on one picture, like this:
To do it yourself, swipe to any filter. When you have the one you want, press and hold on the screen. With the other hand, keep swiping to find the second filter you want. Repeat if you want to add a third. Note that you can only add one filter from each category.
Creating Your Own Filters
Still just can’t get enough of Snapchat filters? Then it’s time for you to create your own. Be warned, though: sponsored Snapchat filters cost money, and they only last for a limited time. To create your own filter, click your Bitmoji in the top left corner of the camera screen. Then, click the settings icon in the top right corner. Scroll down to “Filters & Lenses,” and click it. Then, tap “Get Started!” Next, choose whether you would like to create a filter or a lens.
Follow the prompts to create your filter or lens, adding stickers or emoji to your liking. Then set the times and dates it will be active, and draw a map in which it will be available. The longer and more widely you want it to be available, the more it will cost. When you are finished, submit it. Snapchat will take about a day to review your filter, and will notify you once it has been approved. In the meantime, make sure your friends all know where and how they can access your unique Snapchat filter – or surprise them by sending it to them all as soon as it becomes available.
Disclaimer: Some pages on this site may include an affiliate link. This does not effect our editorial in any way.