It’s safe to say the computer era has come of age. Gone are the days you couldn’t type in the dark without a desk lamp or some other source of light. These days, most computers come with a backlit keyboard to make typing in low-light conditions easier. The backlit keyboard illuminates the keys for easier typing in low-light environments. Even at 3 a.m., you can type away on your keyboard and get the work done from the comfort of your bed.
However, the keyboard doesn’t stay on all of the time. What’s more, backlit settings differ depending on the type of computer you’re using.
If you want your keyboard to be constantly lit up so you can type at any time without having to fiddle around with a bunch of keys or buttons, this article will show you how it’s done.
How to Set a Backlit Keyboard to Always On for a Mac
Mac computers are always ahead of the competition for innovation, and that’s undoubtedly too when talking about their keyboards.
Most modern Macs are equipped with a light sensor at the top of the screen just below the camera. This sensor automatically adjusts the key brightness depending on the amount of natural light detected. Once the sensor has been activated, your keyboard is lit up to ensure you can work in any lighting environment.
Here are the steps:
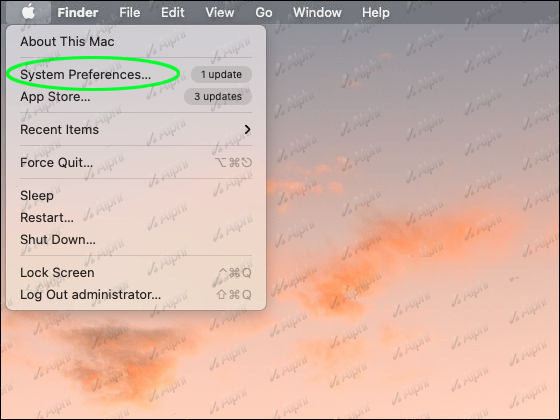
- Open the Apple Menu and select “System Preferences.”
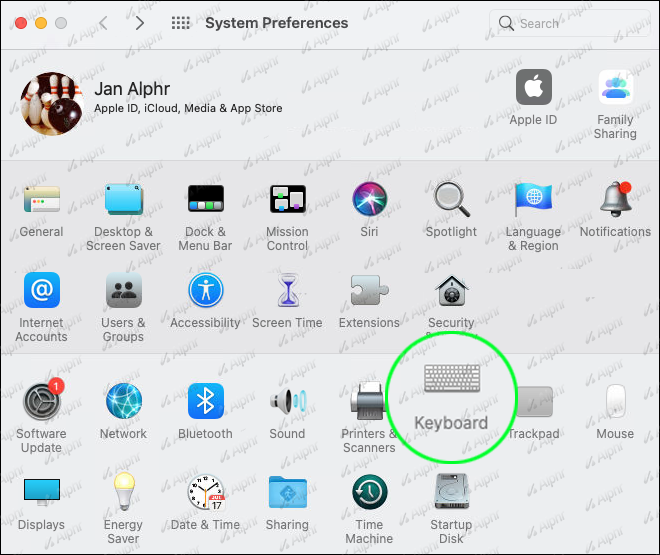
- Click on “Keyboard” to open the keyboard management pane.

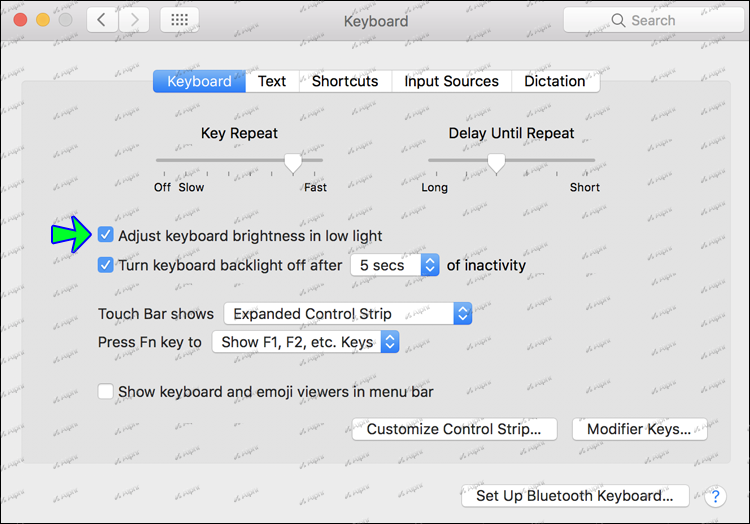
- Check the box next to “Adjust keyboard brightness in low light.”
- Exit System Preferences.
At this point, your keyboard should be lit up, albeit lightly, if the room has a lot of light. If at any point you find the keyboard not bright enough, you can adjust the brightness by pressing F5, Fn, or F repeatedly.
The System Preferences window also allows you to specify how long your keyboard should remain lit when your computer is sitting idle without any key activity. This can be particularly helpful if you’re trying to keep an eye on your battery power.
How to Set a Backlit Keyboard to Always On for a HP PC
Let’s face it. Pressing “Q” instead of “E” isn’t funny when you’ve got an urgent task to complete. It can be frustrating and waste a lot of time.
Luckily, HP has ensured you can set your backlit keyboard to stay on all the time to enable you to type even in low-light environments.
Let’s see how to go about it:
- Restart your computer.
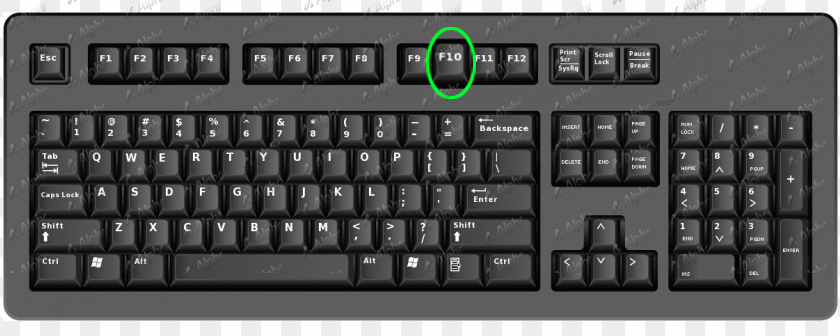
- Before the startup sequence is complete, press F10 repeatedly to open the BIOS.
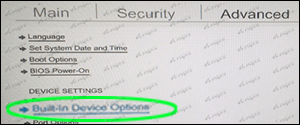
- Once the BIOS is open, scroll down to “Advanced” using the down arrow on your keyboard.
- Select “Built-in Device Options” and then hit “Enter.”
- Click on “Backlit keyboard timeout.”
- Press the spacebar button on your keyboard to open the backlight timeout settings.
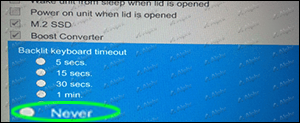
- Toggle the box next to “Never.” This will ensure the backlight remains on at all times.
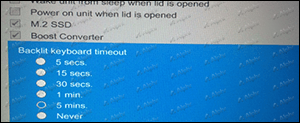
Backlight settings also allow you to select a timeout setting as low as 5 seconds. If you don’t want to drain your battery power too quickly, you should consider a shorter timeout.
How to Set a Lenovo Backlit Keyboard to Always On?
If you own a Lenovo laptop, your backlit keyboard is something you might never truly appreciate if you’re always working in open spaces or rooms with plenty of light. In the dark, however, your keyboard comes alive, allowing you to type without much strain.
Most Lenovo machines equipped with a backlit keyboard also have light sensors designed to adjust key brightness automatically.
Here’s how to activate these sensors:
- Open the Start menu.
- Select “Hardware configurations.”
- Choose the “Keyboard Backlight” option.
- Click on “Automatic Keyboard Backlight.”
- Choose the desired backlight level. You can go with Low, High, or Off. But to keep the backlight illuminated at all times, you should choose either the High or the Low setting.
It’s important to remember that the automatic keyboard backlight feature only works when it’s been activated in the BIOS of your machine.
Here’s how to check whether the feature is turned on:
- Restart your laptop.
- Immediately the boot screen displays, press the F1 key repeatedly to enter the BIOS mode.
- Select the “Keyboard/Mouse” menu.
- Select “Keyboard Backlight.”
If the backlight feature is already activated, you should see an active toggle button next to “Enabled.” If not, the feature hasn’t been turned on yet. However, you can do so by simply toggling the button next to “Enabled.”
How to Set a Backlit Keyboard to Always On for a Dell
Dell computers are known for their versatility and customization options, which is why it’s a little disappointing to see they don’t allow you to you set your backlit keyboard to always-on out of the box.
Luckily, the Dell Feature Enhancement Pack Application allows you to do just that. Here’s how to use it:
- Install the application on your computer.
- Navigate to the Control Panel and select “Hardware and Sound.”
- Choose “Dell Keyboard Backlight Settings.”
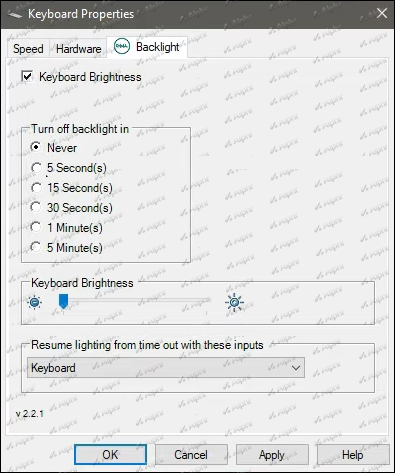
- Select “Backlight” from the resulting window.
- Under “Timeout Settings,” select “Never.”


Additional FAQ
Is There Any Downside to Keeping My Keyboard Backlight Always On?
Yes. Your keyboard backlight can drain your battery power because it uses LEDs to illuminate your keypad. The amount of power it eats up depends on the brightness setting chosen. For this reason, you should only activate the “Always on” setting when it’s absolutely necessary.
Anytime Is Typing Time
The keyboard is one of the most important parts of your computer, but it’s also one of the hardest to work with when you don’t have a light source. With a backlit keyboard, it doesn’t matter how dark your surroundings are – you’ll be able to type comfortably and accurately in any situation.
That said, it’s important to remember that backlit keyboard settings differ depending on your computer’s brand.
Some keyboards will allow you to change colors and brightness levels, and some will stay permanently lit up even if you don’t tweak the settings. Others are designed to turn off automatically after a predetermined period of inactivity.
To find out if your keyboard possesses any of these features, you need to check out the properties section on your computer or consult your manufacturer.
What do you love most about backlit keyboards?
Let us know in the comments section below.
Disclaimer: Some pages on this site may include an affiliate link. This does not effect our editorial in any way.


