If you want to use your Skype background to establish a professional presence or help lighten the mood with a humorous one; in this article, we will show you how creative you can get in modifying your Skype backgrounds.
We’ll discuss how to customize and blur your background before and during Skype calls. Plus, our FAQs include things to try if you’re having problems getting a customized background to display, where to find the best virtual backgrounds for Skype, and alternative options to delete your Skype account.
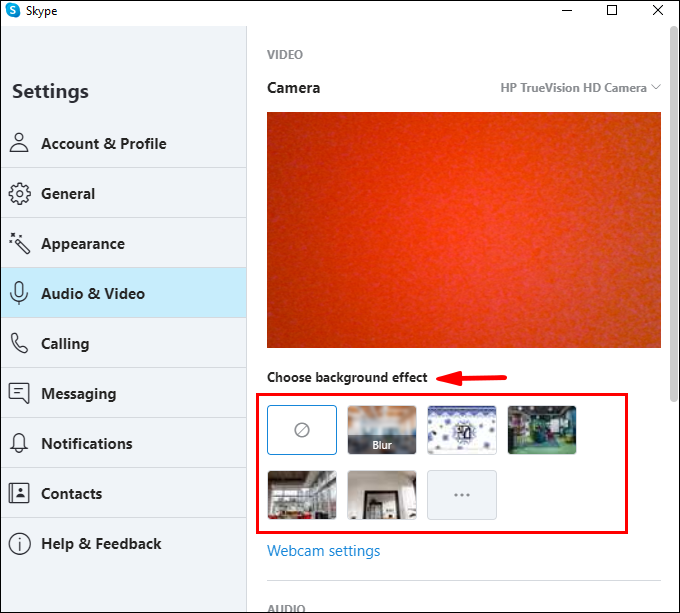
Change/Alter Your Skype Background Using Settings
To blur or customize your Skype background before a video call via Windows, Mac, and Linux:
- Launch the Skype app and click on your profile picture.

- Select the “Settings” icon, then the microphone icon for “Audio & Video.”

- Beneath “Choose background effect,” you can:
- Blur the room you’re currently in (you won’t appear blurred)
- Select an image previously added, or
- Add a new image to customize your background effect.
- For all the predefined image categories, select the three-dotted menu under “Choose background effect.”

Note: It’s recommended that you save your custom image somewhere on your desktop and use the images in landscape orientation.
Change/Alter Your Skype Background During a Call
To blur or customize your Skype background during a call via Windows, Mac, and Linux:
- Once the call has started, hover your pointer over the video icon, or select the three-dotted ‘’More’’ menu.
- Select “Choose background effect.” Here you can:
- Blur the room you’re currently in (you won’t appear blurred)
- Select an image previously added, or
- Add a new image to customize your background effect.
- For all the predefined image categories, select the three-dotted “More” menu under “Choose background effect.”


Note: It’s recommended that you save your custom image somewhere on your desktop and use the images in landscape orientation.
To blur your Skype background via a mobile device during a video call:
- Once the call has started, tap on the three-dotted “More” menu.
- Enable “Blur my background.”

Skype Background Changes FAQs
Does Skype Support Blurred Backgrounds?
Yes, Skype allows you to set a blurred background for display during your video calls. To blur your Skype background before a video call via Windows, Mac, and Linux:
1. Launch the Skype app and click on your profile picture.
2. Select the “Settings” icon, then the microphone icon for “Audio & Video.”
3. Beneath “Choose background effect,” toggle on the “Blur my background” option.
To blur your Skype background during a call via Windows, Mac, and Linux:
1. Once the call has started, hover your pointer over the video icon, or select the three-dotted ‘’More’’ menu.
2. Select “Choose background effect,” toggle on the “Blur my background” option.
To blur your Skype background via a mobile device, during a video call:
1. Once the call has started, tap on the three-dotted “More” menu.
2. Enable “Blur my background.”
How to Create a Custom Skype Background?
To add a custom background during your video call:
1. Once the call has started, hover your pointer over the video icon or click on the three-dotted “More” menu.
2. Select “Choose background effect.”
3. To customize your background effect, add a new image or select one previously used. You’ll also have the option to blur the actual background of the room you’re using.
To set a custom background for all video calls:
1. Launch the Skype app and click on your profile picture.
2. Select “Settings,” then the “Audio & Video” button.
3. To customize your background effect, add a new image or select one previously used. You’ll also have the option to blur the actual background of the room you’re using.
What Resolution Should I Use for My Custom Skype Background?
The recommended resolution and image size for a custom Skype background are:
• 1920 x 1080 pixels (resolution).
• 1280 x 720 size.
Smaller resolutions may work at the risk of your image appearing pixelated due to low resolution.
Why Can’t I Change My Skype Background?
Try the following if your custom background doesn’t display:
Restarting Your Computer
There may be Skype updates available, so a reboot will force Skype to update to the latest version. Save your work, then power off your PC; wait five or so minutes before powering it back on.
Check the Version of Skype Installed
To check your current Skype version:
1. Launch the Skype app.
2. Click on the three-dotted menu icon, found towards the top.
3. Click on “Help & feedback.”
· The Skype and application version will display.
Here are some of the supported operating systems and their latest versions:
Android Phone and Tablet Chromebook:
· Android 6.0+ version 8.70.0.77
Android 4.0.4 to 5.1 version 8.15.0.439
Lite version 1.88.0.1
iPad, iPhone, iPod Touch:
· iPad 8.70.0.77
· iPhone version 8.70.0.77
Mac:
· Mac (OS 10.10 and higher) version 8.69.0.58
· Mac (OS 10.9) version 8.49.0.49
Linux:
· Linux version 8.69.0.77
Windows:
· Windows Desktop version 8.68.0.96
Windows 10:
· Windows 10 (version 15) 8.68.0.96/15.68.96.0
For a complete version compatibility list, visit support.skype.com.
Try Signing Out Then Back In
After confirming that your compatibility and version are ok, click on the three-dotted menu from the top, then select ‘’sign out.’’ Sign back in to help force your custom background to display.
Is There a Virtual Background for Skype?
Yes, Skype does support virtual backgrounds.
If you’re using your own images as a virtual background, make sure it has a high resolution and use royalty-free images. Once you’ve added the image, Skype will auto-fit it; however, sometimes you can end up with an odd-looking stretched image just as the video call starts.
To make life easier, consider using custom-made Zoom virtual background images, for access to a selection of beautiful backgrounds – for approximately the price of your favorite hot drink.
How Do I Share My Screen on Skype?
To start sharing your screen during a Skype call via your desktop:
1. Once the call has started, click on the screen sharing button found towards the bottom-right of the screen.
· For macOS 10.15 (Catalina) users, you’ll need to give Skype access to “Screen recording,” click on: “System Preferences,” > “Security & Privacy” > “Screen Recording” and grant access to Skype.
To share your screen using an Android device:
· Click on the three-dotted “More” menu button, then press the screen-sharing icon.
To share your screen using an iOS device:
1. Click on the three-dotted “More” menu button, then press the screen-sharing icon.
2. Select “Skype” > “Start Broadcasting.”
Can I Delete My Skype Account Without Deleting My Microsoft Account?
When Microsoft acquired Skype, Skype became an integral part of Microsoft. Therefore, if you want to permanently delete your Skype account, any other Microsoft services you have e.g., an Outlook or an Xbox Live account, will be deleted too.
Alternatively, you can delete your subscription—though your Skype account will still exist, you will not be billed for it:
1. Navigate to your Microsoft Services & subscriptions page then sign in to your account.
2. Locate your Skype subscription, then select “Payment & billing” > “Cancel.”
3. Follow the instructions, you will receive a confirmation email once your subscription is canceled.
If you wish to delete your account due to privacy concerns, or you don’t use Skype anymore, you can delete your instant messages and private conversations.
Note: If you remove an instant message that you’ve sent, it will be removed for everyone. You can only remove instant messages that you’ve sent.
To delete your instant messages via desktop:
1. Find the instant message you wish to delete.
2. Right-click on it, then select “Remove.”
To delete instant messages from your mobile:
1. Find the instant message you wish to delete.
2. Hold down on the message, then select “Remove.”
Note: Deleting a conversation will remove your copy of the message and the conversation from your chat list. When starting a new conversation, the conversation history will not be available.
To delete private chats from your desktop:
1. From your chat list, find the conversation you wish to delete.
2. Right-click it, then “Delete conversation.”
To delete private chats from your mobile
1. From your chat list, find the conversation you wish to delete.
2. Hold down on the conversation then select “Delete conversation.”
Getting Creative With Your Skype Backgrounds
Skype has joined the rest of its video conferencing app rivals by introducing its version of customizing a video background feature. You can now change your background with a blurred effect or use an image or video. This comes in handy when you want to blur out a background mess or use a funny image to help lighten the mood.
Now that you know how to customize your Skype backgrounds, what method do you prefer – blurring your background or using an image or video? Have you been bold with the type of backgrounds you’ve used? What have some of the reactions been? We’d love to hear about your experiences with your Skype backgrounds; please let us know in the comments section below.
Disclaimer: Some pages on this site may include an affiliate link. This does not effect our editorial in any way.