There are many reasons why you might want to securely wipe a hard drive. You might be selling it, donating it to a friend, you might be recovering from malware or virus or you may be disposing of the computer entirely. You don’t want any of your private data to get into the wrong hands so securely wiping the drive is what you need to do.
You have several options if you need to securely wipe a hard drive. You can use the operating system, use free software, take it to your computer store or physically destroy the drive. I’ll cover the first two options as the second two should be obvious.
Delete is Not Enough
Simply deleting files or formatting the hard drive is not enough. When you hit Delete or Format, all your operating system does is delete the index telling it where a particular file is stored. This is then interpreted as empty space by the OS that can be overwritten, but the actual data is still intact. It will remain intact until it is written over numerous times.
This offers an obvious security risk. Anyone with the right data recovery software could buy your hard drive, recover those files and access all the data you thought was deleted. This has happened quite a few times in the past, not just for home users, but organizations too. Some of them were very high profile organizations!
Format is Enough
If you just want to wipe a hard drive and are keeping the drive in your computer or as a spare, you can use the format tool in your operating system. As long as you are not allowing anyone else to physically access it, secure wipe isn’t necessary. I would still suggest a secure wipe if you are recovering from a virus or malware though, just in case.
In Windows:
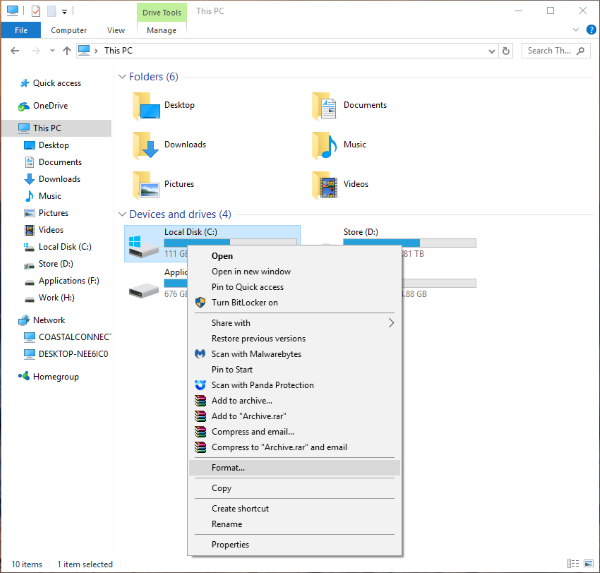
- Select the hard drive in Windows Explorer, right click and select Format.

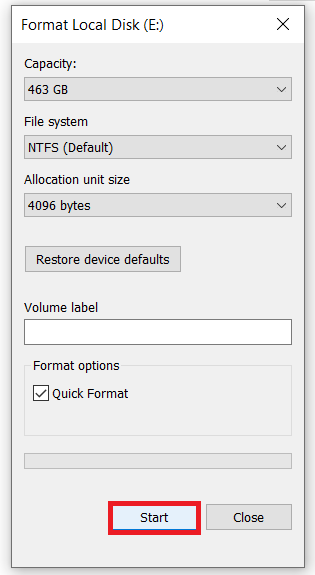
- Select NTFS as the File system and Quick format as the mode, Next, click Start to begin the format.

In Mac OS:
- Select the Disk Utility from Applications and Utilities.
- Select the drive from the left menu.
- Select Erase from the top menu.
- Enter a name, format and scheme.
- Select Erase.
In both operating systems, this will render data from the disk inaccessible but will not securely wipe it.
Use the Operating System to Securely Wipe a Hard Drive
The simplest and cheapest method to securely wipe a hard drive is to use the operating system or free software.
In Windows:
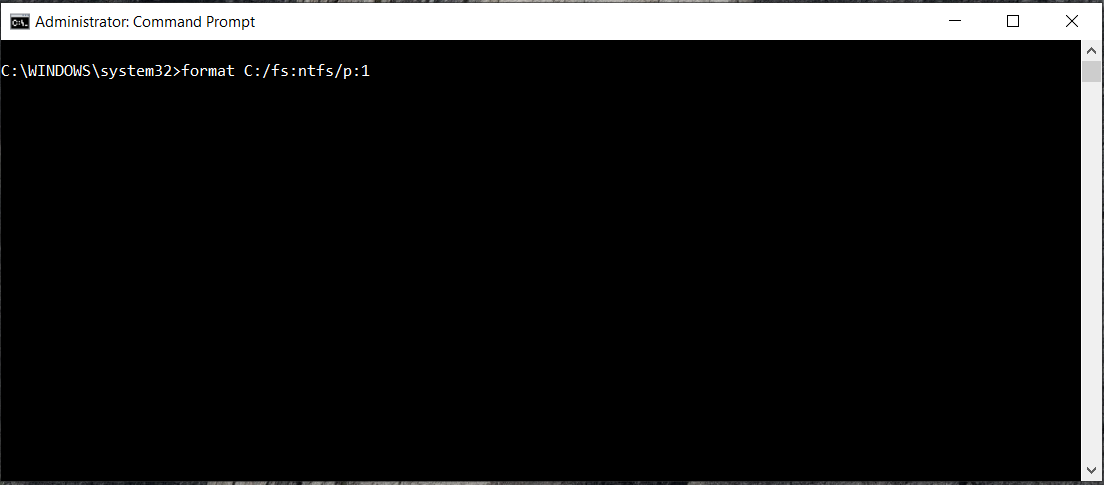
- Type ‘command prompt‘ into the Start menu and click Run as administrator to open a CMD window as an administrator.
- Type or paste ‘format C: /fs:ntfs /p:1’ and hit Enter. Where you see ‘C’, change to the drive you want to wipe.
- Type ‘Y’ to confirm when you see the warning.

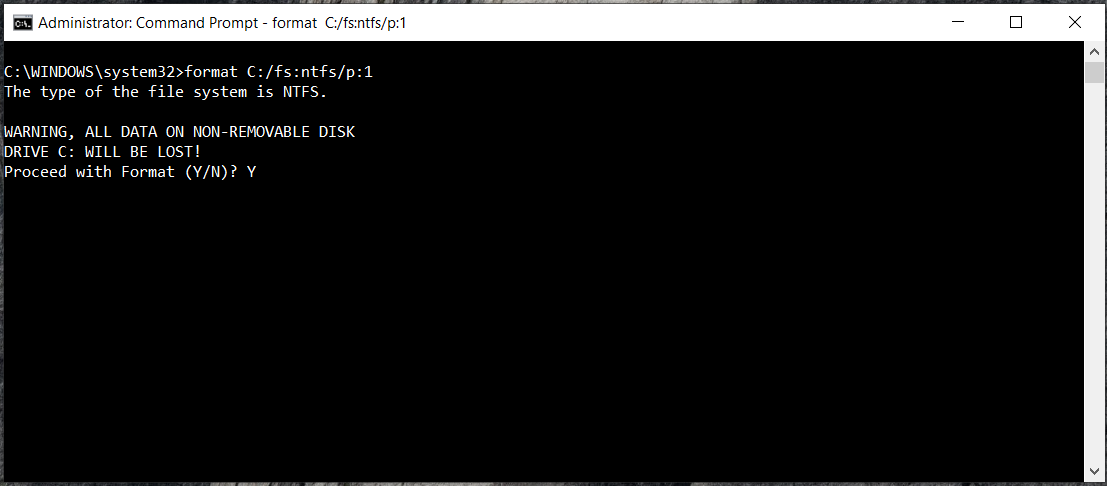
The command first formats the drive and creates an NTFS file system. It will then overwrite the entire drive with zeroes to prevent software data recovery. You can add another pass for extra security if you like by changing ‘p:1’ to ‘p:2’ or ‘p:3’. It’s recommended to do at least two-four passes just to make sure the content is overwritten, if you’re selling the drive, do a minimum of 4 passes.
In Mac OS:
- Repeat the process above to step 2.
- When you name the drive, select Security Options.
- Slide the Security Options slider to Most Secure in the popup window.
- Select OK.
Selecting Security Option 4 will securely wipe the hard drive to US Department of Defense (DOD) 5220-22 M standard. That should be good enough for most people!

Open Source Options to Securely Erase a Hard Drive
If you’re new to the wonderful world of Linux and open source software, then you’re in for a treat. There are a plethora of open-source options available at your disposal to securely erase the content of a HDD or SSD.
Use DBAN to Securely Wipe a Hard Drive
DBAN, Darik’s Boot And Nuke, is the most reliable, secure way to wipe a hard drive for free. It is easily equal to many very expensive data security programs and is free and open source. You will need to download the file and burn it to a DVD or USB drive before use but aside from that is very simple to use.
- Back up any data you don’t want wiped.
- Download DBAN and install it to a DVD or a USB drive.
- Disconnect any other hard drives that you don’t want to wipe including your boot drive.
- Boot your computer from the DVD or USB.
- Press Enter at the blue DBAN screen to load into interactive mode.
- Select the drive from the list in the next window by pressing space.
- Double check you have the right drive.
- Hit F10 to begin the process.
- Wait for the black Pass screen to signify completion.
- Unplug the DBAN media, reconnect your hard drives and reboot your computer.
DBAN is the nuclear option if you want to securely wipe a hard drive but there is nothing better for getting the job done!
BleachBit

BleachBit is designed to securely clear caches, delete files, erase all the content of a partition or drive, compress an image or drive for storage, and reduce the size of backups. This handy software is available for Windows and Linux, comes with a simple GUI, and can even be installed on a live USB with its portable version.
The DD Command
If you’re familiar with Linux or Unix, then you might already know about the built-in dd command. This powerful command can be used to convert, copy, and destroy data. If you want to reuse the drive, you can type: if=dev/zero of=dev/sda bs=4096
The above command will write zeros to all the blocks, a block size of 4096, in the specified device or partition, sda in this case. Remember to enter the correct drive or partition when executing this command.
If you want to sell the drive or dispose of it, you can type: if=dev/urandom of=dev/sda bs=4096
The above command will write random data to all the blocks, a block size of 4096, in the specified device or partition, sda in this case. Again, remember to enter the correct drive or partition when executing this command.
There are many great options available to you to securely erase the contents on a hard drive or solid-state drive. If you don’t like any of these options presented, peruse a few more sites for a solution that works best for you.
Disclaimer: Some pages on this site may include an affiliate link. This does not effect our editorial in any way.