Given that Wireshark is such a useful tool for checking the data packets and analyzing the traffic in your network, you might assume that running these types of checks on Wi-Fi traffic is simple. That isn’t the case. Whether you use the Linux or Windows version of Wireshark, there are a few things you have to do before you can capture Wi-Fi traffic using the tool.
The methods you’ll use differ depending on your operating system (OS), as you’ll discover in this article.
Capturing Wi-Fi Traffic in Wireshark for Linux
If you run Wireshark on a Linux-based OS (i.e., Ubuntu), you’ll have an easier time capturing Wi-Fi traffic than you would if you used Windows. Nevertheless, there are still several setup steps you must complete before you can start capturing traffic.
Step 1 – Check Your Wi-Fi Interface
Before you can capture Wi-Fi traffic, you need to check that Wireshark can detect an operable interface from which to capture that traffic:
- Open a Wireshark terminal using the “Alt + Ctrl + T” button combination.

- Type “
iwconfig” into the terminal.

Assuming Wireshark picks up an operable Wi-Fi interface, it should deliver a result that shows you the nature of that interface (i.e., IEEE 802.11) and some general information about the network. You should also see that the interface is set to “Managed,” which indicates that you’re checking an interface that’s in station or client mode.
Step 2 – Check Your Wi-Fi Card Supports Monitor Mode
Detecting a Wi-Fi interface doesn’t automatically mean that Wireshark can capture Wi-Fi traffic. Your Wi-Fi card has to support Monitor Mode. You can check this by following the below steps:
- Use the “Alt + Ctrl + T” button combination to open a Wireshark terminal.
- Type either of the following commands into the terminal:
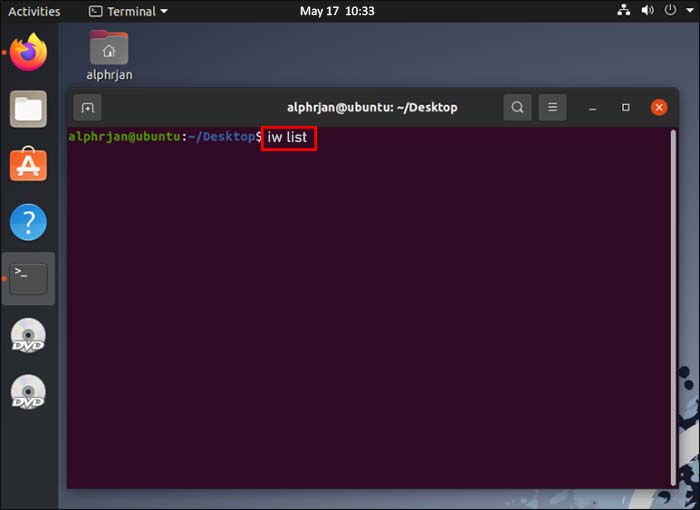
- “
iw list” - “
iw phy0 info”
- “
- Check for the presence of the word “monitor” in the “Supported Interface Modes” list.

If “monitor” is on the list, your Wi-Fi card supports the Monitor Mode necessary to sniff and capture Wi-Fi traffic. If it isn’t, you’ll likely need to replace your Wi-Fi card with one compatible with Monitor Mode.
Step 3 – Configure Monitor Mode
When you checked your Wi-Fi interface, you likely saw that it’s set to “Managed” mode. You’ll need to change that to Monitor Mode to capture Wi-Fi traffic. This example assumes that your Wi-Fi card’s interface name is “wlp3s0,” though you’ll have to substitute this with your own card’s name. You should see the name appear in the details you generate when you check your Wi-Fi interface.
Assuming you have your interface name ready, follow these steps to switch the interface from “Managed” to “Monitor” mode:
- Press “Alt + Ctrl + T” to open a terminal.
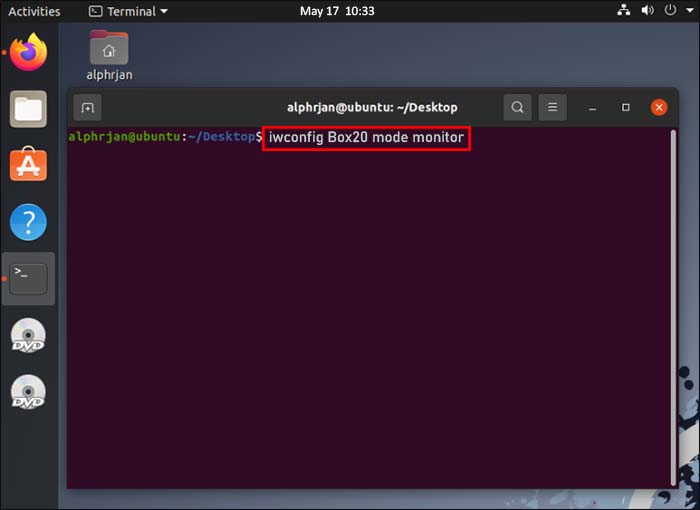
- Type “
su” to enter superuser mode, which gives you the authority to change Wi-Fi interface modes. - Enter “
iwconfigwlp3s0 mode monitor” into the terminal. Remember to replace “wlp3s0” with your Wi-Fi interface’s name. - Type “
iwconfig” again to check that your Wi-Fi interface is now in Monitor Mode.

If you already have an active Wi-Fi interface, the third step of the above process may deliver an error message that reads, “Device or resource busy.” If that happens, you can enter the command “ifconfig wlp3s0 down” (again – replace “wlp3s0” with your interface name) to deactivate the Wi-Fi interface. From there, use the above steps, and you should be able to configure the interface into Monitor Mode.
Step 4 – Select a Wi-Fi Sniffing Channel
Wireless protocols have a pair of radio frequency bands – 2.4 GHz and 5 GHz – but it’s possible that your Wi-Fi card only supports one of these two channels. You need to know which channels your card supports before you can capture Wi-Fi traffic.
Thankfully, a simple terminal command shows you the information you need to know:
- Press “Alt+ Ctlr + T” to open a new Wireshark terminal.
- Type “
iw list” and hit “Enter.” - Check the listed frequencies to see which channel your Wi-Fi card uses.
If the card uses the 2.4 GHz radio frequency band, you should see a bullet-point list of frequencies between 2,412 MHz and 2,484 MHz displayed on your screen. If it supports the 5 GHz channel, you’ll see a list ranging from 5,180 MHz to 5,825 MHz. You’ll see both sets of frequency ranges if your Wi-Fi card operates on both bands.
Each of these frequencies is a channel number you can use to detect Wi-Fi traffic. So, you’ll need to configure a single one of these ranges of channels for use in Monitor Mode.
- Scroll down the list and select a frequency. Each should have a channel number attached to it (i.e., [10]), which you’ll use to configure the channel to Monitor Mode.
- Type “
iwconfig wlp3s0 channel 10.” Remember to change “wlp3s0 to your Wi-Fi interface’s name and “channel 10” to your selected channel. - Execute the “
iwconfig” command to check that your channel is set up and in Monitor Mode.
Assuming this command works, you’re ready to configure Wireshark to capture Wi-Fi traffic. Incidentally, it’s possible that the “iwconfig wlp3s0 channel 10” will output an error, which usually means the channel isn’t available. Wireshark should automatically run an “interface up” command to cycle through channels until it finds one it can use.
Step 5 – Start Capturing Wi-Fi Traffic
With the setup complete, Wireshark should start capturing wireless packets. If you want the tool to run in the background, conducting checks as it goes, do the following:
- Open the terminal using the “Alt + Ctrl + T” button combination.
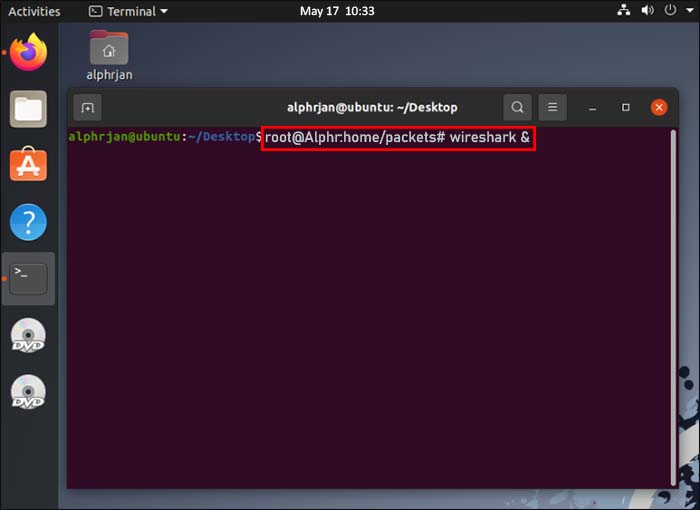
- Type “
root@<your Wireshark folder destination># wireshark &”. For example, you may use “root@test:home/packets# wireshark &”. - Navigate to Wireshark’s startup window and double-click on your Wi-Fi interface’s name.
From here, you should be able to see the “Probe Request,” “Probe Response, and “Beacon” options, as well as an array of data related to your Wi-Fi channel. Simply hit “Save” to save the data you capture for later analysis.
Capturing Wi-Fi Traffic in Wireshark for Windows
Whether you can capture Wi-Fi data using Wireshark in Windows depends on if you have the Npcap or WinPcap libraries installed on your device.
Npcap is available for devices using Windows 7 or later and can be downloaded via the Wireshark Wiki. It offers support for the same Monitor Mode used for capturing Wi-Fi data using Linux, allowing you to follow similar steps to start capturing said data via a Windows machine.
WinPcap doesn’t support Monitor Mode, meaning you can’t track Wi-Fi traffic if you have this library installed in your version of Wireshark. Sadly, you can’t update to the Npcap library if you’re using any version of Windows released before Windows 7.
Finally, installing the Npcap library doesn’t guarantee you can use it to capture Wi-Fi data. Per the Wireshark website, several underlying issues can prevent data capture, including the network adapters you have and the drivers they use.
Solve Your Wi-Fi Capture Problems in Wireshark
It’s undeniably easier to set up Wi-Fi traffic capture in the Linux version of Wireshark than it is in the Windows version, primarily because you don’t have to worry about installing the appropriate libraries for the feature. Even so, executing this action in Linux requires you to run several checks, though these are straightforward enough not to trouble Wireshark veterans.
Why do you want to be able to detect and capture Wi-Fi traffic using Wireshark? Have you tried it before, only to find compatibility issues get in your way? Tell us about your experiences in the comments section.
Disclaimer: Some pages on this site may include an affiliate link. This does not effect our editorial in any way.


