Before hosting your WordPress site or making it public, you’ll want to add widgets to ensure that all your social media icons, latest posts, about us snippets, and subscription forms are included. Fortunately, WordPress enables users to add widgets to their websites.

You’ve come to the right place if you’re struggling with widgets. This article will show you how to add widgets to your website on WordPress.
How to Add Widget to Your Website on WordPress
Widgets are commonly placed in the sidebar and footer, but this isn’t consistent for all themes. For instance, some themes may offer only the right sidebar, while others have the left and right sidebar for widgets. Whatever the case, adding the widget is done in your dashboard’s Appearance or Theme Customizer section.
Also, the process differs for the Classic and Gutenberg (Block) Editor.
Adding a Widget in the Theme Customizer
Most themes allow users to add and customize widgets from the theme editor. This method is preferred as it also shows a preview of edits in real-time. Here’s how to add a widget in the Theme Customizer section.
Classic Editor
- Open your website dashboard and go to Appearance.
- Choose the Customize option.

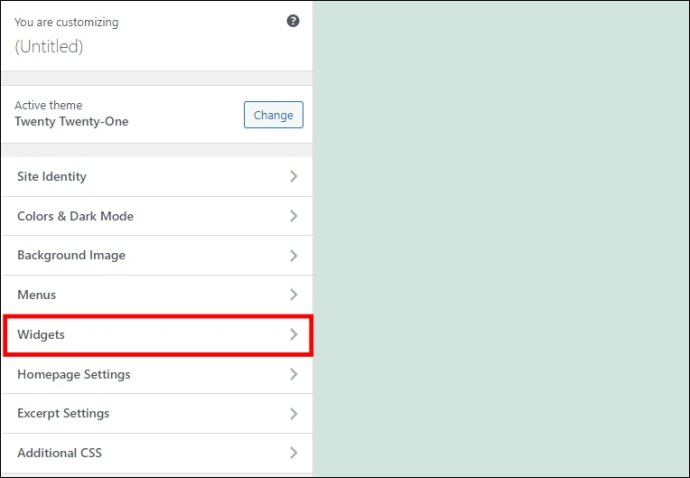
- Select Widgets from the menu options to open the page to customize widgets.

- Click the drop-down arrow for a list of the already registered widgets.
- Go to the area you want to add the widget and click Add a Widget at the bottom of the widget area.
- This will provide all the available widgets. Select your preferred widget, which will be added to the widget area. Add other widgets using the same method.
- Preview your site at the right-hand side of the screen to see if it’s well-placed. If not, arrange your widgets by dragging and dropping them in your preferred order, then click Save & Publish at the top of the screen.

Gutenberg (Block) Editor
- Go to Appearance in your admin area and select Customize.

- Choose Widgets to open the screen to customize widgets.

- Select the widget area you want to add your widget.
- Click the + icon to access the list of available widgets. Select your preferred widget to add it to the widget area.
- You can also preview your work and rearrange your widgets as you wish.
- When you’re done, click Publish.

Adding a Widget in the Appearance Section
Although WordPress supports adding and customizing widgets, your WordPress default theme may not include a theme customizer. In some themes, the feature might not be free, and if you’re using the free version, you’ll need another method to add widgets. In that case, you’ll be left with adding widgets in the Appearance section.
Classic Editor
- Open your website dashboard and scroll to Appearance in the lefthand menu bar.
- Click Widgets and select your preferred widget.

- Drag the widget to the widget area and drop it in the box.
- Click Save.

Add other widgets using the same method. You can rearrange the widgets by dragging and dropping them based on your preferred order.
Gutenberg (Block) Editor
- Open your WordPress dashboard and go to Appearance.
- Choose Widget, then select the widget area where you want to add your widget.

- Select the + icon and search for the widget you want, or Browse All to bring up all available widgets.
- Click your preferred widget to add it to the widget area.
- When you are done, click Update.

How to Remove Widgets in WordPress
If a widget is no longer serving you or you want to change the location of a widget, you can remove it. For instance, if you want a widget initially in the sidebar to the footer, you’ll need to remove the widget from the sidebar and add it to the footer. This is how to remove widgets in WordPress.
Classic Editor
- Go to Appearance in the admin area and choose Customize.

- Select Widgets from the menu options to open the page to customize widgets.

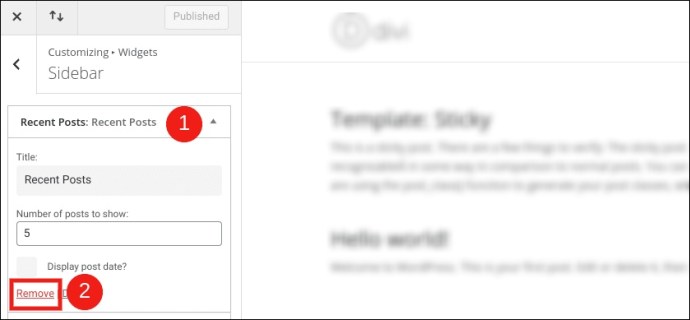
- Click the arrow before the widget area where the widget you want to remove is located.
- Identify the widget and click the down arrow at the widget’s edge.
- Click Remove.

Gutenberg (Block) Editor
- Open the Appearance section in your WordPress dashboard and select Widgets.

- Go to the widget area where the widget you want removed is placed and select it.
- Click the three-dot menu icon to open the menu options.
- Click Delete.

How to Add Widgets with a Plugin in WordPress
WordPress lets you add widgets to permanent widget areas that stay constant through different pages. For instance, your footer remains the same on your About Us and Services pages. But if you want customized widgets for specific pages, you can’t do so using the above methods.
For instance, you may want to add testimonials to the Services page so visitors see you can deliver what is promised. In that case, you’ll need a plugin to add the custom widgets. As usual, there are different plugins you can use for this. In this guide, we’ll explain how to use the Content Block (Custom Post Widget) plugin.
The first thing you need to do is to install the plugin.
Install Plugin
- Go to Plugin in your admin area and select Add New.

- Search for Content Block (custom post widget) and choose the right plugin from the search entries.
- Click Install Now and then Activate, and the plugin will be automatically added to your admin area.

Add Content Block
- Go to Content Blocks from the left-hand menu bar.
- Click Add Content Block and give it a name.

- Name your Content Block and add all the features you need.
- On the left pane, copy the shortcode, then publish the Content Block.

- Go to the page where you want to place the widget and open the visual editor.
- Paste the shortcode and publish the page or post.
You could preview the page before step 6 to be sure you’re satisfied with the changes.
Add Widgets for a Functional Website
If you blog on WordPress, you should know that widgets are important for a functional website. Without them, your site would be missing essential aspects that can improve the user experience and increase conversion.
For this reason, learning how to add widgets to your site is necessary. And as you can see, getting it done is straightforward. With the click of a button, you can have the widgets your website needs.
FAQs
No, you can’t drag and drop widgets between areas. You can only remove the widget from the first area where it is and add it all over in the new area where you want to place it.
No, it’s not compulsory to have widgets on your website. Your site can function without them, but it may not be effective.
Disclaimer: Some pages on this site may include an affiliate link. This does not effect our editorial in any way.


