Contact forms conveniently allow website visitors to contact you for inquiries and requests and even buy from you. You can add a contact form to websites built on WordPress to help customers reach you more efficiently. This article will show you how to add a contact form on WordPress.

How to Add a Contact Form in WordPress
Although WordPress has two distinct platforms for building websites, most businesses prefer WordPress.org to WordPress.com because it’s self-hosted and, therefore, more customizable. You can easily make the website your own using this platform, which appeals to business owners.
This is unlike WordPress.com, which hobby bloggers often use due to its limitations. However, the downside to WordPress.org compared to WordPress.com is that it does not come with a built-in contact form.
Fortunately, WordPress enables adding a contact form using plugins, which this article will address.
You’ll find different WordPress form plugins to add a contact form. However, for this article, we’ll use one of the most popular form plugins, WPForms. The form builder has a paid and free version, WPForms Lite. As a beginner, you can always start with this and upgrade to WPForms Pro when you need more features.
1. Install the Plugin
- Open your dashboard, go to Plugins from the menu bar, then click Add New Plugin.

- Search for WPForms in the search box.
- Select the first entry titled Contact Forms by WPForms – Drag and Drop Form Builder for WordPress, and click Install beside it.

- Click on Activate after it’s installed.
2. Create Contact Form
- Return to your dashboard, scroll through the menu bar, and click WPForms.
- On the right pane, click Add New.

- This will open the template library. Choose a template by hovering over it and clicking the Use Template button that pops up.

- To create a basic form, select Simple Contact Form. You’ll get a form with Name, Email, and Message as default fields.
- Edit the fields by:
- Click on it to change the title of the field.
- Dragging and dropping the fields to rearrange them.
- Dragging a field from the selection at the left-hand sidebar and dropping it into the required position in your form.
- Click Save when you’re done.

3. Set Email Confirmations
Email Confirmations is what your audience receives after filling out your form. It can be a thank you message or the next stage of your sales funnel. For instance, the following action after they fill out a form could be downloading an eBook or joining a community.
- Go to the Settings tab in the form builder and click Confirmations.

- Edit the default appreciation message if you wish.
- If you’re redirecting them, navigate to Confirmation Type and choose Go to URL from the dropdown menu.
- Type the URL and click Save.

4. Set Email Notifications Settings
This is the email you get when someone fills out your form. It can also be customized.
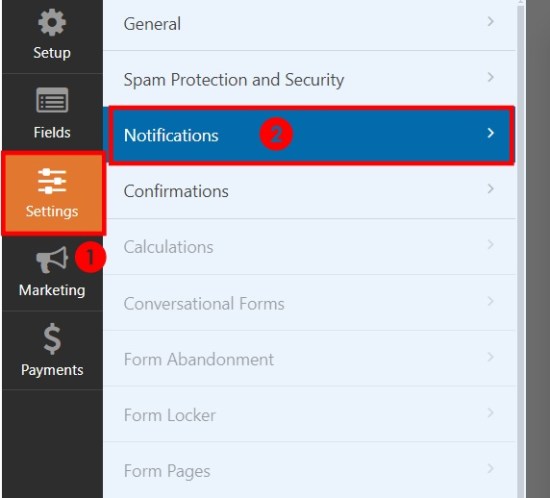
- Select Settings and click Notifications.

- Edit the fields as you require, or leave them as they are.
- Change the email address if you prefer something else. Use a comma to include multiple emails.
- The subject line is the name of your contact form, while the From Name field is automatically the user’s name.
- Click Save.

5. Add Form to a Page
After setting the above, you must add the form to the WordPress page where you want it to appear. You can use an existing page or create a new one.
- Go to your dashboard and select Pages from the menu bar.
- Click Add New Page or locate the page where you want to add the form.

- Depending on whether you are using Classic Editor or Gutenberg (Block) Editor, the process differs from here. You will have to click Publish or Update to complete the process.
Classic Editor
- Place your cursor where you want the form and select Add Form in the toolbar.
- Select the form you created, identifying it by the name you gave the form.
- Click Add Form.

Block Editor
- Click the + icon and enter wpforms in the search box.
- In the WPForms block, click the dropdown menu and select your form.

- Click Publish or Update.
Apart from a contact form, you can embed Google Maps in WordPress to show off your business’s location.
Add a Contact Form to a Widget Area
You can also add the form to a widget area, like the footer or sidebar, if you prefer. The process is the same regardless of the editor you use.
- Go to your WordPress dashboard.
- Select Appearance from the menu bar and click Widgets.

- Locate the WPForms widget and drag it to the exact widget area on the right-hand side of the screen.
- Give the widget a name and choose your created form from the dropdown menu.
- Click Save.

Get the Required Customer Information
About half of the websites on the internet are built on WordPress.org. So, it’s good that the provision was made to add a contact form to your website, even though WordPress.org doesn’t have a built-in form builder.
Thankfully, you can now add a form to your site with the guide above. Although WPForms was the example we used above, most form builders take a similar format, so you shouldn’t have an issue if you settle for another.
FAQs
However, you will need paid add-ons to integrate with services like Mailchimp, Constant Contact, AWeber, GetResponse, and Campaign Monitor.
Using outdated or ill-maintained plugins is always a security threat. You should have no vulnerability issues as long as you keep WPForms updated. It would help to consider built-in integration with Google’s reCAPTCHA and Cloudflare Turnstile to guard against spam.
Disclaimer: Some pages on this site may include an affiliate link. This does not effect our editorial in any way.


