When switching your music streaming platform from YouTube to Spotify, one concern you might have is losing your curated playlists. This is understandable because YouTube doesn’t offer an in-built way to transfer them. It can be daunting to imagine the time you’ll need to recreate playlists involving hundreds of your favorite songs. But this doesn’t need to be an issue because tech enthusiasts have invented several solutions.
Keep reading this article if you want to learn how to transfer your YouTube playlists to Spotify.
How to Transfer YouTube Music to Spotify
YouTube can’t distribute playlists because this would violate their licensing and copyright agreement with artists. So, when switching to a new music platform such as Spotify, you’ll have to recreate your playlist or use third-party tools to transfer your playlist. The latter might be the easiest way to do so.
You can find lots of paid and free third-party tools online that help you transfer your playlist from YouTube to Spotify. Let’s discuss the five best that you should consider.
1. TunemyMusic
TunemyMusic is an online tool that supports music transfer across all music streaming platforms, including YouTube, Spotify, TIDAL, iTunes, and Deezer. It has both a free and a paid plan. The free plan doesn’t have automatic syncing and limits you to converting 500 tracks. On the other hand, the premium version has up to 20 automatic syncs and unlimited conversions.
Here is how you transfer YouTube playlists to Spotify:
- Launch your browser and go to TunemyMusic website.

- Select the “Let’s start” button on the TunemyMusic home page.

- The above step prompts you to select where to source your music playlist. Tap the “YouTube” icon.
- On the new page, you need to select the playlist to move. You can either tap “Load from YouTube” or copy the playlist YouTube URL. If you choose the former, a new mini-window opens for you to log in to your YouTube account and select the playlist. For the latter, copy the playlist URL from your YouTube account and paste it into the empty box, and tap “Load from URL.”
- Select “Choose destination” on the new page and choose “Spotify.”
- Sign in to your Spotify account to start moving your playlist. When the transfer process completes, you’ll get a report of the songs added to the playlist. If a song is unavailable on Spotify, it won’t appear on your playlist.


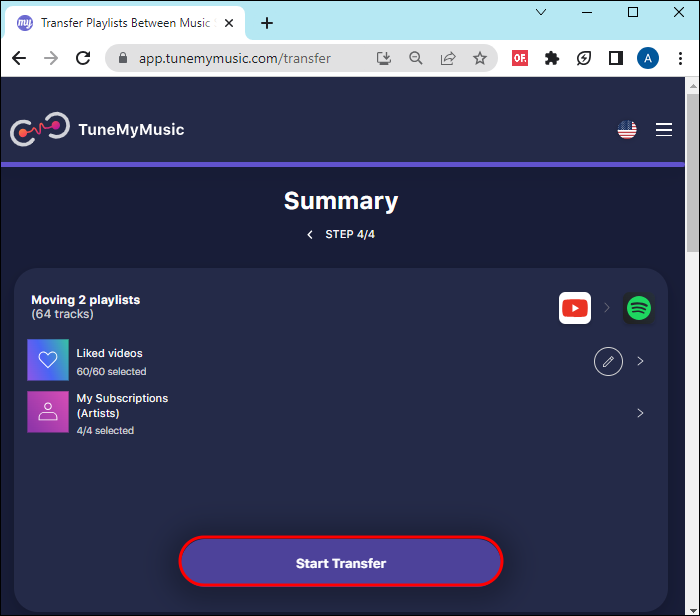
The benefit of this tool is that you can sync your YouTube and Spotify so that when you create a new playlist, it’ll appear on both music streaming platforms.
2. FreeYourMusic
FreeYourMusic is a cross-platform app on Windows, Android, iOS, Linux, and OSX. It lets you move your playlists and albums to and from all music streaming platforms. With its basic version, you can transfer unlimited songs and playlists and save them in a cloud backup. In addition to these features, you’ll access an auto synchronization feature and dedicated support if you choose the premium version.
To transfer your music from YouTube to Spotify using this application, follow these steps:
- On whatever device you’re using, download the FreeYourMusic app and follow the on-screen instruction to install it.
- Open the app and select “Transfer.” This will take you to a new window to select the source of your playlist.
- Select “YouTube” or “YouTube Music” from the options displayed. This prompts you to log in to your YouTube account.
- On the “Select destination” page, select “Spotify” and log in to your account.
- After logging in, select the playlist you want to transfer from YouTube to Spotify and wait for the transfer process to complete.


3. Soundiiz
Soundiiz is a web-based tool that can help you transfer your playlist across multiple platforms. Its free version allows you to transfer playlists with 200 tracks and has only one active sync. You can go for the premium or creator versions for unlimited features. You can transfer your YouTube playlists to Spotify using these steps:
- Open your browser and load Soundiiz website.
- Select the “Start now” button to initiate the transfer process.
- On the sign-in page, select “Sign in with Spotify.”
- Navigate to the bottom of the new page and choose “Agree” to give Soundiiz access to your Spotify account information.
- Go to the left sidebar and select “YouTube Music.” Tap “Connect” and log in to your YouTube Music account.
- Choose “Transfer” on the main screen and select “YouTube Music” as your playlist source.
- Tap the “Playlists button” and choose the playlist you want to transfer. Tap “Confirm and continue.”
- Configure your playlist on the next page and select “Save configuration.” Check if that’s the playlist you want to transfer and tap “Confirm.”
- Choose “Spotify” as your destination and wait a few minutes for the transfer to complete.


4. Youfy
Youfy is a free Chrome extension specifically designed to transfer songs and playlists from YouTube to Spotify. The good thing about this tool is that it doesn’t ask for your personal information, and you can move playlists without leaving YouTube. You can only transfer playlists with 50 videos for now, but the brand hopes to increase the number. Also, the tool allows you to import your files as .txt files.
Use these steps to transfer your playlist from YouTube to Spotify using Youfy:
- Launch your Google Chrome browser and go to Youfy’s official page.
- Select “Add to Chrome” on the right side of the screen.
- After downloading and installing, tap the “Extension icon’ in the top right corner. Look for Youfy and tap the “Pin” button to access it easily.
- Go to your YouTube account and tap “Youfy” from your pinned extensions.
- Tap “Sign in to Spotify” and enter your sign-in details.
- Select the playlist you want to transfer in the Youfy extension and tap “Transfer” Ensure your playlist doesn’t exceed 50 songs. Wait for a few minutes for the transfer process to complete.


Switch to Spotify
Let nothing hold you back when you want to enjoy Spotify’s features. Even though YouTube doesn’t allow users to transfer files to other music streaming platforms, the above third-party tools can offload the burden of having to recreate your playlists again. However, each tool has unique features—you must evaluate them to select one that matches your needs. Also, some are not free, so you should be prepared to pay.
Did you know that you can transfer your YouTube playlist to Spotify? Which third-party tool impressed you the most? Tell us in the comment section below.
Disclaimer: Some pages on this site may include an affiliate link. This does not effect our editorial in any way.