Google Sheets allows you to add text, numbers, and as of recently images to spreadsheet cells.
Until recently, if you wanted to add an image to the cell, you had to type in a complex formula. Now, Google Sheets added an option to insert an image to a cell with a few simple clicks.
This article will look at the two main ways to add images to your Google spreadsheets.
Adding an Image: The Simple Way
To add an image to the cell in the quickest way possible, you can use the new feature “Insert Image in a Cell.”
Follow these steps to insert and image into a cell:
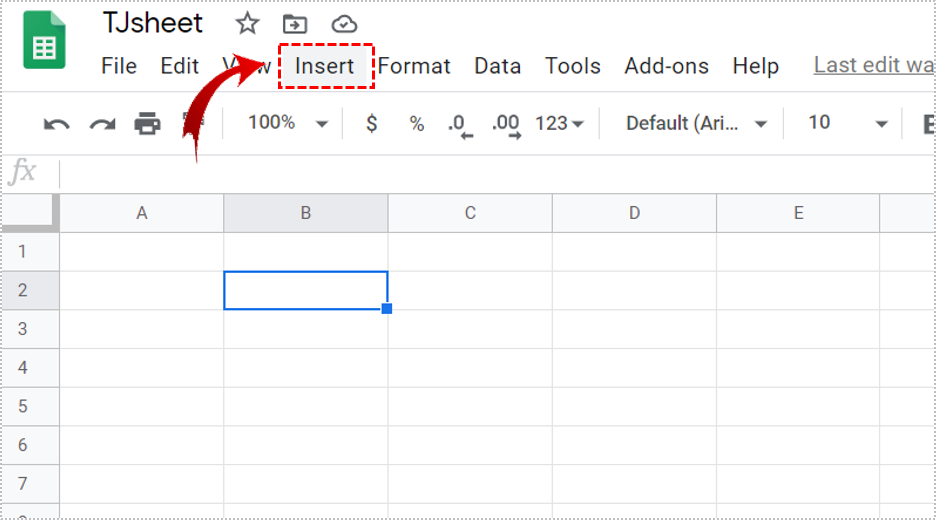
- Open your Google spreadsheet and click “Insert” on the menu bar at the top.

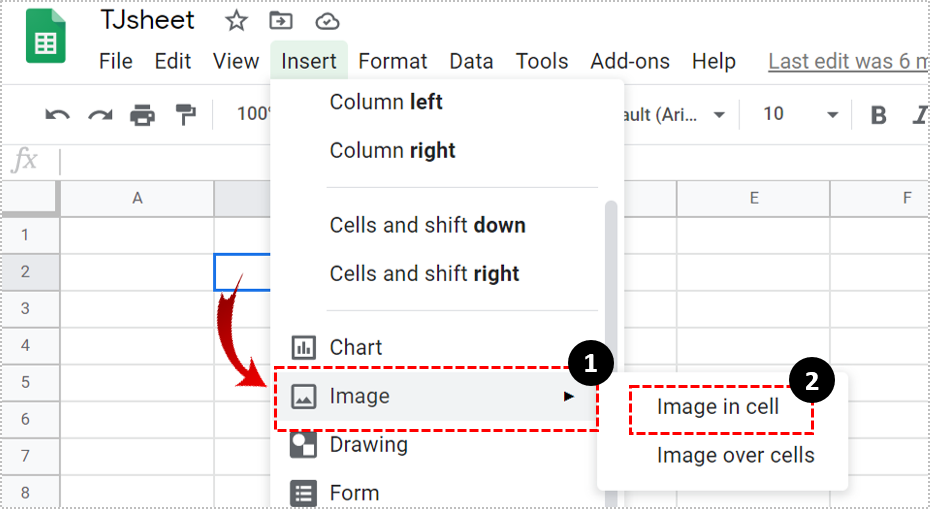
- In the drop-down menu, find “Image” and click “Image in cell.”
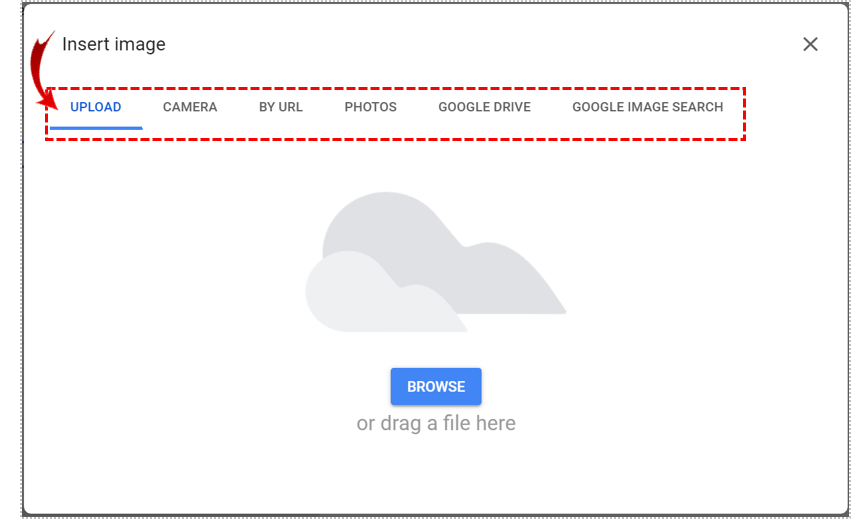
- You will see many options to add your image. You may upload it, link the URL, find it on your Google Drive, and so on.
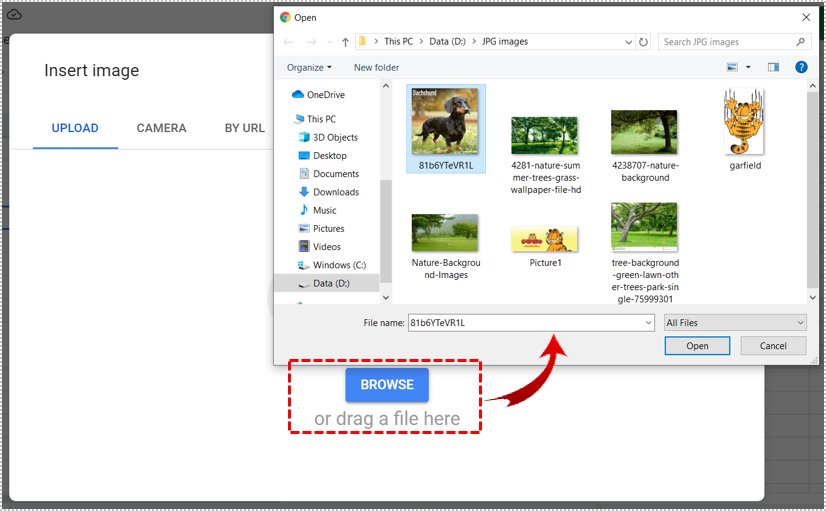
- Once you choose the option to upload, click “Browse” then select the image.
- The image will upload.

You can see that the image adapts to the size of the cell. If you want to make the image bigger or smaller, you will have to resize your cell.
To resize the cell, do the following:
- Right click on the column label (A, B, C, D, etc.).
- Click on “Resize column.”
- A window will appear where you can type the value. The higher the value, the larger the column.
- Click “OK.”
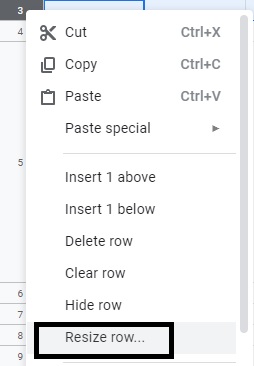
- Do the same for the row that you want to resize. Right-click > “Resize row.”
- Choose the value that you want and press “OK.” You will notice that your image has been automatically resized to fit the size of the cell.

There is also a quicker way to resize the cells. Move your mouse to the right or left edge of the main column. You should see it turn blue. Click on it and drag it until you are satisfied with the size. Then, you should do the same for the row.
Adding an Image via Function
Before you could insert an image to a cell using the method above, you needed to type in a formula.
You can still use it and it goes like this: =image(“url”, [mode], [height], [width])”
url is the link to your image. You must include the ‘http’ or ‘https’ prefix when pasting the URL of the image. Otherwise, it won’t work. You also must place it in quotation marks.
mode is the size of the image. The default mode is 1, but there are three more.
1 – adjusts an image to fit the cell, but keeps the aspect ratio
2 – ignores the aspect ratio and stretches the picture to fit the size of the cell
3 – leaves your picture in its normal size and crops it if it’s larger than the cell
4 – you can customize your own size
None of these modes will resize the cell. They refer only to the image. When you set the mode to 4, you can change [height] and [width]. The value should be in pixels.
So, how do you insert an image with a formula?
- Find the URL of the picture that you want to insert. If it’s on your hard drive, you can upload it to Google Drive or Google Photos and copy the link from there.
- Open your Google spreadsheet.
- Choose a cell where you want to insert the picture.
- Type the formula with the chosen mode and size.
- Hit Enter and the picture should appear.
For example, if you want to add this image of a pencil and notepad, you should type:
=image(“http://www.google.com/images/icons/illustrations/paper_pencil-y128.png”)
This will load the image adjusted to the size of the cell with the correct aspect ratio.
If you want to define the default size of the image, you should type:
=image(“http://www.google.com/images/icons/illustrations/paper_pencil-y128.png”,4,35,60)
Here we have an URL with quotation marks, mode 4, and height and width in pixels.

Insert Image Over Cells
When you go to Insert > Image, you will see an option labeled ‘Image over cells’ just below ‘Image in cell’. When you choose it, your picture will appear in front of the cells. It will not adjust to the cell borders and the edges. Instead, it will go over them.
This means that the image will cover the content in the cells and make them invisible. Sometimes when you want to design your spreadsheet in a certain way, you can use this function, too.

Which One Is Better?
Now that you know the easier and the more difficult way, you can make your preference. The simple way is quick and convenient, but the formula allows you more customization.
Both options allow you to make your documents richer and better organized, so make sure to remember these steps well!
Have you used the newer, simpler method of inserting photos into cells in Google Sheets? Let us know if you have any tips, tricks, or questions in the comments below.
Disclaimer: Some pages on this site may include an affiliate link. This does not effect our editorial in any way.