Reaper is one of the most popular and widely used Digital Audio Workstations (DAW). As such, it provides a comprehensive suite of effects and filters that you can add to your tracks. However, this DAW primarily caters to musicians who need professional music production software.
Therefore, it might be hard to find your way around all the options. The following sections focus on adding reverb in Reaper and aim to provide an easy-to-follow guide to prevent trial and error.
Before You Start
The guide assumes that you’ve already uploaded a track into Reaper, and it’s ready to be mixed. So the steps won’t include actions to open, prepare, or record tracks in the software.
Reverb is part of the essential effects available in Reaper, and you don’t need to install third-party plugins or effect packs. Aside from reverb, the basic package also includes flanger, delay, and compression plug-ins, to name but a few.
Adding Reverb
As indicated, reverb is a part of Reaper’s arsenal. Aside from adding effects to tracks, the software allows you to add effects, reverb included, to items. But this topic merits its own article, so we’ll stick to adding the effect to a track.
With this in mind, the article does offer tips and tricks on how to add more effects, and organize, and tweak them.
Step 1
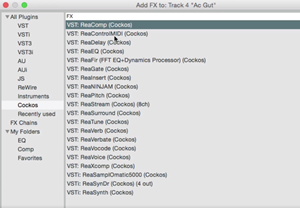
First, you need to click on the FX button in the main track window. That brings up a menu that features all available tracks and plug-ins.

To quickly locate reverb, click on the search box next to the “Filter list” and type “reverb.” The search results feature all the reverbs available within the software.
Step 2
Find the reverb that you would like to use and double-click on it to add the effect to a track. As said, this filter will affect the entire track and all its items. Once the effect has been added, the small FX button turns green, and you can see the added effects when you hover over it.
Step 3
At this point, you can access the reverb customization window and tweak the default settings to your preference. The main gain slider is on the far- right side of the window, and you have more options just under the effects waveform.

Note: The active effect or plug-in has a checked box in front of its name. If you uncheck the box, that effect is bypassed on the entire track.
Adding More Plug-Ins on Top of Reverb
One of the best things about Reaper is that it’s super easy to add more plug-ins once the first one is in place. To do this, click the Add button at the bottom left of the effect window and choose one from the list.
The effects are included one after another in the order that you’ve added them, and it’s easy to move them up and down. Hover over the effect you’d like to move, click and hold, then move it up or down. Of course, you can also change the effect’s properties and bypass just one of them.
Tip: To quickly get to the reverb or any other effect, right-click on the FX button and select one from the drop-down window. For better control and usability, consider organizing the effects in folders.
Organizing Reverb Effects in Folders
If you like using reverb, you can put all the related effects and plug-ins in a single folder. When you open the “Add FX” window, right-click on an empty spot and select “Create new folder.”
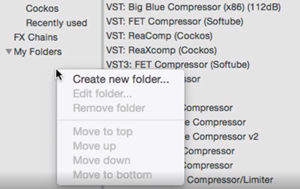
Name the folder Reverb and click the search bar to narrow down the selection to all reverb effects. Select all reverb plug-ins and move them to your new folder.
Now, you can go into the folder and delete the ones that you’re not likely to use. This action doesn’t permanently delete the plug-ins; it only removes them from the folder you’ve just created.
Expert Tip: Utilize the method mentioned above to create a Favorites folder. Then drag and drop all the plug-ins you frequently use to the new folder. This way, you get super quick access because the Favorites pop up when you right-click on the FX button.
Creating FX Chains
Reaper allows you to create an FX chain from the effects you’ve selected for the track. To do it, you should open the active filters/plug-ins, select them, and right-click on the selection.
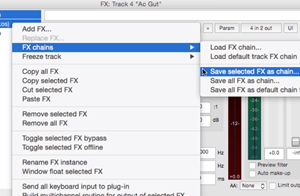
You choose “Save all FX as chain…” and you’re good to go. You can select everything except the reverb and isolate it as an FX chain. In this case, you choose “Save selected FX as chain…”
When creating chains, make sure you give them exact names for better navigation and editing. If you choose to use just the reverb, you can save the effect by right-clicking on it.
Shooting for a Grammy
This quick tutorial scratches the surface of what’s available on Reaper. The important thing is that it’s relatively easy to add reverb when you understand the necessary actions. However, customizing the effects to get the most out of your track is a different question altogether.
How long have you been using Reaper? What kind of music do you produce? Tell us more about your music ventures in the comments below.
Disclaimer: Some pages on this site may include an affiliate link. This does not effect our editorial in any way.