Device Links
Adding a table of contents is a useful way to organize the topics or chapters in your Google Document so that readers can quickly peruse and find exactly what they’re looking for. It also adds a touch of professionalism to the whole thing.
Regardless if you’re an employee whose company requires the use of Google Docs for business documentation, an author writing a novel, or a student writing a lengthy essay or dissertation, there is a good chance that you’ll require a Table of Contents.
Thankfully, Google Docs has provided a feature that can create a Table of Contents that will generate links to each section marked with a header. Technically, you could just create a ToC manually, but creating all of the links for every section could prove to be a major pain. So, to avoid any unnecessary obstacles that would present themselves when attempting to do it all yourself, I’ll provide the steps to add a ToC using Google’s built-in option in the section below.
Creating a Table of Contents in Google Docs
When walking you through the process of adding a ToC to your Google Doc, know that it can be done using any browser, though Google Chrome would be the obviously preferred choice. You will also not have a need for any third-party extensions or applications in order to pull it off.
Headings will be very important for your document. Even more so if you plan to add a ToC to it. You’ll need to ensure that your headings are consistent and that you’re using the correct ones for the right things.
Heading 1 should be used as the primary name of the section or for a chapter. If you have to breakdown a section into smaller topics based around what the section is meant for, you can then use the next sized heading. But you will still return to Heading 1 once the next section begins.
Making sure that your document is properly formatted will make the entire process go that much smoother. If you need to go back and change the sizes of the headings:
- Scroll through your document and locate your first title, highlight it, and then select Heading 1 from the Styles drop-down.

You’re going to want to do this with every title or section. Anything that is in the Paragraph style will not be featured within the Table of Contents. Once you have the formatting complete, you’ll now be able to add the ToC.

Adding A Table of Contents Using The Built-In Google Doc Feature
It is important that you place your cursor where you want the ToC located. You can place the insertion point anywhere you want the table of contents to go in your document. You might want it at the beginning of the document or the end as this is typically where you’ll find a ToC. The more professional area you’ll find a ToC will appear after the initial title but before the introduction or body of your document.
When you’ve decided on the spot for your ToC, left-click the area. Follow this up by clicking on the Insert tab and highlighting Table of Contents in the menu. You’ll be presented with two options from which to choose.

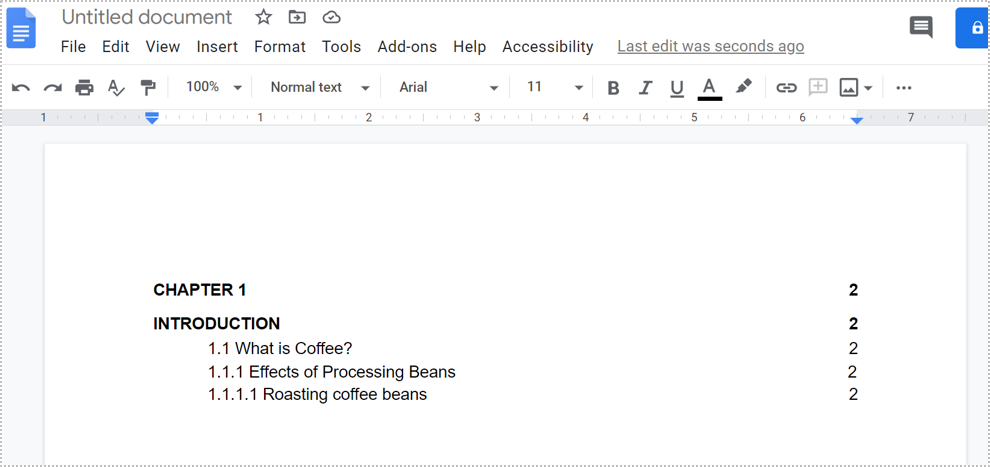
- Option 1 – This a plain-text table of contents with numbers on the right side.
- Option 2 – This option doesn’t use page numbers, but instead inserts hyperlinks that jump to the noted section.
Your choice should be determined by the type of document. The one with numbers is meant for documents that you intend on printing out. The option with links is meant for online viewing. If the document is an assignment you need to turn in, the first option is the best one. Planning on posting the document live to the web? Choose the second option. Once you’ve clicked an option, Google Docs will automatically generate the ToC and place it where you selected.
The second option relies on your ability to use the correct headings for your chapters, topics, or sections place in the document. This point was already hit on previously but I feel it necessary to go over it once more. If your intent is to generate a table of contents that links to specific sections of your document, you must format each chapter—or title—using the correct heading styles. This lets Docs know how to populate the table add clickable links.

Each heading style is treated slightly differently in the table of contents. The Heading 1 style denotes a top-level entry in the table of contents. Headings using the Heading 2 style are considered subsections and appear indented under the preceding Heading 1 style in the table. Heading 3 is a subsection of Heading 2, and so on.
If you have to change your headings in any way (or any changes that affect your ToC), you can update your table of contents to reflect those changes. Just click on the table of contents in the body of the document and then click the Update Table of Contents button.

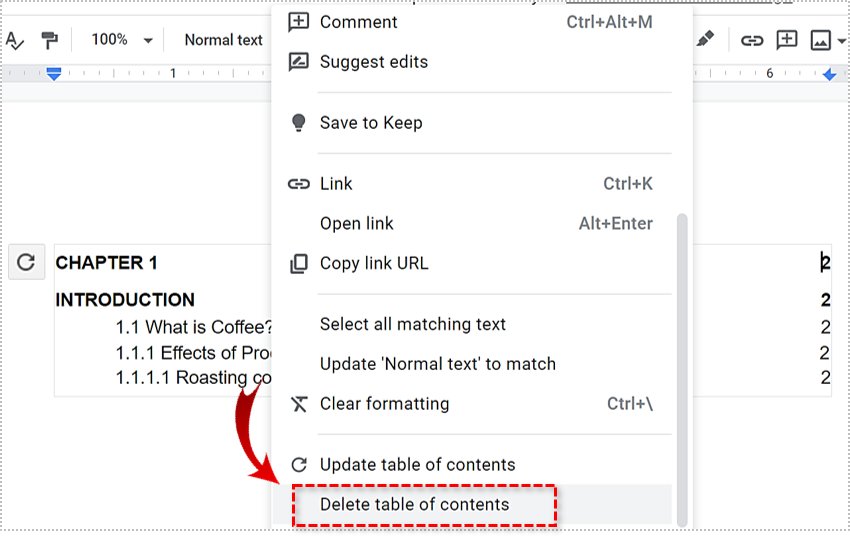
To remove a table of contents from your document, all you have to do is right-click it and select Delete Table of Contents.
Creating a Table of Contents on Android
Unfortunately, Google Docs currently doesn’t offer this feature on Android, you’ll have to use a computer or iOS device.
Creating a Table of Contents on an iPhone or iPad
- Open up the document you want to add the table of contents to in Google Docs.
- Now, tap Edit at the bottom of the screen.
- Then, tap where you want the table of contents and select Insert at the top right of the screen.
- Next, select Table of contents.
- From here, select your table of contents appearance.
Using Google Docs
Google Docs has a ton of built-in useful features. The fact that it’s free to use makes it all the more ideal. With the steps mentioned above, you can make navigating through documents as simple as clicking the mouse.
Disclaimer: Some pages on this site may include an affiliate link. This does not effect our editorial in any way.