Most people disregard their network’s Wi-Fi settings after the initial setup. However, the default channels are crowded, which often causes slow Wi-Fi connections. Changing the Wi-Fi channel can improve the performance and your internet speed.
If you’re having trouble with changing the Wi-Fi channel, read on.
Changing the Wi-Fi Channel on Your Router
Let’s cut to the chase. First, here’s how to change the Wi-Fi channel on your router:
- Find your router’s IP address (default gateway) on the back or in the router manual. You can also type “ipconfig” in the command prompt. Insert your IP in an internet browser on your computer. It will look similar to this: 192.168.1.1.

- Enter your router’s username and password to log in. The details are located on the back of your router if you haven’t changed them. Default credentials are usually “admin,” and the password is usually “password” or “wireless.”
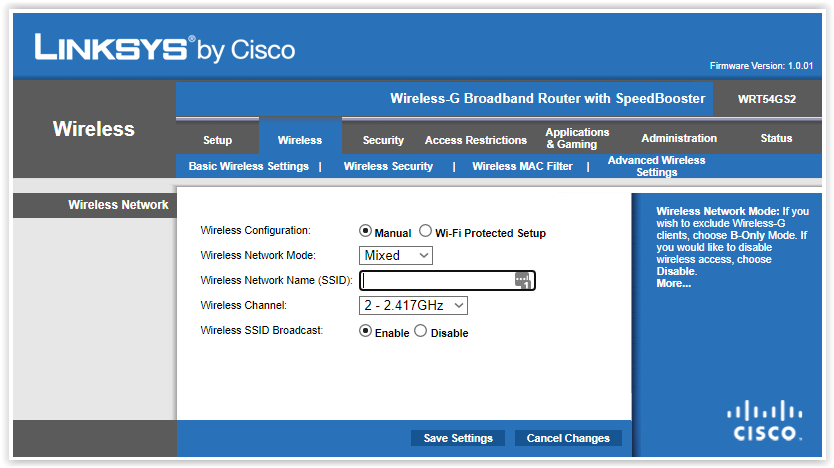
- Access the wireless settings, or the advanced settings, depending on your router. On D-Link routers, you need to select the Manual Wireless Network Setup. The steps may vary slightly for different router brands, but the principle is the same.

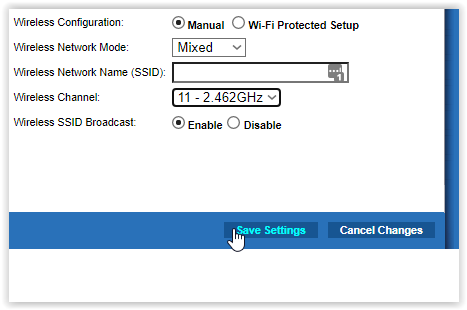
- Then, look for the Wireless Channel, and change it to a more optimal one. If you have split wireless for 2.4 GHz and 5 GHz connections, change the channels on both frequencies.
- Save the changes and log out from the page, if applicable.

Finding the Optimal Wi-Fi Channel
Changing the Wi-Fi channel is not so hard, but finding the optimal channel is a little trickier. First, you need to understand why you are changing the channel. When you set up your router for the first time, it will automatically connect to the most optimal Wi-Fi channel.
However, in most cases, that channel is not so optimal. That’s because many people around you may be using the same channel. They are not connected to your network, but you share the same Wi-Fi channel, causing interference and slow Mbps or MBps transfer rates.
When too many people connect to the same channel (on your Wi-Fi), it gets crowded. Your internet performance goes down. In other words, your data speeds become sluggish, and the router is not using its full potential. That’s why you want to change the Wi-Fi channel.
You can try the channels out one by one manually. Also, you can use a third-party app, and there many of them available for different devices. Here are some suggestions.
Use Third-Party Apps to Detect Optimal Wi-Fi Channels for Your Router
Many apps can detect your local Wi-Fi channels and more, but not all of them are reliable or practical. NetSpot is an excellent channel finder app for Mac and Windows users.
You can use the seven-day trial to find the currently most optimal channel, but you need to subscribe or opt for the free version if you want to keep using the app. We’ll leave that to you, but the trial version is just enough for the task at hand.
If you’re on Android, you can find many Wi-Fi Analyzer tools on the Play Store. Wi-Fi Analyzer by farproc and WiFi Analyzer by olgor.com are great options, and they’re both free.

Apple users can download the Network Analyzer by Techet. The app is free, and it doesn’t take up much storage space.

The tools above give you details on your Wi-Fi network and offer you the best channels for your router. Note that you need to grant them access to your location.
Once you fetch the best Wi-Fi channel for your particular setup, go back to the first section with the instructions, then select that channel in the advanced Wi-Fi settings of your router. You should see an improvement right away.
Testing a Wi-Fi Channel
After you apply changes that include a new Wi-Fi channel for your router, go online, and test your download and upload speeds.
Speedtest by Ookla is an excellent option to check your bandwidth speeds. Press the big “GO” button in the center, and the tool will calculate your current internet speed (in Mbps). Note that you will never have the connection speed you bargained for with your internet provider. You may get close to your package’s maximum speed, but only if you are close to the server base or have an outstanding provider.
Enjoy Better Wi-Fi with a Better Channel
Hopefully, this guide helps you get a better Wi-Fi experience in no time. The instructions from the second section of the article should work on all popular router brands, including D-Link, TP-Link, Asus, Google, Netgear, and others.
Have you managed to improve your internet speed by changing the Wi-Fi channel? Have you found the new channel manually, or did you use a 3rd party app?
Disclaimer: Some pages on this site may include an affiliate link. This does not effect our editorial in any way.


