You can’t access a Chromebook tablet or laptop without your email credentials. However, your Chromebook might refuse your email address or password and prevent you from logging in. You can get a range of error messages with hints to where the problem is.
Luckily, there are fixes and solutions for every error message you might get. We’ll go over them one by one and then explore recovery options.
Password and Account Verification Problems
If you’re unable to connect to your Chromebook, you might encounter one of numerous error messages. However, there are three that point specifically to password and account verification issues. These include:
- “Wrong password. Try again”
- “Couldn’t find your Google Account”
- “Sorry, your password couldn’t be verified”
In case you see one of these after a failed sign-in attempt, you should first ensure that you’ve entered your Google account’s correct name and password. Retype both of them and press Enter. If that fails, check whether Chromebook is connected to the internet and if the connection is strong and stable.
In case you changed your account’s password lately, you can try to log in with the old one. Not everyone who uses a Chromebook also has a Google account. If you don’t, check twice if you’ve entered the email address correctly.
Finally, if all else fails, go to Google’s account recovery page.
Connectivity Problems
If your Chromebook is having troubles with Wi-Fi, you might get this error message after an unsuccessful attempt to sign in: “Your username or password cannot be verified on this current network.” Basically, Chromebook’s trying to tell you that the existing Wi-Fi network is not sufficiently strong or stable.
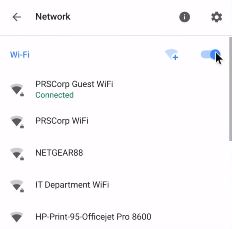
To remedy this, you should consider resetting your Chromebook’s Wi-Fi. Here’s how it’s done.
- Click on the Wi-Fi icon at the bottom-right corner of the screen.
- Click on the on-off slider button to deactivate Wi-Fi.

- Click on it once more to activate the Wi-Fi.
- Wait for the Chromebook to sign in to your network and try to log in.
If that doesn’t help, you might want to sign out of the current network and sign into another one. To do this, follow these steps.
- Click on the Wi-Fi icon at the bottom-right corner of the screen.
- Click on a network on the list that you’re not signed into.
- Provide the password, if prompted.
If there’s still no result, you might want to try other methods listed on this page.
Deleted or Disabled Account
In case you see the “Your account may have been deleted or disabled” error message, the only solution is to sign in with another account.
Disabled and deleted accounts are prohibited from signing into any and all Google services. Instead of the above error message, you might get redirected to this page. Alternatively, Google might notify you with a text message or an email that the account you tried to sign in is disabled or deleted.
You can ask Google to give you your account back. Here’s how to do it.
- Try to sign in to your disabled or deleted account.
- Next, pick the “Try to restore” option.
- Follow the instructions.
Alternatively, you can go to this page and fill out Google’s official account restoration form.
Lacking Permissions
If you’re not the owner of the Chromebook you’re trying to sign into, you might get the following error message: “Sorry, you don’t have permission to sign in.” This can happen if the owner revoked your rights to sign in, whether accidentally or on purpose.

There are only two ways out of trouble here. The first one is to talk to the device’s owner and persuade them to give you the permission you’re lacking. If the owner’s not around or you can’t reach them, you can opt to log in as a guest. To do so, click on the Browse as a Guest button on the sign-in screen. It should be near the bottom of the screen.
Network Activation Problems
On rare occasions, a Chromebook might fail to activate the Wi-Fi network before you try to log in. If you get the “Before signing in, please start a Guest session to activate the network” error message when you try to log in, you should sign in as a guest. Chromebook will then guide you through the network setup.
In case the message appears again after you’ve established a connection, you should try to connect to another available network.
Hard Reset
Regardless of the error message you get, you can always try to perform a hard reset. This simple and effective method is known to solve many software-related issues on a Chromebook. To do that, follow these steps.
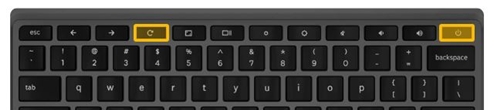
- Turn off your Chromebook completely.
- Press together the Power and Refresh buttons on the keyboard.
- Hold the Refresh button until the device reboots.
Here’s how to hard reset a Chromebook tablet.
- Press together the Power and Volume Up buttons.
- Hold them for 10 seconds, at least.
- Release the buttons and wait for the device to reboot.
Some Chromebook devices have special reboot procedures. Check the “Other ways” section on this page. If your model is on the list, follow instructions below its name.
Once your Chromebook reboots, try signing in again.
Don’t Stay Locked Out
Chromebook laptops and tablets might prevent users from signing in due to various software and network issues. However, the methods presented in this article should solve your problem. If you still can’t connect, you might want to contact Google support.
Have you ever been locked out of your Chromebook? How did you solve the issue? If we’ve missed a good troubleshooting method, let us know in the comments section below.
Disclaimer: Some pages on this site may include an affiliate link. This does not effect our editorial in any way.