The desktop of any computer serves an important part of everyday life. For some, the desktop serves as a way to customize your computer, with different backdrops and wallpapers that allow you to feel at home while on your computer. Other people use their desktop as a way to save files currently being worked on at any given time, from important tax documents to Photoshop or Illustrator files. We’d bet, however, that the largest percentage of people choose to keep their desktop as a way to manage and launch their applications, keeping system shortcuts on the left side of their desktop right alongside photos and documents. No matter whether you’re the kind of person who micromanages their desktop to keep things clean and tidy, or if you’re someone who lets icons and documents live on your computer without care, making your desktop feel like your own is an essential part of customizing your computer.
If you happen to own a Chromebook, however, things get a little more complicated. Chrome OS doesn’t allow you to pin documents to your desktop, which basically makes most users opt for using the desktop as a way to display some of your favorite photos. There’s no way to display anything beyond the wallpaper you enable in settings, which may make the Chromebook launcher seem a bit disappointing compared to MacOS or Windows 10. However, Chrome OS doesn’t just feature a desktop interface, but a full app launcher, capable of launching applications and other content right from the desktop. Chrome’s launcher is similar to the start menu in Windows, but with the features and visual flourishes you might expect from Android. It’s an interesting way to recreate a computing experience, and it’s easily customized for those looking to tweak the way Chrome works.
There are quite a few ways to customize the launcher built into Chrome OS, so if you’re missing the customization that comes from Windows and MacOS desktops, there are plenty of options from here. Whether you’re looking to change up the app shortcuts in your shelf, or you’re looking for fully-fledged shortcuts to make using your device a little easier, we have some advice on how you can make your Chromebook feel like home.
Can I Use Android Launchers on Chrome OS?
The last year and a half has seen Google make efforts to launch the Play Store—and with it, the entire library of Android apps—on Chrome OS. The rollout has been slow, far slower than Google likely expected when the feature was announced in 2016, but surely, older laptops have been pushed updates to ensure they can run Android applications. Newer Chromebooks, meanwhile, have largely been shipping with the feature ready out of the box, and both last year’s Samsung Chromebook Plus and Pro lineup and Google’s own Pixelbook have pushed the app angle in their advertising.
Not all Chromebooks are currently capable of running Android apps, but at this point, most modern devices have at least received the update in the form of a beta. This means some longtime Android users may be wondering whether they can put their Android knowledge to the test by using a third-party launcher on their laptop to power their apps and recreate the experience of using an Android device on a laptop. Android’s wide variety of third-party launchers, including Nova Launcher and Action Launcher, have made the platform legendary for its ability to easily customize and change the experience of using a tablet or phone with a few short steps. Considering the ease of powering an Android device with a third-party launcher, why wouldn’t you want to try using one on Chrome OS?
The problem, of course, is that Chrome OS is quite the unique platform. Unlike Android, Chrome OS uses both Chrome apps and Android apps, and manages to differentiate between the two on the platform. Most of Chrome OS is built on top of using the universal web, whereas anything you’re looking to do with Android is split into their own apps. It’s why Chrome OS users have run into issues where they have two different versions of apps (the Chrome version and the Android version) installed on their devices. An app launcher will only be able to show you the Android apps installed on your device, which means no Chrome apps, no shortcuts, and perhaps most importantly, no access to the standard version of Chrome. Android launchers on Chrome OS are also run in a window, which means the only thing running Nova or Action will do to your productivity is slow things down and make simple actions a whole lot more complex.

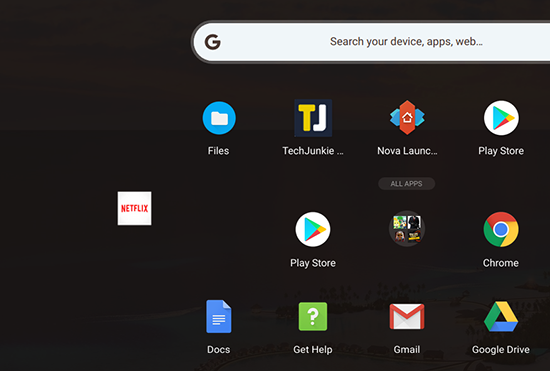
So, the answer is yes, you can use Android launchers within Chrome. But you won’t want to, because their utility is limited based on how Chrome works. There’s no benefit gained from using a launcher inside Chrome, and it actually could be considered harmful to your day to day use of the platform. Instead of leaning into using an Android launcher with Chrome OS, you should make some changes to how your device works within the exist desktop and Chrome launcher. There are three major pieces to the Chromebook experience: the desktop, the shelf, and the drawer. We’ll discuss all three below, along with some notes on other options you can use if you’re looking for a more smartphone-like Chrome experience.
The Desktop
As we mentioned in the intro, the desktop on Chrome OS devices is fairly limited in terms of customizability. If you’re the kind of person who likes to store documents or app shortcuts on your computer’s desktop, you’re out of luck when it comes to using a Chromebook. Chrome OS’s developers have made it clear through a number of bug reports that they have no interest in adding the ability to host icons and documents on a desktop, Windows-style. Instead, the team behind the updates being pushed to your Chromebook really want the desktop to function as a way to display your favorite backgrounds and photos, but really nothing more. If you’re coming from Windows or MacOS, this might seem strangely limiting, but it’s how Chrome OS works, and it’s how Chrome OS will continue to work for the foreseeable future.
Wallpaper
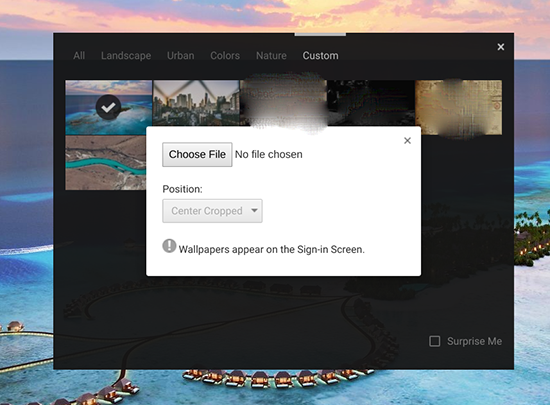
So, this makes the wallpaper the only seriously-customizable portion of the desktop, which means you’ll want to make sure you use it to your advantage. Changing the desktop wallpaper can be done in two ways, and both accomplish the same task. First, try right-clicking anywhere on the wallpaper of your computer (on most Chromebook touchpads, you can click with two fingers to emulate a right-click). Three options will display in the context menu, and all three will be discussed in this guide. For now, however, click on the selection on the bottom of the list, “Set Wallpaper.” This will open Chrome’s wallpaper selector, which has a few different options we should mention.

Along the top of this box, you’ll see the categories for Chrome’s included, default wallpapers. The “All” tab allows you to view all wallpapers on the device, while the other four categories (“Landscape,” “Urban,” “Colors,” “Nature”) allow you to limit your choices to those genres of backdrops. These categories will sound familiar to any Pixel owners, as Google’s Wallpaper app uses the same types of wallpaper genres. The final tab, “Custom” allows you to select a wallpaper you’ve added from the web or from your personal files, though you may not see any saved photos here if you’re new to the operating system. At the bottom of your Custom list, you’ll see a blank wallpaper with a Plus (+) symbol. Click on this icon to open your collection of personal photos and wallpapers inside of the wallpaper picker.
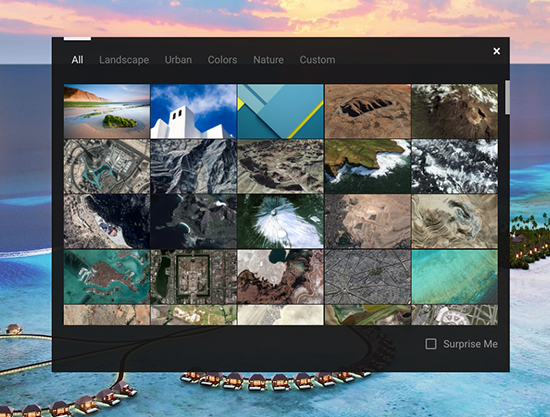
You can only open one wallpaper at a time, and the wallpaper you select will automatically be designated as your Chromebook’s wallpaper for both your desktop and your sign-in screen (there’s no way to differentiate these at this time, as you can on Android, so make sure your wallpaper is safe for your environment, be it home, school, or work). You can add as many wallpapers to this list as you feel appropriate, and they’ll also appear in your “All” tab.
If you don’t care what wallpaper is, setting the “Surprise Me” checkbox at the bottom of this prompt will automatically select a wallpaper from the entire collection. Unfortunately, there’s no way to currently select a subsection of these wallpapers with “Surprise Me;” it will always select a random wallpaper from the entire wallpaper library. “Surprise Me” is designed to select a new wallpaper once a day, so you may want to make sure your wallpaper collection is safe for work.
If you just want to choose a single image you have saved on your Chromebook to be your desktop wallpaper, you can skip using the entire wallpaper selection tool and dive into your file browser to select the file you want. Find your photos, either in your Downloads folder or wherever you have them saved, right-click on the file, and select “Set Wallpaper” at the bottom of the list. It’s important to note that this won’t add the file to the Custom section of the wallpaper picker on your device, so if you want to include that photo inside of the standard wallpaper selection tool, you’ll have to add it manually as described above.
The Shelf
While the desktop may not have a large selection of customization options outside of changing the wallpaper, the shelf allows you a lot more freedom. Chrome OS’s shelf is used how the dock is used on MacOS and the taskbar is used on Windows 10, but with a cute nickname for the utility. It displays your currently-open applications in an easy to see layout, and allows you to pin your favorite apps and websites for easy access. You can rearrange every app within your shelf, and you can also change how the shelf displays on your device. Let’s take a look at how to use Chrome OS’s main app launcher in a way that feels right for you.

Adding and Removing Apps
This one is easy, especially if you’re familiar with the docks available on MacOS, Windows, or even iOS and Android. Chrome OS has a full app drawer, similar to Android, hidden behind a menu icon, which means you don’t necessarily need to keep every app you have on your device pinned to your dock. Still, it’s a good idea to use the shelf to save your favorite web and Android apps to the device, since it speeds up the process of launching your content.
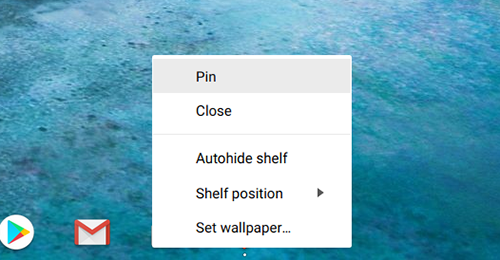
To add an app to your shelf that is already running on your device, right-click on the icon in your shelf to load the context menu for the application. Five choices will appear here, though only two of them directly apply to the app you’re looking to pin to your document. At the top of the list, you’ll see “Pin;” pressing this option pins the file to your shelf permanently. There’s no visual indicator that anything has changed once an app has pinned. The white dot that appears below an icon remains there whether or not an application has been pinned. However, once you close out of the app, the icon will remain in your shelf instead of closing and disappearing from the dock, which allows you to relaunch the app without opening the App Drawer.
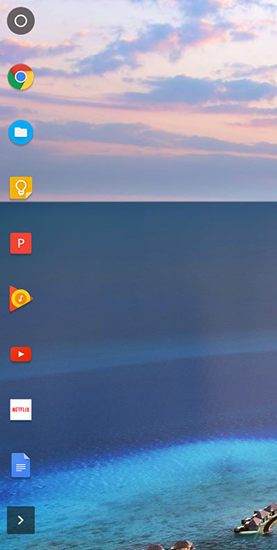
Apps that aren’t pinned to your shelf are pushed to the far right of the dock, and can only be dragged and rearranged with other unpinned apps (dragging an app to the left will only move through unpinned apps; pinned apps act like a wall to your open, unpinned applications). However, once an app is pinned to your shelf, you can quickly and easily move the software around your device, allowing you to move your pinned apps in any order you want. Finally, if you’re looking to add a lot of pinned apps to your shelf, you should be aware that, once the shelf has filled, a small arrow icon will take its place at the far-right of your dock. This will show the rest of your pinned and open apps once you’ve run out of room, itself acting almost like a miniature version of the App Drawer we’ll discuss below. Unlike Windows and MacOS, you can’t resize the shelf without resizing the entire display along with it.
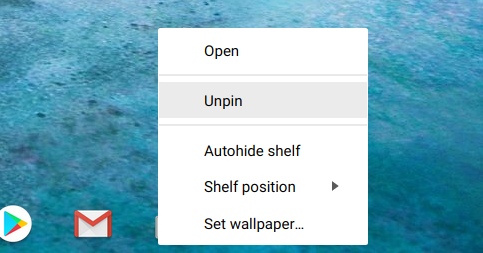
To remove pinned apps from your shelf, repeat the steps above and select “Unpin” at the top of the context menu. If the app is currently open on your device, nothing will change visually, but the app will disappear from your dock once closed. Likewise, if the app isn’t running, the icon will fade away from your shelf once unpinned. Any app can be pinned and unpinned as you wish, with the exception of the Chrome icon which, by default, is on the far-left of your dock, next to the launcher icon. Right-clicking on Chrome will allow you to close the window, but you won’t have an option to unpin it from your shelf.
Pinning Web Pages
Like apps, web pages can also be pinned to your device for easy access. Any one of your bookmarks, social networks, or favorite news sites can be added to your device easily, just with the quick click of a button. Pinning tabs and web pages makes a ton of sense, since the majority of Chrome’s apps work and display as web pages anyway. This way, launching your favorite sites can be done like launching an app on Android or iOS, but with the ease of use and access that we’ve seen from Chrome OS.

To pin a web page to your shelf, open the page you want to add to your dock in Chrome. Chrome allows for pages to be “pinned” within the browser, but to add a page to your shelf, we’ll have to go into Chrome’s menu interface. Right-click on the triple-dotted menu icon in the top right corner of your display and scroll down the list until you find “More tools;” arrow over this selection. Here, you’ll see several options, including the standard Chrome extension menus that are available within Chrome on any platform. However, a few of these options are limited solely to Chrome OS devices, including “Task Manager” and, for our uses, “Add to Shelf.”
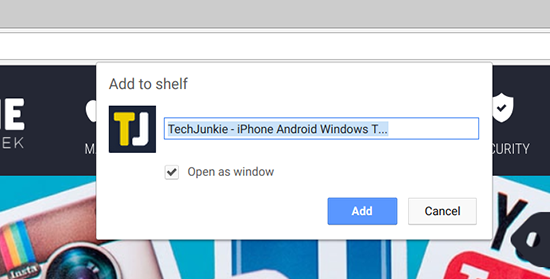
Once you click on “Add to Shelf,” you’ll be given a dialog box to complete. You’ll see the web page icon to be added to your shelf (this typically takes the form of the page’s favicon, and cannot be changed), along with the name of the web page (which you can edit or shorten), and a checkbox to open in a dedicated window. If you choose to leave this box checked, your pinned web page will be added to your shelf and clicking on it will launch it in an independent window, without the option to open a new tab or enter a URL to redirect the page. For some apps (Spotify, Pocket Casts, etc.) this is ideal, since it makes the web page feel more like an independent app. If you want the page to open right alongside your other tabs, however, you’ll want to make sure you uncheck that option before you add the page to your shelf.

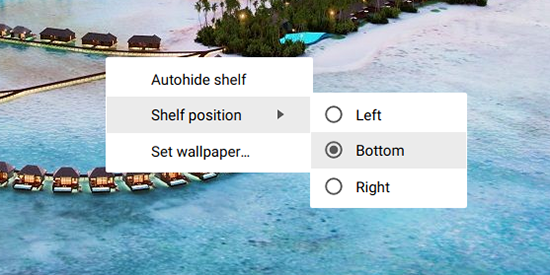
Changing Position of the Shelf
Like Windows 10’s taskbar and the MacOS dock, Chrome OS allows you to change the position of your shelf to fit your needs. Repositioning the shelf on Chrome OS can’t be done by dragging it, like you can in Windows 10, but it can be repositioned to the left and right side of the display. To accomplish this, right-click anywhere along the shelf to open the context menu. If you have a shelf full of icons, you can also click on an icon. Move your mouse over the option to adjust your shelf position, then select left or right, depending on which you prefer.
You can’t move the shelf to the top of your display, as you can on Windows, and it’s worth noting that the dock has far fewer slots for app icons when positioned to the left and right of your display, as you can see in the image below.
Autohide Shelf
Finally, like both Windows and MacOS, the shelf in Chrome has the ability to automatically hide itself when not being used. With the dock automatically hidden, all of your windows will essentially automate to full screen mode once opened. It will also add a semi-transparent black border to your dock on the desktop, indicating that the dock is in autohide mode. To enable this setting, right-click anywhere on the dock, as described above, and check the “autohide shelf” option. When you have a Chrome window, web app, or Android app open on your device, the shelf will automatically hide, giving you the full screen real estate to use your laptop, to edit documents, browse the web, and anything else you’re looking to do on Chrome OS.

To reveal the shelf, simply move your mouse to the very bottom of the screen, and it will appear as an overlay on your current tab or window. Once you move your mouse away from the shelf, it will automatically hide itself again.
The Drawer
If the shelf is the main way most people interact with their Chromebook’s lineup of apps and software, the drawer is the area of Chrome OS that holds all the non-essential software installed on your device. Most people will probably want to balance out the apps kept on their shelf with the apps they use on a regular basis, and that means that the App Drawer inside of Chrome will end up being used regularly. The Drawer in Chrome operates like a cross between the Start menu in Windows and the App Drawer in Android, which makes sense, as both systems work wonderfully for managing apps while keeping content organized and easy to reach.
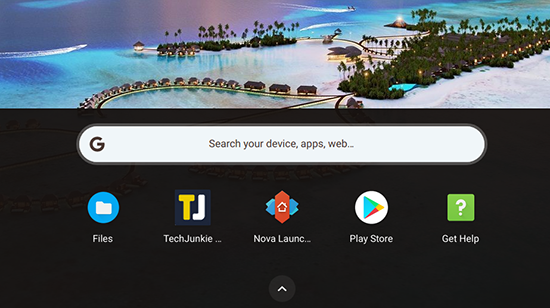
To open the App Drawer, look for the circular icon in the bottom-left corner of your display (or hit the Search key on your keyboard; some newer devices, like the Pixelbook, have a Google Assistant button there instead). Windows users will be used to this location; it’s where the start menu has lived for (almost) every iteration of the classic operating system. The App Drawer has changed a lot since the early stages of Chrome OS. Though it used to appear as a pop-up box on your desktop, the App Drawer is now a full-fledged horizontal menu that rises from the top of your device. Once there, you’ll find a Google search bar, which looks nearly identical to the one on newer Pixel devices, and your most recent applications read to be accessed. Below that, there’s an upwards-facing arrow icon with a repeated bounce animation. Tap or click that icon to enter the full App Drawer and to customize your Chrome OS experience.
Drag and Drop and Folders
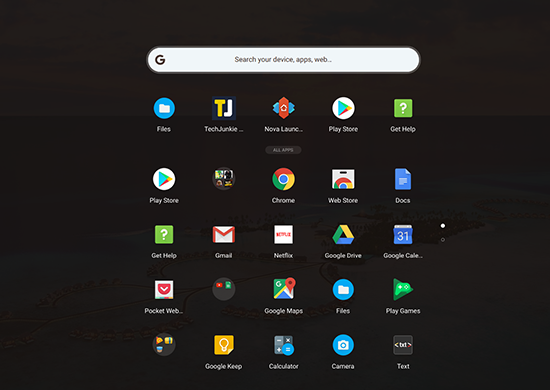
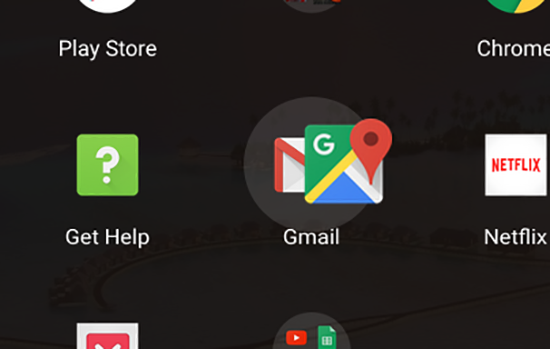
The App Drawer features a 5×5 grid of app icons lined up on your device, with the top five apps being your most recently opened, and the twenty below being your full list of applications. Scrolling down will load the second page, which also features a 5×5 grid of app icons but without listing your most recent apps. Unlike Android, where your App Drawer is sorted alphabetically automatically, without effort on your part, your Chromebook simply lists apps in the order they were added to your device. This means there’s a good change your App Drawer is a total mess when you first open it, which can make finding content a real chore if you aren’t sure where to look.
Here’s the good news: unlike the Android app drawer, this App Drawer allows you to drag and drop icons wherever you want in the app drawer. Have a bunch of utilities you never use, but like to keep around just in case? Throw them in the back of the Drawer. Use Netflix regularly? Keep it up front. The possibilities are basically endless, and it makes for a fantastic way to make your device feel like your own. Dragging and dropping icons is exactly how it sounds: using the mouse, click and hold on an icon, and then use your mouse to reposition it on the display. To move an icon along your display, you can drag it to the top or bottom of your display. New pages won’t spawn until you’ve filled a full 5×5 page of apps.
The other option here, of course, is to create Android-like folders within the App Drawer to help better organize your content. If you use both Gmail and Inbox, for example, you might want to keep all your mail apps in one folder. Same goes for the multitude of Google Drive apps you might have on your laptop (Google Drive, Google Docs, Google Sheets, the list goes on and on). It helps keep your laptop a bit more organized, and helps you personalize the content.
To create a folder, just click and hold or use your finger on a touch-enabled device to drag one icon over another, just as it works on Android and iOS. After holding the icon over another matching icon for a moment, release your mouse or finger and a folder will automatically be created, freeing up a space on your device.
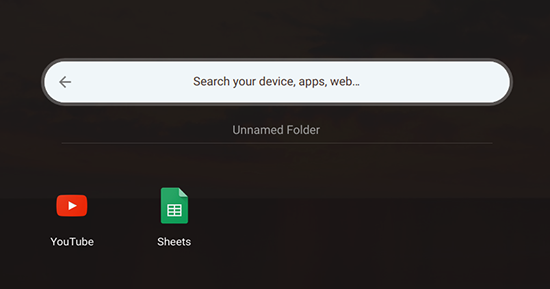
Click on the new folder to open the display, which takes over the entire screen (similar to how iOS works). At the top of this display, you’ll see “Unnamed Folder” on all of your new folders. Click this to edit the folder name; you can name it anything you want. To close the folder, just click on the arrow icon at the top where the G in Google usually stays; to close the entire App Drawer, just click on the top of the display.
Uninstalling Apps
This one’s easy. Whether it’s a web page shortcut you accidentally made, or you’re looking to remove an unused or old app from your Chromebook, the App Drawer is the easiest way to remove your apps. Unlike with Windows 10, which requires you to open the Uninstall Apps prompt in Command Center, Chrome OS treats apps more similarly to how they’re treated within a smartphone environment, like iOS or Android. There, the apps can be uninstalled with a long-press or by dragging the apps to an “Uninstall” icon, depending on the platform you use.
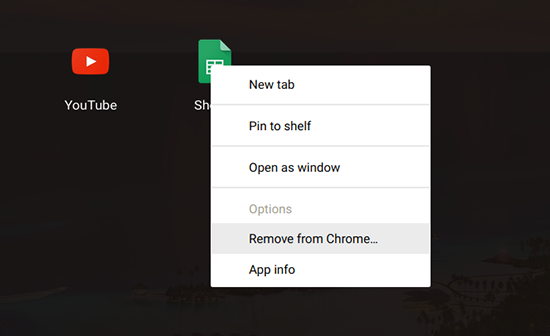
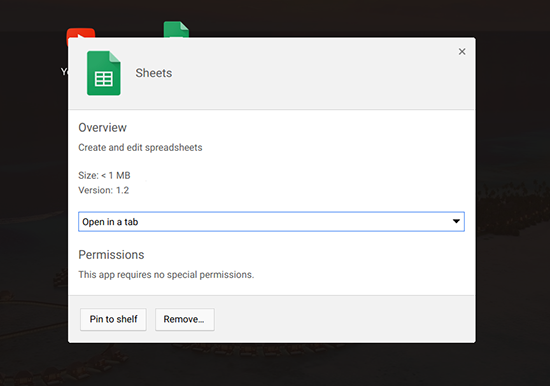
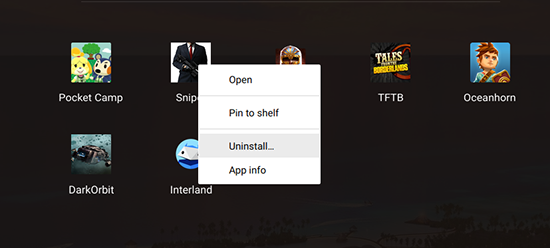
To uninstall an app from Chrome OS, find the app in your App Drawer and right-click it to bring up the contextual menu. At the bottom, you’ll see three different choices: Options, which may or may not be greyed out depending on the app (also, Android apps won’t show this at all), Remove from Chrome, and App Info. To remove the app, either tap on “Remove from Chrome” to automatically uninstall the app, or select “App Info” to bring up the info page, which will display how the app opens, the size of the application on your device’s flash storage device, the ability to pin or unpin the app to your shelf, and a Remove icon. Tap or click on Remove, then accept the prompt.
Android apps are also removed this way, though instead of reading “Remove from Chrome” in the contextual menu when you right-click on the icon, you’ll see an option to Uninstall the app from your device. The process, however, is the same. Finally, there are a handful of apps you can’t remove from your device, including Chrome (unsurprisingly), the Web Store and Play Store, and the Get Help application.
Pin to Shelf
Pinning apps to your shelf is done through your App Drawer, and the method for pinning them is even easier than how you pin web pages. Open your App Drawer by hitting the icon in the bottom-left corner or tapping the Search key on your Chromebook. Find the app you want to add to your shelf, then right-click on the icon to open the contextual menu. Select Pin to Shelf, and your icon will appear on the far right of your shelf. Unfortunately, there’s no way to currently pin folders to your shelf, so you’ll have to make due with single application icons.

Other Tweaks
The desktop, shelf, and App Drawer make up the majority of the ways you can customize your device’s launcher, but they are by no means the only way. The flexibility of Chrome allows for some serious changes to how your Chromebook works, and also allows you to feel a bit more at-home with your device. Neither of these options have to be used by regular Chrome users, but it’s good to know that options like these exist, and to keep in mind that your Chromebook experience can actually be customized a whole lot. Let’s take a look.
Browser Themes
First up, we have browser themes, which allow the main interface of your Chromebook—the browser—to be customized and recolorized in a way that fits your own personal aesthetic. Chrome themes are pretty hit or miss overall; some of them look phenomenal, but some look rather shabby on the whole, so you’ll want to dig through the pile online before you really choose the one that fits you. Still, considering how much time you spend in the Chrome interface on your Chromebook, it’s a good idea to make it look the way you like your device to look. You can browse through the theme store within the Chrome Web Store here. Chrome themes expand over every computer you’re logged into, so keep in mind that changing your theme on your Chromebook will also change the theme on your desktop or work PC.

App Launcher Extensions
Finally, for those who aren’t fans of the standard App Drawer interface inside of Chrome, you can use an extension to change how you launch apps within Chrome OS. These extensions don’t radically change how your computer works, but if you absolutely despite the standard Chrome launcher interface, launching your apps using an extension from the Chrome Web Store is your next-best bet, especially over using something like Nova Launcher or another Android-friendly application.

There are a number of app launcher choices in the Chrome Web Store, including Apps Launcher by Grzegorz Lachowski, which gives you the option to keep an app shortcut list inside of Chrome, to the right of your URL bar. A similar app by tlintspr allows for the same utility; both are highly-rated in the Chrome Web Store. Simple App Launcher creates a list option, instead of showing a full grid, which works better on current, mouse-friendly computers, while New Tab Apps Page uses the new tab page inside of Chrome to display your apps, complete with a custom background and the option to rearrange your apps (it’s similar to Launchpad on Mac). None of these are must-have extensions, but they’re decent options for anyone looking to customize their own computer outside of what the current default launcher on Chrome allows for.
***
At the end of the day, Chrome OS simply isn’t as customizable as platforms like Android, or even Windows. The limitations around Chrome OS may cause Chromebooks to feel a lot more limiting than their mobile cousins, where custom launchers can completely change the feel of your phone in day to day usage. That doesn’t mean there isn’t a wide variety of ways you can use the tools Chrome does give you to change how your Chromebook works, of course. In fact, the simplification of Chrome OS allows you to change necessary portions of the launcher—your desktop wallpaper, the arrangement of applications, the apps you keep in your shelf—without forcing you to constantly reorganize your computer.
What are your favorite tweaks for the Chrome OS launcher? Have any favorite apps or extensions? Let us know in the comments below!
Disclaimer: Some pages on this site may include an affiliate link. This does not effect our editorial in any way.