Your Mac’s hosts file is a small but important text document that has the ability to map hostnames to specified IP addresses. While the modern Internet uses a variety of public and private DNS servers to map IP addresses, the hosts file is a handy way to override those DNS servers, allowing you to manually point a website address to the desired IP address, or block access to a site altogether by pointing to an unused or internal IP address.
Let’s take a quick look at how to edit the Mac hosts file on macOS.
How to Edit Your Mac Hosts File with Text Edit
There are two primary ways to edit the hosts file in Mac OS X.
The first is by using TextEdit since the hosts file is a plain text document. However, you can’t open the file directly since it resides in a protected area of the file system. Instead, we need to copy the file to an unprotected location, like the Desktop, edit it, and then copy it back.
- To find the hosts file, open the Finder, which you can access by clicking on the desktop, the smiley face finder in the lower left of your screen, or by pressing Cmd + Spacebar + Finder.

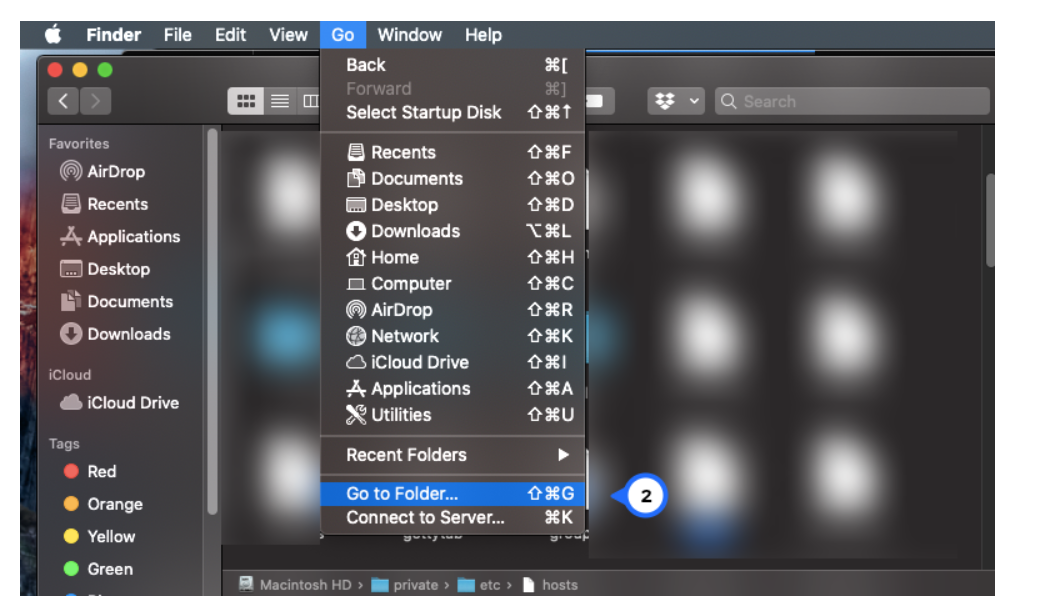
- Now, select Go from the menu.

- Then, select Go to Folder from the menu.
- In the box, enter “/private/etc/hosts” into the box and press Return.
- A new Finder window will open and your Mac’s hosts file will be selected. Click and drag it out of the Finder window and drop it on your desktop.


Block IP Addresses
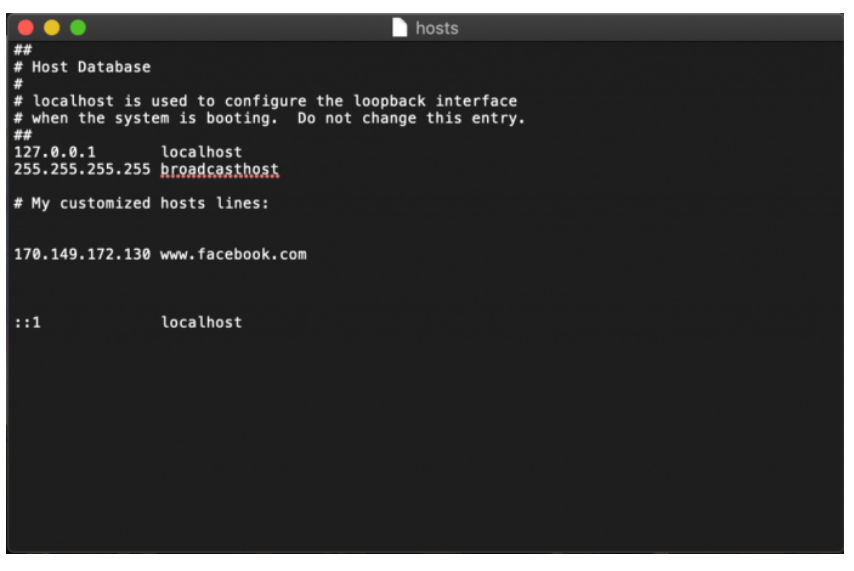
By default, the /etc/hosts file is relatively simple. It contains a number of lines of descriptive text which are “commented out” with the pound or number (also called a pound or hashtag) sign (#).
Any line that starts with a # sign is a comment and is not read by the /etc/hosts file. For each line, any text after the pound sign is ignored by the computer, making it a good way to add notes and descriptions to your files. It also contains default IP values for localhost and broadcasthost. To edit the file, you’ll add your own lines after broadcasthost.

In addition to testing newly developed websites and web hosting migrations, another reason to edit the hosts file is to block access to specific websites.
In our example, we’ll pretend that the computer we’re using is a device that we want to use exclusively for work, not allowing ourselves to get distracted by Facebook on our work machine.
- To do this, type the IP address you wish to assign, followed by two tabs and the hostname.
- In our case, we want to block Facebook so we’ll map www.facebook.com to 0.0.0.0 which, as an invalid IP address, which will result in an error.

Reroute Web Addresses
Alternatively, you can enter the IP address of a valid site instead of 0.0.0.0, which will result in users attempting to access Facebook being directed to the site of your choosing. To determine a website’s IP address, you can use the dig command, which comes standard with macOS. To dig the site via Terminal, we simply open up Terminal and then run the dig command on URL, which will then return the IP address as output.
- Open up terminal and type “
$ dig www.techjunkie.com + short104.25.27.105“- Note: The + short option keeps the output to just the information we need, which is the IP address.
- Make note of the IP address that’s returned and use it in your Mac hosts file mapping. For example, The New York Times website returns an IP address of 170.149.172.130. If we map that to Facebook in our hosts file, any time someone using the Mac tries to go to Facebook, they’ll see The New York Times load instead.
- You can add as many entries to the hosts file as you wish by entering new mappings on each line. Once you’ve made your desired changes to the hosts file, save it in its current location on the Desktop.
- Then, drag and drop the hosts file from your Desktop back to its original location at /private/etc. If you’ve closed the Finder window pointing to this directory, simply use the Finder > Go > Go to Folder option, discussed above, to reopen it.
- When you drop the hosts file back in its original location, macOS will ask you what to do about the unmodified hosts file that’s already there. Choose Replace and then enter your administrative user password to authenticate the transfer.
With the modified hosts file now in place, fire up your Web browser to test the changes.
Flush Your DNS Cache
In most cases, the new mapping should work immediately, but if you’re not seeing the correct behavior, you may need to flush your DNS cache, forcing the browser to read from your hosts file to determine the mapping.
To flush the DNS cache on your Mac, open Terminal and use the following command (sudo enables you to run this command as the admin of your machine):
- Now, type “
sudo killall -HUP mDNSResponder” and press Return. Note: You will need to enter your admin password to execute this command. - To get your Mac to clear your DNS cache, then confirm it’s cleared your cache by echoing a confirmation, enter these two commands separated by a semi-colon as shown here: “
sudo killall -HUP mDNSResponder;say DNS cache has been flushed.”

Your Mac will then come through the speakers saying “DNS cache has been flushed.”
How to Edit Your Mac Hosts File in Terminal with Nano
The steps in the previous section are easy enough, but if you want to avoid copying the hosts file you can edit it directly in Terminal using the UNIX Nano Text Editor, which is built into macOS.
- To get started, launch Terminal, type the following command, and press Return. As with all sudo commands, you’ll need to also enter your admin password to execute it:
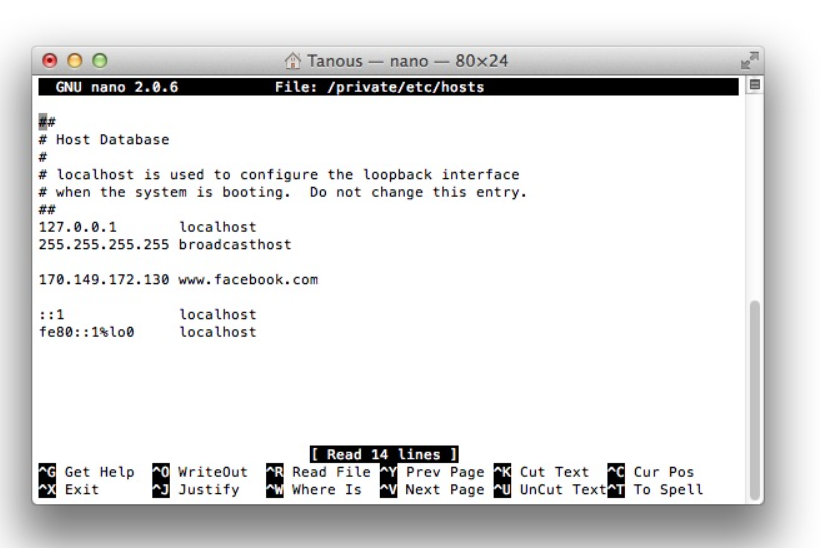
"sudo nano /private/etc/hosts“ - You’ll now see the hosts file open in the Nano editor or vim or another editor of your choice. To navigate and edit the file in Nano, use the arrow keys on your keyboard.
- Just as we did with the TextEdit method above, we can add, edit, or remove hostname mappings at will. Because we launched Nano using sudo, any changes will be authenticated and saved directly to the original hosts file, without the need to copy it outside of its home directory.
- When you’re done making changes, press Control-X to exit the editor, Y to save, and Return to overwrite the existing hosts file.
As we mentioned earlier, make sure to flush your DNS cache if you notice that your new mappings aren’t working properly.
Our examples mentioned blocking and redirecting distracting sites in a work environment but you can also use these steps to manually block access to malicious websites and, of course, other uses as well.
If you ever make a mistake and you’re not sure how to fix it, you can always restore the default hosts file contents by using one of the methods above to enter the following default information:
##

# Host Database

#

# localhost is used to configure the loopback interface

# when the system is booting. Do not change this entry.

##

127.0.0.1 localhost

255.255.255.255 broadcasthost::1 localhost

fe80::1%lo0 localhost
Final Thoughts
Knowing how to edit the hosts file on macOS offers a convenient way to override DNS servers and manually point a website address to a new IP address or block access, and by following the steps outlined above, you can accomplish this task very quickly.
If you are a Mac user and found this article useful, you might want to check out other TechJunkie tutorials, including How to Find Your Mac’s Exact CPU Model and How to Flush the DNS in Mac Mojave.
What’s the reason you are seeking to edit your Mac’s hosts file? How did it work out? Please tell us about it in the comments below!
Disclaimer: Some pages on this site may include an affiliate link. This does not effect our editorial in any way.