

If you’re the proud owner of a Raspberry Pi, the visual Scratch language is a great way to take your first steps in programming. But to unlock more of the power and potential of the hardware, take a look at Python.
More Raspberry Pi…
Check out our tutorial guide to writing your own Raspberry Pi game using Scratch and submit your game creation for a chance to win £250
Python is the default educational programming language for the Raspberry Pi. It’s used around the world as an introductory language for many platforms, thanks to its uncluttered style and easy-to-understand syntax. It isn’t only for beginners, though: according to the TIOBE Programming Community index, Python is the eighth most popular programming language among professional engineers, ahead of Perl, JavaScript and Visual Basic .NET. It’s also free, so it’s easy to see why so many people choose Python as their first scripting language.
In this feature we’ll introduce the key concepts of Python, and show you how to get started with the language by walking you through a sample game written in Python. Then it’s over to you to create your own masterpiece, which you can submit to our Raspberry Pi coding competition.
Getting to know Python
There are two major versions of Python in use. Python 3 is the future, but Python 2 enjoys wider compatibility with existing resources, and it’s this version that’s currently bundled with Raspberry Pi. For this tutorial, we’ll use Python 2.7, the final stable release in the 2.x series: this means we can use the majority of online examples and pre-written code unchanged. When the time comes, moving up to version 3 will be straightforward.
The first thing you may notice about Python is how neat it looks. Those used to PHP, JavaScript or other modern languages will also spot the absence of curly braces, as conventionally used to enclose sections of code. This is because Python uses indentation to organise code. This is good practice in most languages, because it makes code more readable: in Python it’s mandatory. If you don’t get your spacing right, your code won’t work. While this can be a shift for experienced programmers, it becomes natural quickly and leads to clear, intelligible code by default.
Python also makes a good first language because it represents a simple implementation of object-oriented programming – a concept any aspiring coder must understand – and is relaxed about how variables are created and managed. The net result is a particularly productive programming environment.
Python code is usually run through an interpreter rather than being compiled, but despite this, end results are pretty fast. Python applications can run on all major operating systems, so it’s possible to create a Python game on a Windows PC and have it run on a Mac or Linux box – or, indeed, a Raspberry Pi.

A final great strength of Python is the availability of a wide range of add-on modules that bring extra functionality. One such module is Pygame. As its name suggests, Pygame helps you create games using Python: for example, it greatly improves image handling through its Sprite class, makes it easy to control in-game audio, and even allows your game to work with joysticks. Games such as Call of Duty might be beyond its capabilities, but an Angry Birds clone certainly isn’t.
Native and cross-platform development
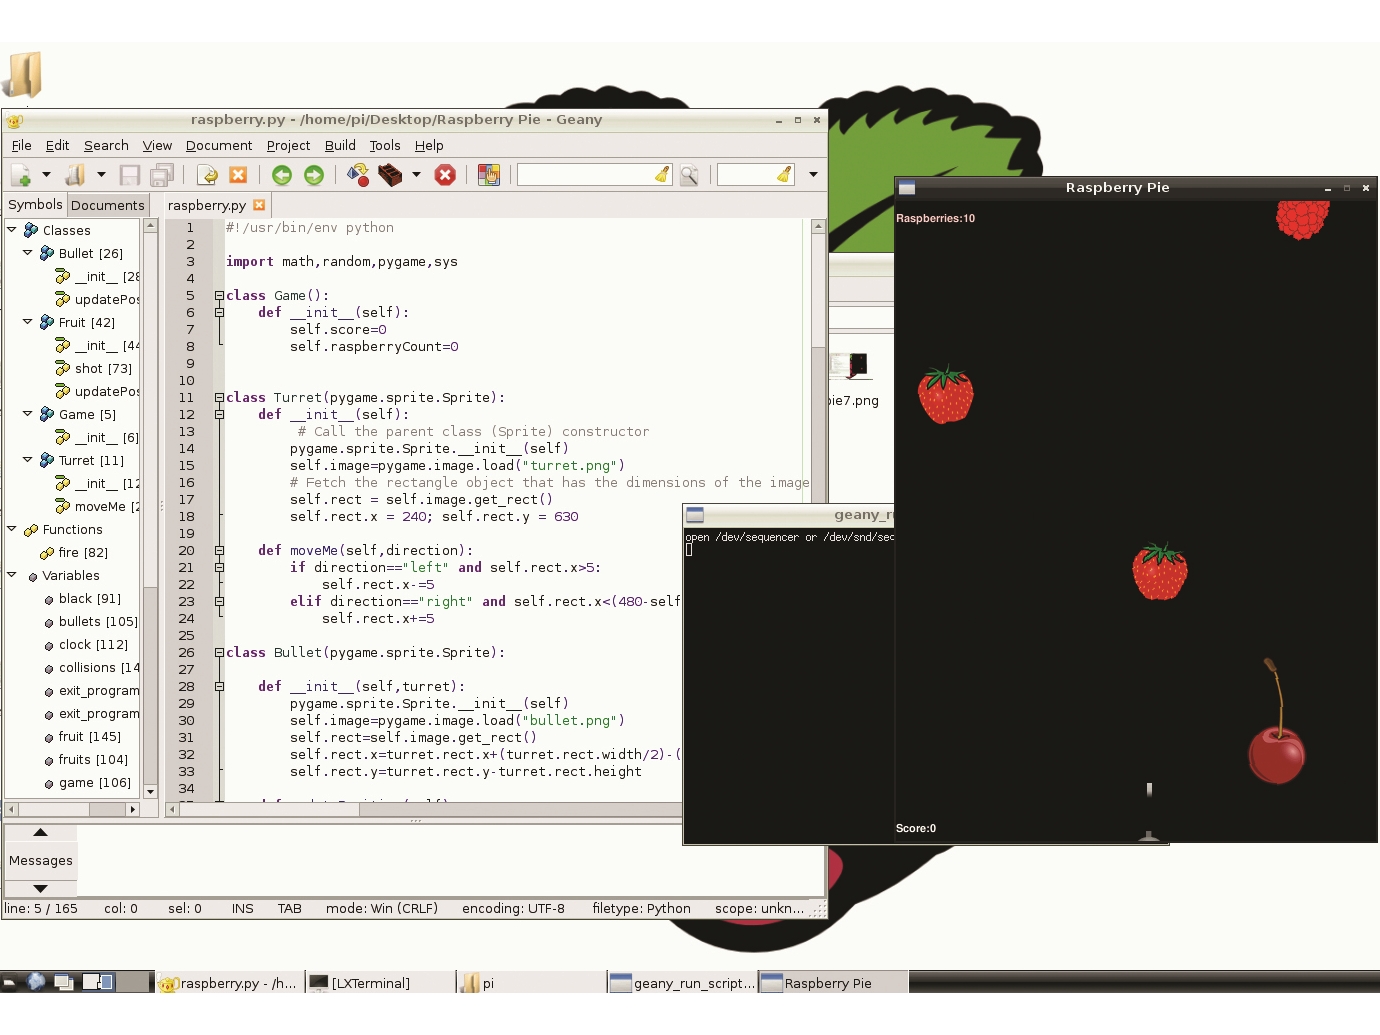
If you’re running the recommended Debian Squeeze Linux distribution on your Raspberry Pi, Python and Pygame come preinstalled, so you can start programming right away. You can write Python scripts in a text editor, but we suggest you take advantage of the free Geany integrated development environment (IDE) that’s also installed as part of the operating system. This software offers numerous helpful features for programmers, such as automatic syntax colouring, to make your code simpler to read and debug, and a symbol browser to help keep track of all the classes and variables in your code.
As we’ve mentioned, however, Python works across many platforms, so you can write your code on a Windows PC and then move it across to the Raspberry Pi when you’re finished. To do this, you’ll need to install Python 2.7 on your PC. Even if you’re running 64-bit Windows, choose the regular Windows installer, not the x86-64 one, since the standard Pygame installation is 32-bit only.
Once you’ve installed Python (accepting the installation defaults), download Pygame for Windows – again, accept default settings. If you already have a preferred IDE, it will almost certainly support Python “out of the box”; if not, get Geany for Windows. To configure it for testing and running Python scripts, launch Geany, then go to the Build menu and click Set Build Commands. Find the Execute field and replace the current contents with C:Python27python %f (assuming you installed Python to the default directory).
Designing a game
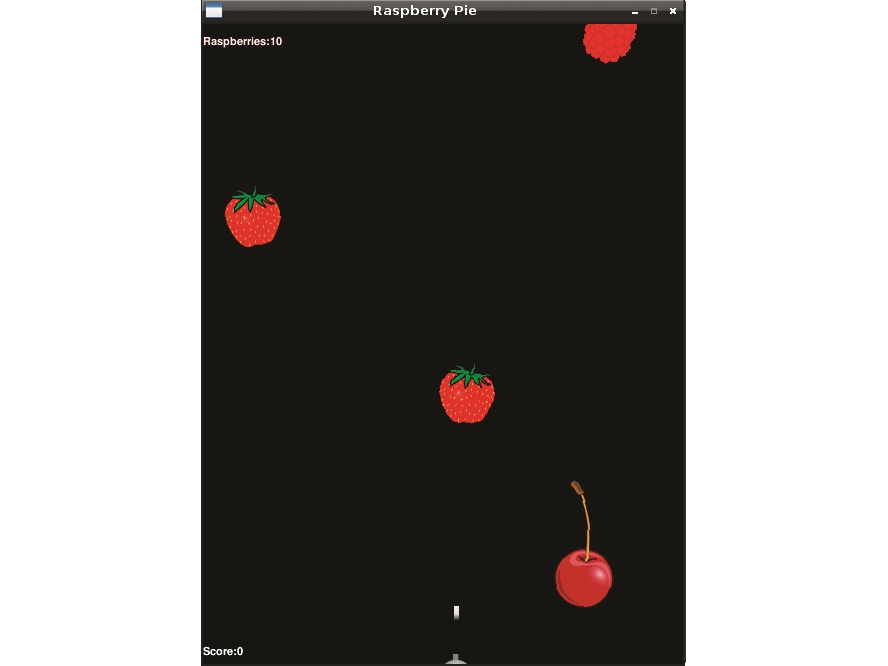
Our first Python project will be a simple shooting game called Raspberry Pie (ahem). In this game, three different types of fruit will fall from the top of the game area, but only the raspberries should reach the bottom and go into the pie. The player controls a movable turret, and wins points by shooting cherries and strawberries: points are deducted if a raspberry is destroyed accidentally, or if one of the other fruits ends up in the pie.
Let’s start by collecting together the assets. The Open Clip Art Library is a great place to find free clip-art; we can get our fruit images from here. We’ll create our own images for the turret and the bullets. We could collect together sounds for our game, too, but for now we’ll keep things simple and silent.
Now let’s think about how we’re going to structure our program. The basic structure of an arcade game is the same whether you’re planning to use Scratch, Python or any other tool. We begin by setting up the execution loop environment, and create the objects that will be used in the game. We then initialise everything – for example, setting the score to zero. Then there’s a main loop that handles the gameplay. Once the game ends, the score is displayed.
Objects
Object-oriented programming (OOP) underpins most modern programming languages, and it isn’t too difficult to understand. Think about the visible objects in our game: the only aspects that vary from one tumbling fruit to another are their position and genus (that is, whether they’re raspberries, strawberries or cherries). We can therefore represent them all very simply by creating a single fruit class with properties that indicate genus and position. We can then create fruits as independent instances of the class (these instances are the “objects” of OOP), each of which contains information about what sort of fruit it is and its location.
As well as properties, classes can have methods – built-in actions that we can invoke whenever we want. In the case of fruit, the major thing each object does is fall. So we might build a method into our class that says “take my current vertical position and move it down by 3 pixels”.
Since all the code relating to the fruit sits within the fruit class, bugs are easy to find and, once fixed, apply to all instances across the entire program. You can even base one class on another, giving you a hierarchy of subclasses. For now, however, let’s stick to a simple implementation. Remember that, while classes are written as part of the code, objects are created only when the program runs, and don’t exist beyond the duration of the game.
Creating the code
On the following pages we’ll walk you through the code for Raspberry Pie, so you can see how the program works and type along if you wish. If anything seems unclear, your first stop should be the Python documentation for more information. We’ll also be drawing heavily on the methods and properties provided by Pygame – see documentation here.
You can also download the code file here if you want to play the game yourself right away. In addition, you can use this code as a starting point to learn more by modifying and updating it yourself. Can you add a high-score table? Or make different types of fruit move in different ways? Once you’ve mastered the basics of writing games in Python, you can create your own original game, and send it in for our competition.
The code
You can download this raw code in full using the links in the box. The comments beginning each section – e.g. “## 1:” – correspond to the numbered steps in the text below.
Walkthrough: creating Raspberry Pie in Python
1: Start by opening Geany and saving a blank document as “raspberry.py”. The extension tells Geany we’re using Python, so it will highlight our syntax accordingly. As another visual aid, go to Geany’s Edit menu, select Preferences | Editor | Display and tick ”Show white space“ – this helps spot indentation errors. Now we’re ready for our first line of code. The import statement links external libraries into our program, so we can use the classes, properties and methods they contain. Before going any further, let’s test that these libraries can be found. Click the Execute button and a command window should pop up. If there’s a problem, this will contain an error message; otherwise, we’re good to go.
2: Now we create our first class – a simple one called Game that keeps track of the score. We define this class using the class statement, and give it a name. The colon after the name marks the start of the block of code that describes the properties of instances of Game. No punctuation is needed to mark the end of this block: that’s shown by indentation. Define a single method called ”__init__“. This is a special method (called a constructor) that’s automatically run whenever an object of this class is created. In this case, it creates and initialises variables for the score and the raspberry count. As you can see, the same colon and indentation syntax is used, and when we’re defining a class we use the placeholder ”self“ to stand in for whatever the name of the instance might be.
3: Now let’s define a class for the player’s turret. We’ll base this on Pygame’s Sprite class, which is full of useful properties and methods. To specify this, we put the name of that class (the ”parent class“) in brackets after the class name. Now we create a constructor method for the turret. First, we call the parent class constructor to initialise everything. Then we use the Pygame image.load method to import a graphic for our turret and store it in the property ”image“. The get_rect() method lets us access the position and dimensions of this image, so in the next line we can use the rect property to set the pixel position of the turret. The co-ordinates we’ve chosen place it halfway along the bottom of the area we’re going to use for the game. Using a semicolon lets us put two commands on one line.
4: The turret needs to be able to move, so we’ll add a second method called moveMe, to be called when the player presses a cursor key. This will take two arguments: a reference to the turret to be moved and a direction to move in. If the direction argument is ”left“ – and the left edge of the turret isn’t already within five pixels of the edge of the game area – we subtract five pixels from its horizontal co-ordinates using the ”-=“ subtraction operator. (Note also the ”==“ operator that’s used for checking if two values are equal.) If the direction is ”right“, we test whether the turret’s right edge is too close to the right-hand side: we calculate this using the rect.width property, so our code will work regardless of what size the turret graphic is. Assuming there’s space to move, we then add five pixels to the turret’s horizontal co-ordinate.
5: Next we create a class for bullets, in much the same way as the turret. However, whereas the turret is always created in the middle of the playing area, each new bullet instance must appear directly above the centre of the turret. To find the correct ”x“ co-ordinate, we perform a few calculations involving the rect.width properties of both the turret and bullet objects. To place the bullet directly above the turret, we set its ”y“ co-ordinate to be the same as the ”y“ co-ordinate of the turret, minus the turret’s height (vertical co-ordinates count from the top of the screen to the bottom). The bullet needs a movement method too: updatePosition moves it five pixels up the screen, or deletes it if it has reached the top.
6: All three types of fruit in the game behave in the same way, so we can derive them all from a single class. The type of fruit each instance represents is determined by a random integer between one and three, and stored in a property called genus. We use this property to assemble a filename and load in the right image. To add visual variety, we rotate the image randomly, to an angle between -5° and 15°. All fruits start out above the top of the screen, ready to drop into the playing area, so we set the initial vertical position to zero, minus the height of the image. Finally, we set its horizontal starting position. We don’t want fruit to protrude off the edge of the play area, so we use a random number between 20 and 440.
7: Just as bullets travel upwards, fruit moves down the screen at regular intervals – so we give this class its own updatePosition method. If the fruit’s vertical position is less than 640 – that is, if it’s still within the play area – it drops by three pixels. Otherwise, the score is updated. If the object’s genus property is 1, meaning this fruit is a raspberry, the player gets ten points, and the raspberry counter is incremented. Otherwise, the player loses 50 points. Either way, the fruit object is now deleted. We also create a method called Shot, to be called if the fruit is hit by a bullet. If the fruit is a raspberry, we deduct 50 points from the player’s score; otherwise, add 10 points. Again, in either case, the object is then destroyed.
8: With all our classes now created, it’s time to initialise the game. First we initialise Pygame itself, to ensure everything is in its default state. Then we use the pygame.key.set_repeat() method to specify that if the user holds down a key, an event will register every 20 milliseconds. The next two lines set up font objects that will display the score and how many raspberries have landed – for more on this, see the Pygame website. We store the value of black in a variable of that name (the three zeros represent red, green, and blue values) – this is just for convenience later on. Next we set up the game’s window: Raspberry Pie runs in a portrait-shaped space measuring 480 x 640 pixels, which we’ll refer to as ”screen“. Finally, we set the caption of this window to show the name of the game.
9: We’re now ready to start creating objects based on the classes we defined in steps 2-7. First we create a Game object called game, and a Turret object called turret (note the capitalisation convention). For convenience, we then create a group called ”sprites“, and add the turret to this group. We also create groups for the fruits and bullets (although we can’t add members to these groups yet, as we haven’t yet created the objects). Combining sprites into groups is a convenient way to organise game elements. If you were creating a platform game, for example, using groups would make it easy to draw all the background tiles at once, then draw the player and enemies on top. Sprite groups also make it easy to use Pygame’s collision detection routines: a single line of code can check whether any element of one group has collided with any element of another.
10: Before entering the main loop, we initialise a variable called end_game: so long as this remains False, the main loop will continue cycling. When ten raspberries have hit the ground, we’ll set this variable to True and the game will end. Next we initialise an object called clock, based on the Pygame Clock object, to manage how often we poll for events and update the screen – if the game tore along at the maximum speed the Raspberry Pi can handle, it would be unplayable. Finally, we initialise a variable called ”tock“. This will keep track of how long it is since a fruit last appeared onscreen, so we can introduce a new one every two seconds.
11: Now it’s time to start the main game loop. We implement this using a while block – a block of code that executes only while the variable end_game isn’t set to True (the != operator means ”not equal to“). At the end of the block, this condition will be tested again, and if it’s still true then the block will execute again – and so on, round and round, until the value of end_game changes. Inside this loop, we start with a Pygame clock.tick() statement: this introduces a small pause, regulating the speed of execution so that the loop runs no more than 30 times a second (as specified by the number in brackets). Next we increment the value of tock by one, to mark that a bit more time has passed. Finally, we clear the playing area, using the value of black that we defined earlier.
12: Now we check for keypress events, so that the game can respond to the user. Pygame creates and stores an event each time a key is pressed (or multiple events if a key is held down), and we can access them using its event.get() method. Python’s for…in syntax allows us to cycle through and deal with each event in turn. For each event received, we first check whether the user has closed the game window – in which case we terminate the game. Then we check whether the user has pressed the left or right cursor key: if so, we call the turret’s moveMe method with the appropriate parameter. If the user has pressed space, we create a new bullet – passing it a reference to the turret so it knows where to appear – and add this bullet to our sprite group.
13: Now we move all bullets up the screen, and all fruits down. As each object contains a method that moves it appropriately, we simply need to call this method for each bullet and fruit in the game. Again, we can do this using the for…in syntax to move each member of the bullets group and each member of the fruits group in turn. We don’t need to send any arguments to the bullet’s updatePosition method, but for the fruits we must call updatePosition(Game). This is because the updatePosition method in the fruit class includes code that automatically updates the user’s score if the fruit reaches the bottom of the play area – so it needs a reference to the object that contains that property.
14: The variable ”tock“ increments each time the main loop is executed. Since the loop runs 30 times per second, we know two seconds have passed when tock exceeds 60. At this point, we add a new fruit – so long as there are fewer than ten fruits already onscreen. We check this using the len function (the name is short, slightly incongruously, for ”length“) to count how many members the fruits group has. If it’s fewer than ten, we create a new fruit object and add it to our fruits group. As the game runs, ”fruit“ will always refer to whichever fruit object was created most recently: we could give each fruit instance its own unique reference, but there’s no need. Finally, we reset tock to zero, restarting our two-second count.
15: Now let’s check whether any of the fruits has been hit by a bullet. Pygame makes this very easy: simply pass references to the two sprite groups to Pygame’s groupcollide() method and it will work out the collisions. It can also automatically delete either or both of the colliding objects. In our case, we don’t want fruits to be deleted (first we want to check the fruit type and update the score accordingly) – but the bullet can be removed right away. We convey this by passing ”False, True“ as arguments, referring to the first and second arguments respectively. The groupcollide() method returns a list, which we’ll call ”collisions“: if it has any members, we use yet another for…in loop to run the ”shot“ method on each fruit that’s hit.
16: The game mechanics are now complete, but we still need code to show the current score and how many raspberries have been collected. Earlier on, we set up two Pygame font objects; now we can create text by accessing the render method of this class. This takes four arguments: the first is the text to be rendered, followed by a string (text) representation of the user’s score. Then we specify whether or not we want the text to be smoothed, and give RGB values for foreground and background colours. Pygame’s screen.blit() method draws the rendered text onto the screen at specified co-ordinates. We repeat this with the raspberry count, the difference being that this number counts down from ten and appears at the top of the screen rather than the bottom.
17: Finally, we update the screen to reflect the new positions of our turret, bullets and fruit. Pygame’s draw method lets us render all members of a sprite group in one line of code, but the screen isn’t redrawn right away: the display.flip() method updates the whole screen in one go, so that everything moves smoothly and simultaneously. Finally, we check whether the game is over. As the indentation shows, this is the end of the main code block, so execution loops back to the while statement in section 11, and the following lines are executed only after the game ends. These lines load in a frame graphic, using Pygame’s convert_alpha method to provide transparency, and render the final score text on top. We use another ”while“ block to pause the game so that the player can read the text. When they close the game window, Python exits the game.
The very last step is testing. This is especially important if you’ve been using a different platform for development: by modern standards, the Raspberry Pi is a very slow computer, and it runs a different OS to your PC, so it’s vital to ensure that your game works properly and runs at a playable speed before publishing it. If you’re working in Windows, and plan to test your creation on native hardware only at the end of the process – for example, if you’re coding at home to run on a Raspberry Pi at school – the easiest approach is to transfer the folder containing your game using a USB memory stick and load it up in Geany on the Raspberry Pi. It may take a little while to initialise, but so long as your game doesn’t waste memory or try to carry out excessively demanding computations, it should be fine.
Disclaimer: Some pages on this site may include an affiliate link. This does not effect our editorial in any way.