

Photoshop Express is a free smartphone download. That probably sounds too good to be true when you consider how much the full-blown Photoshop image editing application costs on Windows or a Mac… but that’s only half true.
While Adobe is clearly using the free download as a way to drive sales of add-on effects and tools, the complimentary application itself is surprisingly powerful and extremely easy to use.
Photoshop Express started life as a Flash-based application on the internet, which was used by many blog editors to tweak their images prior to uploading them to their sites. When Adobe decided to port it to the iPhone and iPad, though, it had to rewrite it from the ground up, as the iPhone is famed for not running Flash. The result is a sprightly, responsive and highly capable application that’s perfect for making quick and surprisingly sophisticated edits on the go, without the cost of upgrading to iPhoto.
Adobe Photoshop Express can work either with images you take directly inside the application or previously-shot photos stored on your Camera Roll or synchronised through Photo Stream. Your first task on launching it is therefore to decide where the asset you’re going to edit should be drawn from.
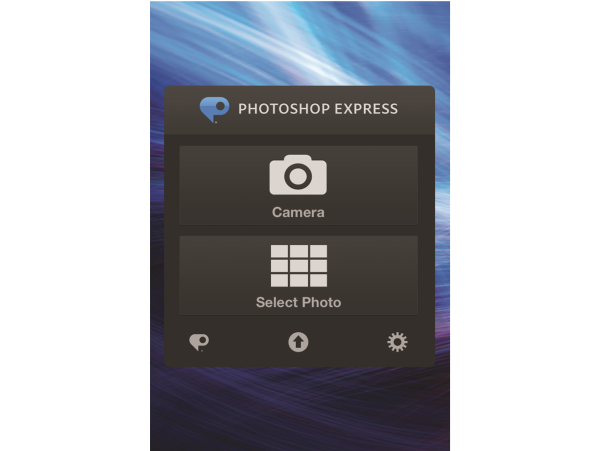
We’ve selected an image from our Camera Roll that we’d taken previously and now want to edit before uploading it to the web.
The first thing you’ll notice when you take or open a photo are the two buttons at the bottom of the screen. The first, the box with the arrow pointing out of it, is the Share control.
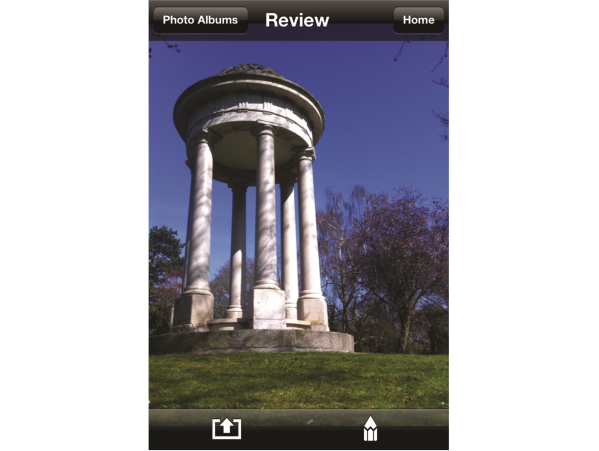
This lets you upload your image directly to Facebook, Twitter, Flickr, or Tumblr, send it to photoshop.com for further work or email it to your contacts.
If you want to edit your image before sharing it, tap the pencil icon to open the editing tools.
Photoshop Express editing tools
The editing tools are broken down into four primary categories. The buttons for each of these run across the top of the screen. They are, in turn, cropping and orientation (the double set square icon), luminance, which incorporates exposure, tint, saturation and so on (the sun icon), filters (the half shaded circle), and effects and borders (the stars).

Tapping any one of these drops down a menu from which you can select sub options. Notice that in the menu the over the page, where we have dropped down the filters menu, the last option – Reduce Noise – has a plus in one corner. This indicates that the tool is a premium element that must be bought separately as an upgrade.

You can still use it, but before you save the results you need to make an in-app purchase. We’ll come to this when we look at effects and borders, later.
At the bottom of the screen there are four other buttons. The cross cancels the current editing operation, the backwards- and forwards-pointing arrows undo and redo your last operation, and the down pointing arrow touching a block saves your edited photo.
Any time you’re working on an image, you’ll see three other icons in this space.
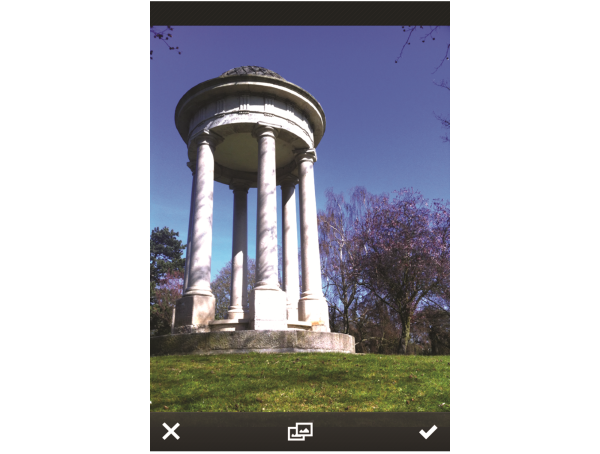
Again, the cross, which sits on the far left, cancels the edit. Holding down on the two overlaid frames at the centre of the toolbar calls up the original image again so that you can compare what you started with to what you have now, and the tick on the far right of the bar applies your edit.
All of the tools work on a frame-wide basis and are controlled simply by dragging up and down or left and right on the screen.
For example, in the image below we have selected the brightness and contrast tool from the second drop-down menu – luminance.
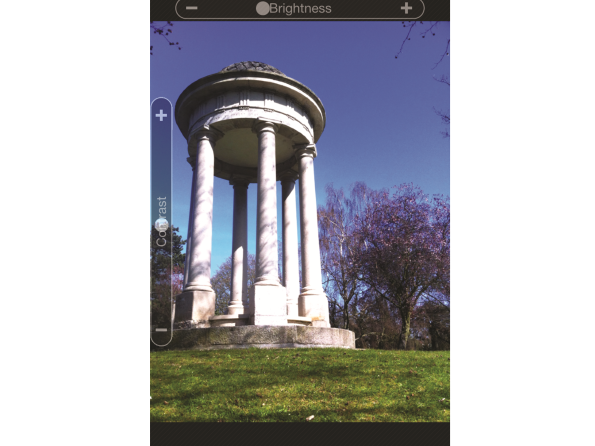
The individual controls for brightness and contrast have been split out so that dragging to the left darkens the image and dragging to the right lightens it.
At the same time, dragging down reduces the contrast in the image, and dragging up increases it. Because we don’t need to put our fingers on the actual bars themselves at the top and left edges of the screen, we can simultaneously make the image both brighter and with a sharper contrast by putting a finger somewhere around the centre and dragging up and diagonally to the right.
Likewise, we could increase the brightness and reduce the contrast by dragging down diagonally to the right, and so on.
Some effects, such as this one, are applied in real time, so dragging slowly will allow you to see the effect you’re having live, as you make your changes. If you drag too quickly, you’ll find that Photoshop Express has to pause for a moment while it updates the picture to take account of the more extreme adjustment.
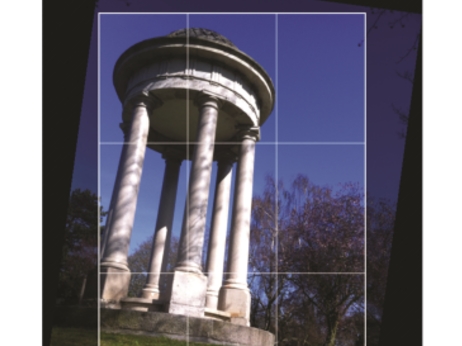
Some adjustments, however, don’t require that you work in two directions. The straighten tool, for example, which is found in the first drop-down menu, requires only that you rotate the image on screen and then tap the tick.

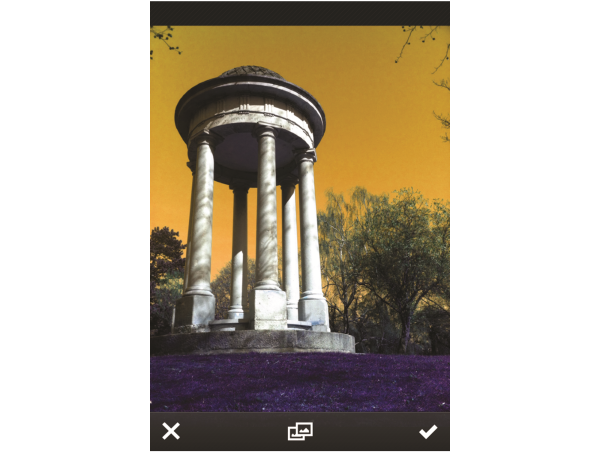
Even those tools that do call up two adjustments simultaneously, such as Hue and Saturation, or Brightness and Contrast, can be used so that adjustments are made to only one element at a time. For example, in the image below, we have adjusted the hue of the frame so that the green grass is now purple and the blue sky is yellow, but we have not played at all with the saturation, so the tones, while unnatural, are not unduly prominent within the picture and the overall balance is maintained.
Effects and borders
Open the fourth menu – effects and borders – and you’ll find a healthy selection of graphical treatments ready to be dropped onto your image. However, beware that this is one area in which you are most likely to find yourself applying adjustments for which you might be asked to pay. Fortunately, you’re not committed to buying them just because you’ve applied them to your image; you only have to spend if you want to save the result.
The free effects and borders that come bundled as part of Adobe Photoshop Express are all on the top line of the various menus. Tap one to apply it to your image and drag up and down on the screen to adjust the strength of the finished result.
In the image above, we have applied the Lens Zoom Blur effect and dragged down the screen to reduce it slightly so that we still have a fairly clear image in the background. Notice, though, that the preview thumbnail at the top of the screen is overlaid by a colour chip corner and the plus symbol, which as we learned from the drop-down menus indicates that this is a premium effect.

Tapping the tick button to apply it to our image brings up a request to buy the Adobe Effect Pack, which unlocks this blur effect and 44 others. If we don’t want to buy it, we simply tap close to return to our image, but if we tap the tick again to exit, we just get back to this screen. The only option if we don’t want to buy it is to tap the cross and cancel the edit altogether.

If you don’t want to spend any money, then, confine yourself to using only those borders and effects that appear on the top row of options in either module.
Saving your work
Once you have finished making your edits, you need to save your work back to your camera roll. To do this, simply tap the down-pointing arrow and it will be sent back to your Camera Roll.
Although it doesn’t say so when saving, Photoshop Express actually saves a completely new version of the image in the Camera Roll rather than overwriting the original, so if you want to start again and make a whole different set of changes, simply return to the beginning, open a second copy of the original image and let your imagination run wild.
Disclaimer: Some pages on this site may include an affiliate link. This does not effect our editorial in any way.


