Email marketing gets a bad rap. With so much spam already clogging up inboxes worldwide, small-business owners may be understandably wary of sending automated sales emails. But a well-run email campaign can yield positive results. Sending carefully targeted, well-designed emails to an opt-in audience can increase web traffic and conversions more effectively than the most active social media campaign.
Making a success of email marketing is easier said than done, however. Building a list, managing sign-ups, designing your emails and distributing them is a big job, and it gets bigger as your business expands. Enter MailChimp – a service that provides list management, drag-and-drop email design and in-depth performance reports for organisations of all sizes. And there’s no need to pay until your list grows to a substantial size, so with the aid of a free HTML editor, it’s possible to launch your first email campaign without paying a penny.
Signing people up
The first way MailChimp helps out is by storing the addresses of everyone who has agreed to hear from you in a mailing list. If you already have a list of email addresses, you’ll be prompted to import it right after creating your MailChimp account (see below).
If you don’t have such a list, or want to expand one, MailChimp can also host a handy sign-up page for you. Under MailChimp’s Lists tab, you can choose “Create forms” to set up sign-up pages where your would-be mail recipients can enter their names and addresses. To prevent the service from being abused, MailChimp uses a double opt-in process; when a new email address is entered into your web form, the system doesn’t add it to your list until the owner of that address acknowledges receipt of a confirmation email. This reduces spamming, by making it impossible to sign up people without their knowledge and active assent – MailChimp estimates that a list using double opt-in receives only around three spam reports per 50,000 recipients.
However, it gives new users a little extra work to do before they start receiving your messages. Hosting sign-ups at MailChimp’s site also limits the ability to use your own website branding, and to integrate the sign-up process into other parts of your business.
Happily, there are ways to mitigate both of these concerns, should you wish to do so. Head to the “For your website” dropdown box in the main List view and you’ll find the code for the sign-up form, which you can copy and paste into a page on your own site. The classic form comprises standard HTML, CSS and JavaScript, so customising it is simple.
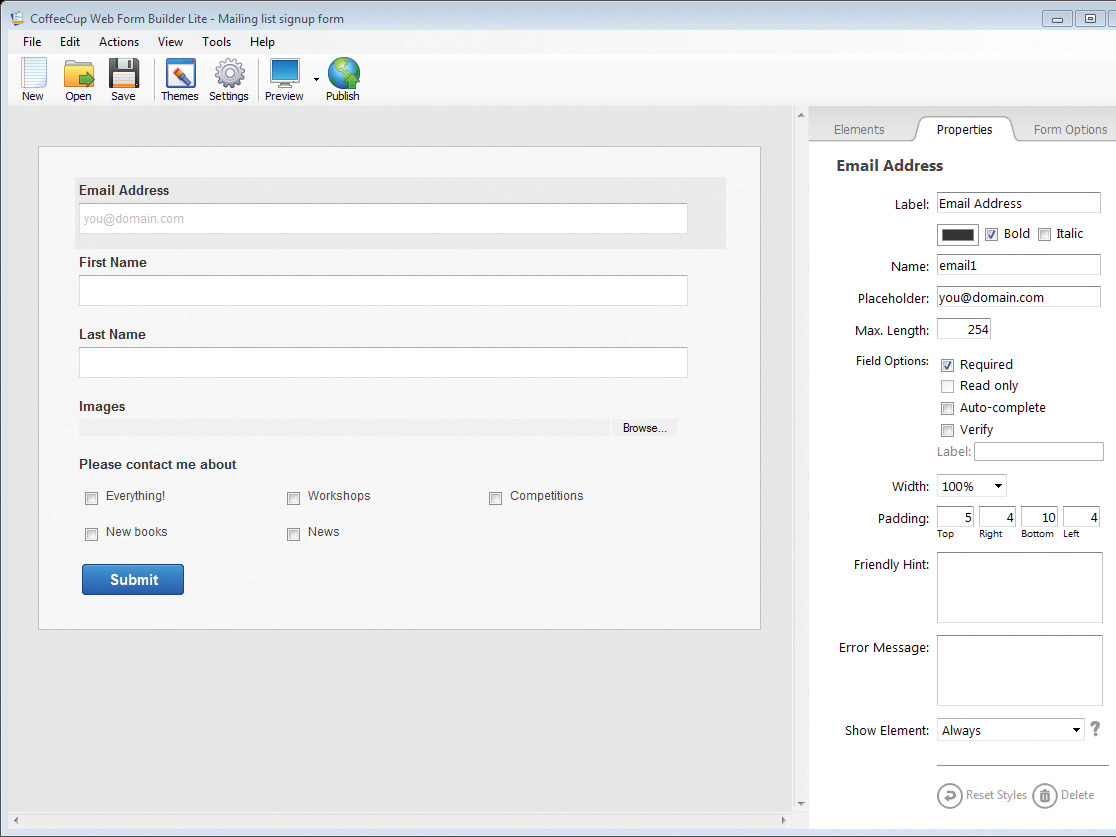
Email authentication can’t be disabled within MailChimp, but you’re free to use a different sign-up system that doesn’t insist on double opt-in if you prefer. One such alternative is the excellent Web Form Builder from CoffeeCup – a standalone service that provides you with a wysiwyg interface for building web forms, and supports the MailChimp API, so all you need to do is generate an API key and plug it into CoffeeCup’s software to have sign-ups automatically added to your mailing list. The basic version of Web Form Builder is free, but if you want to host the forms it creates on your own site, you must upgrade to one of CoffeeCup’s premium accounts, which start at $5 (around £3) per month.
Another useful feature of MailChimp is the ability to divide your mailing list into groups: for example, you might have one list of people who want to receive all your emails, another list that wants to see emails from you only once a month, and a third that only wants to hear about special promotions. You can manage your groups by clicking Groups on the list-management page. You can also allow people to choose which group they join when they sign up, via radio and tickboxes, or a dropdown menu for people to classify themselves. When you create email campaigns, you can then filter the recipients by group.
Importing an existing mailing list
The ability to manually add email addresses directly to a list is useful if, for example, you’ve been collecting email addresses via physical sign-up sheets, or if you’ve previously been using a different system to manage your email subscriptions and want to switch to MailChimp without requiring everybody to sign up again. MailChimp allows you to import mailing lists as CSV files or paste them in from a spreadsheet program. You can also manually type in addresses one by one.
Be careful not to sign up recipients who aren’t expecting to hear from you, however. Using email addresses you’ve acquired from third parties, whether bought, rented or simply found, is a strict no-no. The same goes for simply dumping your Outlook contacts database into a mailing list – you’ll inevitably end up adding users who don’t want to receive emails from you. This will attract spam reports, and MailChimp takes spam very seriously – with 1.2 million users sending more than 95 million emails a day, it can hardly afford to be blacklisted by ISPs or spam-detection services. So if you receive more than a few spam reports per month, you can expect the company to take action.
The golden rule for avoiding suspicion of spamming is to explicitly tell new sign-ups that you’ll be using their email addresses to get in touch with them. If consent isn’t given, or is only implied, expect MailChimp to take tough action if you receive too many complaints. If the number of abuse reports hits one in 1,000, you’ll receive a warning; go far beyond that and you’ll be suspended until you can prove your mailing recipients definitely asked to hear from you.
Creating your first email
The emails you send from MailChimp to your mailing list are known as campaigns. The first step in creating a campaign is deciding how you want your emails to look. The simplest approach is to use one of MailChimp’s bundled templates. These are all but guaranteed to work in a wide range of email clients, and they’re highly editable, so you can add your own company artwork and brand colours to make them less generic.
If you can’t find anything suitable among the templates on offer, it’s possible to use bespoke templates. You can use an HTML editor to put together the kind of box-based design MailChimp expects, complete with editable content areas for images and text, which can then be imported or pasted into MailChimp. The process is similar to creating a web page, but with caveats: for one, mail clients aren’t guaranteed to render CSS layout information correctly, so old-fashioned nested tables are a safer way to specify your email’s layout. Second, although you can use CSS for styling text, your message must be self-contained, so you’ll need to use inline styles rather than attempting to call an external sheet. You can group CSS styles at the top of your HTML template if you like; MailChimp converts them to inline styles when the template is uploaded, so they can’t be stripped out.
Once you’ve assembled your basic template, you can choose which parts will be editable within MailChimp by adding a few snippets of MailChimp-specific code. A text container cell defined with MC:EDIT=”mainbody” will be replaceable without you needing to revisit the original HTML each time you want to update the text. Similarly, an IMG MC:EDIT=”imagename” SRC=… tag will create an image box whose contents can be changed in the MailChimp editor prior to sending, so you can easily update the images in every email campaign you send. Bear in mind that images should be referenced in HTML with absolute URLs (“http://www.pcpro.co.uk/image.png”, for instance).
You can use MailChimp to host images, too, which will save your web host from a sudden influx of traffic if 10,000 newsletter recipients all attempt to download the same images at once. This involves nothing more than hovering over an image box in a template and clicking Edit. A dialog will appear, offering a drag-and-drop target that allows you to upload JPEG and PNG files. You can host images elsewhere, of course – other options include entering a URL, using Flickr, and browsing iStockphoto for paid-for professional options.
When creating your template, we suggest you use the least complicated HTML editor possible to minimise unnecessary auto-generated CSS and HTML code, which may yield unpredictable results when viewed in a mail client. Don’t attempt to create a layout in Word or Publisher and export it as an HTML file; the code is likely to be cluttered with unnecessary tags and certainly isn’t guaranteed to display properly. One handy, free alternative is Mozilla’s open-source SeaMonkey Composer, which lets you type and edit text in a wyiswyg environment and, using the tabs at the bottom of the pane, switch to Source view to check and clean up your code.
Testing and troubleshooting
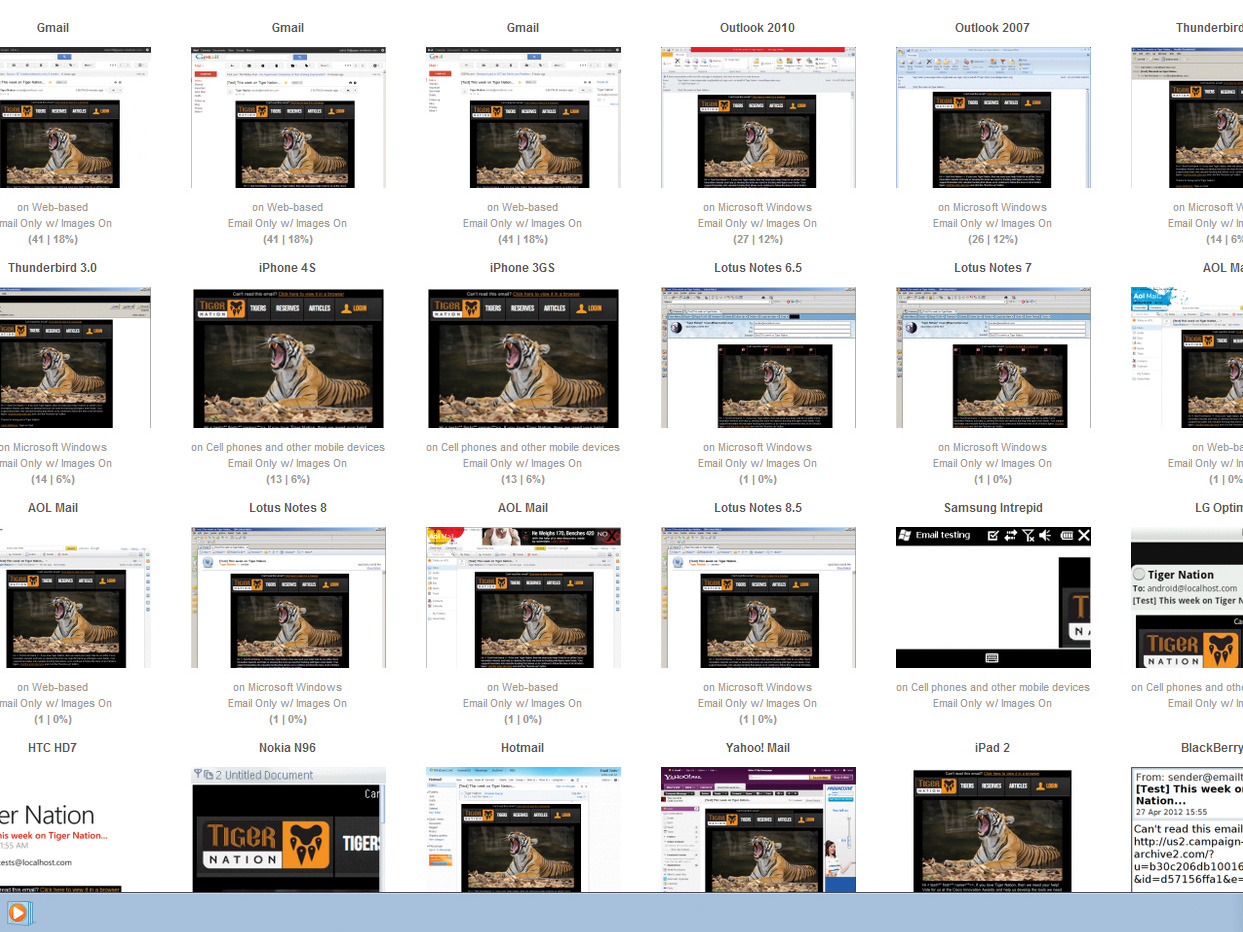
Once your template is looking good in MailChimp’s internal editor, it’s time to check how it will look to your recipients. This is a bigger job than it sounds. Different email clients handle HTML code and layout in different ways: for example, Outlook 2013 renders email using Word’s HTML engine and will ignore background images. Testing on the myriad versions of Outlook, Apple Mail, Mozilla Thunderbird and the multitude of web clients out there would be a nightmare.
The answer is MailChimp’s Inbox Inspector tool, which quickly and automatically creates previews of how your email will appear in a variety of clients. For users signed up to one of MailChimp’s monthly paid-for accounts, Inbox Inspector is free.
For free users, an Inbox Inspection costs $3 (around £2). You can see what your email looks like in each client, and track down problems. You can also see each preview as it will appear if the user doesn’t download images, or if they open your email in a separate window. Fixing the problems you find can still be a pain, but the benefit of working with a template is that you’ll only need to get it right once.
Interpreting reports
Open rates for marketing emails hover around the 20% mark for most industries; the rates at which people actually follow links contained in those emails are much lower, often coming in below 5%. To maximise your chances of attracting one of those hard-earned clicks, it’s crucial to understand how recipients interact with your messages. That’s why MailChimp’s reports are perhaps its most valuable feature.
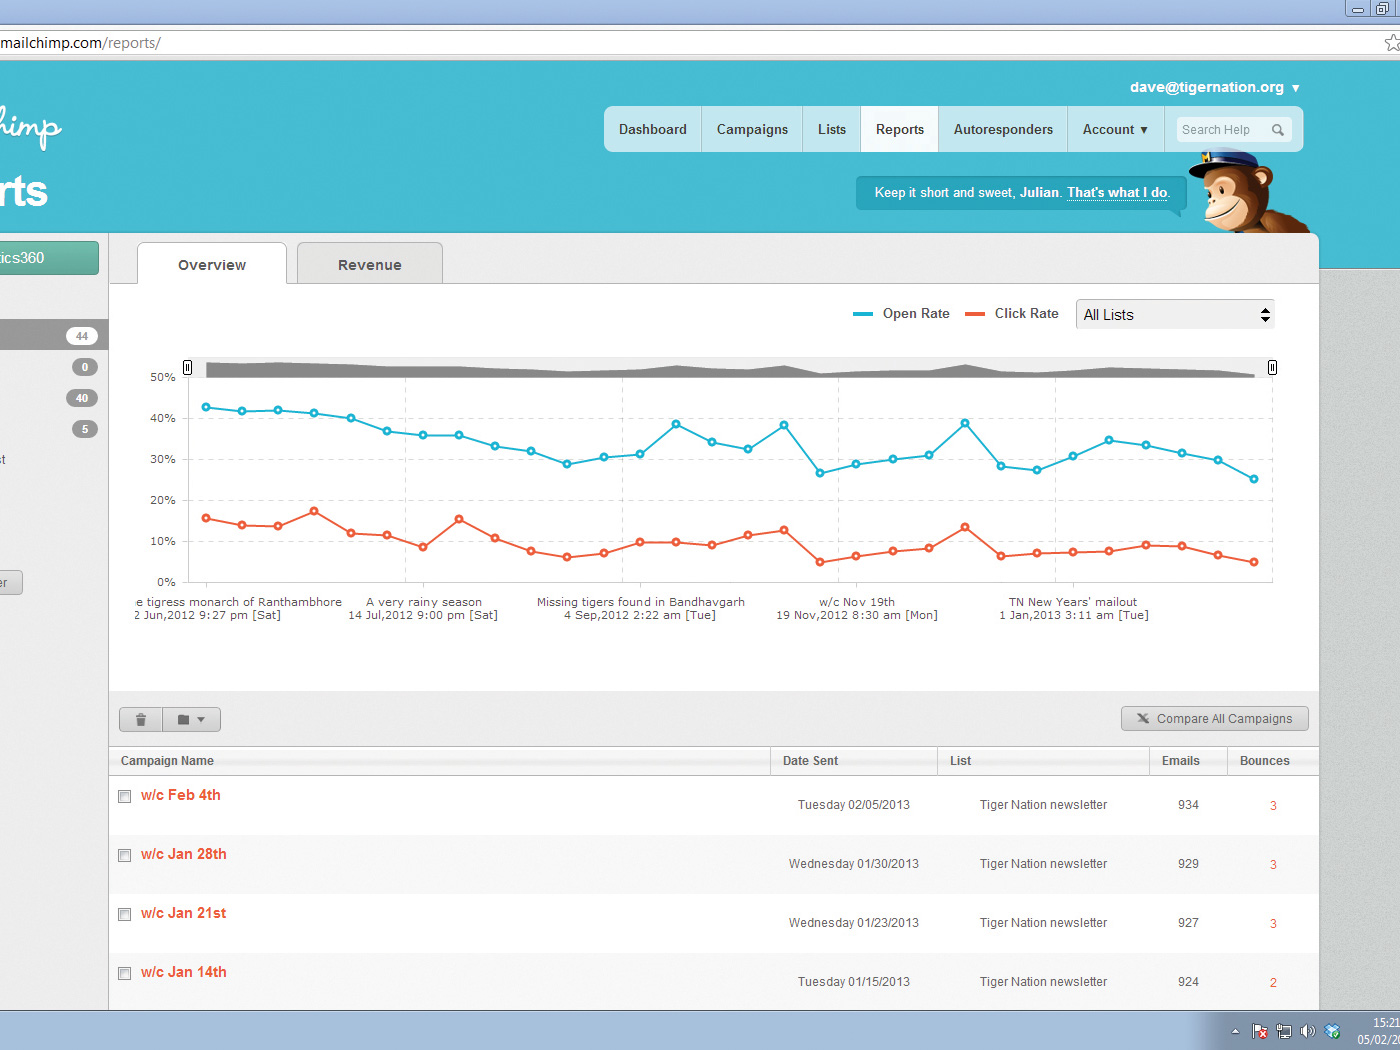
Head to MailChimp’s Reports tab and the first thing you’re given is a useful graph representing all the email campaigns you’ve sent. The graph shows two lines: one for the percentage of recipients who opened your email; and another for the percentage of users who clicked on something. The more email campaigns you send, the more useful this graph is, since it allows you to spot trends based on subject line, delivery day and so on.
For the detail-orientated, there are plenty of extra numbers available that can help when it comes to encouraging greater engagement from your readers. Clicking on a specific email in MailChimp’s Report tab produces a wealth of data about that campaign. Click on Trends under Subscriber Activity, for example, and you can see a breakdown of the times of day at which people opened your email.
You can also check which parts of your email are generating the most clicks. Click Performance lets you see which links in an email performed best, with a graphical overlay showing the percentage of people who clicked on each link. This could help you identify a part of your design that’s being overlooked by recipients, for example.
Upgrading MailChimp
You can open a free MailChimp account and start sending emails without paying a penny. Free accounts have a few restrictions, however. As a free user, you can sign up a maximum of 2,000 members to your list, and send out only 12,000 emails per month. In addition, MailChimp’s logo will be appended to the bottom of every email sent, which may discourage companies that don’t want to share their branding.
MailChimp also offers various pay-as-you-go and monthly accounts. For users sending weekly newsletters, an account costing $10 per month (around £6) allows you to send an unlimited number of non-MailChimp-branded emails to up to 500 users. The price rises as you add subscribers: a list of 501-1,000 costs $15 per month, while big companies targeting mass audiences can pay thousands of dollars.
Disclaimer: Some pages on this site may include an affiliate link. This does not effect our editorial in any way.