Digital artwork has, in recent years, become a hot topic for anyone looking to cash in on non-fungible tokens (NFTs). You can partake in this digital gold rush using Figma. Unlike popular design tools such as Canva and Photoshop, Figma boasts unique features that can help you quickly scale the digital art space. One of these properties is its ability to trace images.
Read on to learn how to quickly trace on Figma and take advantage of this moneymaking digital innovation.
Using Figma Quick Image Tracing
Be aware that Figma can’t trace PNG or JPG photos by default. But, installing the Image Tracer plugin makes it possible for the app to trace pictures quickly. After that, using Figma quick tracing is a pretty straightforward process. While there are many ways to trace an image on Figma, the Vectorize feature within the app’s plugins is the most convenient for quick tracing. The instructions below will help you in using the Image Tracer:
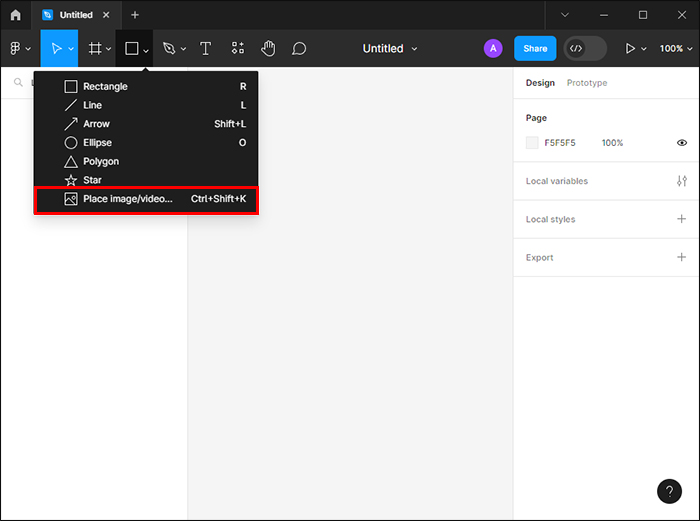
- Draw an image and photograph it or download a picture and launch the Figma application and click on the down-facing arrow with a square next to it. You’ll find it on the top navigation bar.

- Scroll through the dropdown menu and select “Place image.”

- Locate the image on your PC and click “Open.”
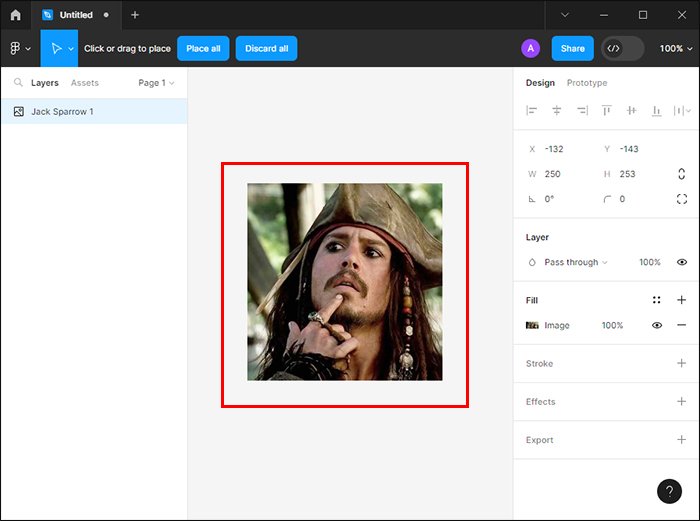
- Navigate your artboard and click on the position you want the image dropped.
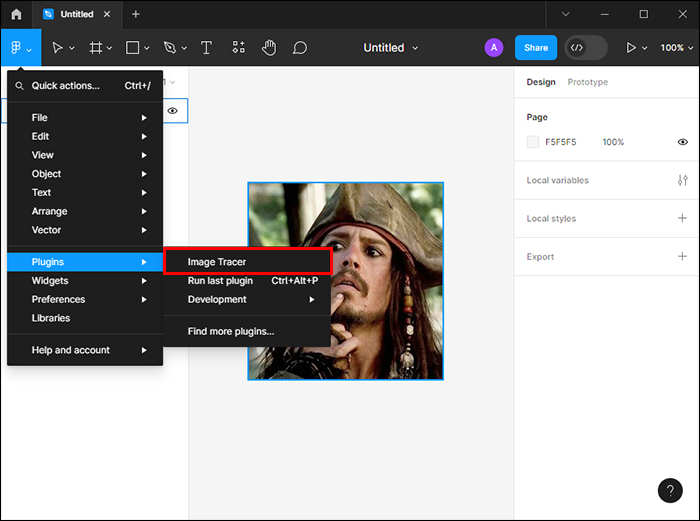
- Click on the Figma “F” icon on the top left corner to expand the menu, then select “Plugins” and go to “Find more plugins.”
- The search results will take you to the “File” page.
- Locate the “Plugins” tab next to it to find “Image Tracer” and install it.
- Return to the “Plugin” section in the menu, select your image, and then choose “Image Tracer.”
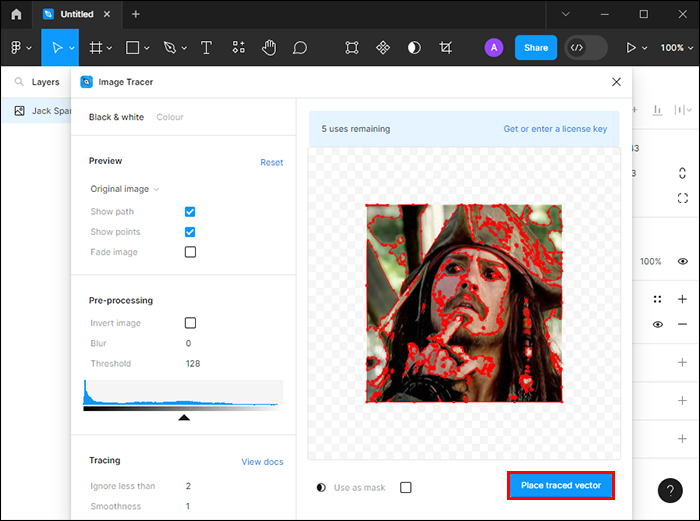
- Select “Place traced vector” to create a traced image. You can then make preferred adjustments to the picture.


You also only get a few tries to test the Image Tracer plugin before you need to obtain a license key. It can be obtained for free with limited options or as low as $10, depending on the plan you select.
Figma Quick Tracing Plugin Settings
Once you’ve installed and launched the Image Tracer plugin, follow the next steps :
- Drag and drop your image file onto the blank canvas. Select the image.
- Choose “Plugins.”
- Click “Image Tracer” to open the plugin.

The new Figma plugin panel will then be displayed with an option to choose between Grayscale and colored image settings. The functions vary with each option. Here’s how each setting operates:
- Grayscale: Selecting this color scheme changes your image into a black-and-white vector layer.
- Color: This option is perfect for graphic designers looking to transform photos into colorful vector art.
The Figma quick tracing plugin also provides you with preview options. You can choose between the Original image, Processed image, and Traced vector. Artists can also enable settings such as Show paths, Fade images and Show points. Their functions are as explained below:
- Show points: Displays an overlay of vertices to which the traced vector belongs.
- Show paths: This option allows you to see an overlay of the traced vector path.
- Fade image: Selecting this option makes the traced path and vertices appear more clearly by making the photo faint.
Before you quickly trace the image on Figma, the plugin, by default, changes the photo to black and white. It’ll then provide you with three attributes to choose from. Below are the properties:
- Invert Image: This attribute flips the traced image, switching what is black to white and vice versa.
- Blur: If you’re looking to achieve a smoother trace to help lax the image resolution details, you should increase this property’s value.
- Threshold: This setting determines which parts of the traced image are included in the vector graphic. You’ll have to keep adjusting these until you obtain your preferred results. If you get this option just right, you can create exceptional artwork.
Why Use Figma Quick Tracing?
Graphics design can be complex, and some images can be hard to work with. Figma quick tracing makes them easy to process. Here are some unique instances where quick tracing is useful:
- Raster Images: These types of photos can’t be scaled unless you’re willing to compromise on quality. However, using quick tracing converts them into vector images. This allows you to scale images however you like without losing quality.
- Space-saving: Vector images take up little space on your PC compared to raster images. The small size guarantees faster processing and enhanced performance.
Popular Plugins for Quick Tracing in Figma
To quickly convert raster images to vector images, plugins are necessary. Installing them makes the conversion process so much easier and quicker. The plugins listed below are some of the most common ones.
Image Tracer
This is the most popular Figma plugin for tracing images. It allows you to change the photos into vector layers directly. It’s perfect for raster images, quick tracing, and restyling pictures.
Vectorize
Vectorize is handy for converting images to vectors. It is an excellent design tool for artists seeking to transform logos, icons, and other graphics into geometric files.
Remove BG Plugin
This is yet another useful Figma plugin that is designed to get rid of the image background. It makes converting the photo quick and easy.
Several plugins are available for quick tracing in Figma. Image Tracer ranks as one of the most reliable ones. But you can try various options before settling on the best one for you.
Figma Quick Tracing Tips
It’s every graphic designer’s dream to make excellent artwork. If you’re new to Figma and want to create unique images, this section highlights a few tips that can help perfect your quick tracing:
- Image resolution plays an essential role in determining how your traced image results. When an image is highly pixelated, the vector picture will bear curvy edges. The reason is its sensitivity to the tracing algorithm.
- If you want your traced image to have a high resolution, select the “Outline Trace.” Be aware that the resultant picture will appear in Grayscale format.
- Quick tracing uses the original image when you select an image layer. But if you want to use Figma quick tracing on an altered photo, you’ll have to frame it and run the plugin on the parent frame.
- Images with over 2M pixels will be downsized using the Figma Image Tracer plugin. With this in mind, it’s best to frame the photo you want to use and use the scale tool to resize it. You can then run the plugin on the parent frame.
- To view the image being traced, you’ll have to tweak the options popup in the dropdown menu from “Original menu” to “Processed Image.”
Trace Images Like a Pro With Figma
Figma image tracing allows you to convert images into vector graphics quickly. It does all these while still maintaining the image quality even after resizing. This makes it a useful design tool for logo creation and any other graphics that may be required in multiple sizes. Be aware that you should avoid any copyright infringement. If an image is copyright protected, reach out to the copyright holder and request to use it.
How do you plan to use quick tracing in Figma? Share your thoughts with us in the comments section below.
Disclaimer: Some pages on this site may include an affiliate link. This does not effect our editorial in any way.