Having the same footer on each page of a Google Doc doesn’t require much altering. Most likely, you’ll use the footer for numbering pages to keep your document organized.
But what happens if you want to add a footer in Google Docs to only one page? Doing so will require a bit of fine-tuning on your end. But no worries, this process is relatively straightforward and won’t take more than 30 seconds of your time.
In this article, we’ll provide all the necessary instructions. Plus, you’ll also learn how to find page numbers in Google Docs and have different headers within the same document.
How to Add a Footer to Only One Page in Google Docs
It takes time to figure out how to add a separate footer in Google Docs. Tossing and turning the not-so-customization-friendly layout settings doesn’t help. In the main, because there’s no option available to add a separate footer for different pages in this app.
Luckily, there’s a way to get around this. It involves inserting a section break.
Section Breaks in Google Docs
Section breaks come in handy when you want to divide the document you’re working on into multiple sections. This is because all pages in Google Docs share the same formatting by default – margins, page numbers, footers, headers.
If you want to change any of these elements, you’ll have to insert a section break. That way, each section will act as a separate document, and you can change any element you want there. For that reason, we’ll first show you how to insert a section break, which will lead us directly to adding a footer to only one page in Google Docs.
Follow the steps below to insert a section break and then customize your footer:
- Launch Google Docs and open the file you want to edit.
- Locate the page where you want to add a footer.
- Place your cursor right at the end of the previous page, just after the last sentence. Remember – the previous page, not the one you want to add a footer to (current one).

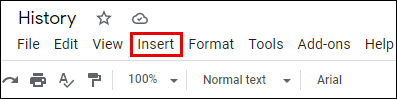
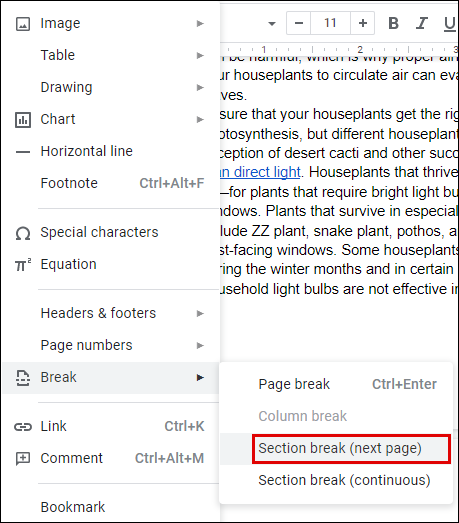
- Click on Insert at the top menu.
- From the dropdown menu, choose the Break option and then click on Section break (next page).
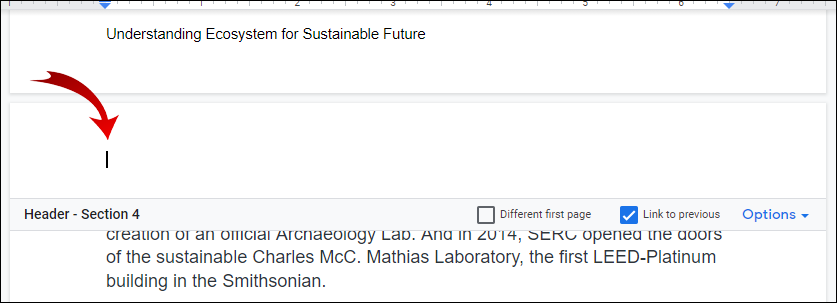
- Now you’ll see that your cursor moved to the following page. Potentially, you’ll see a line break at the end of the previous page as well.
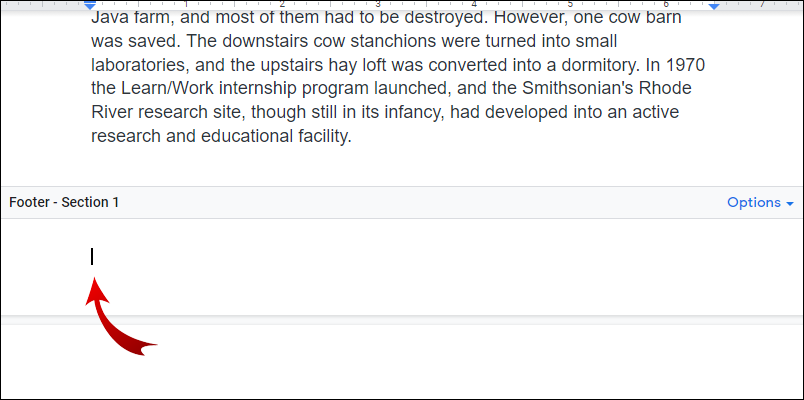
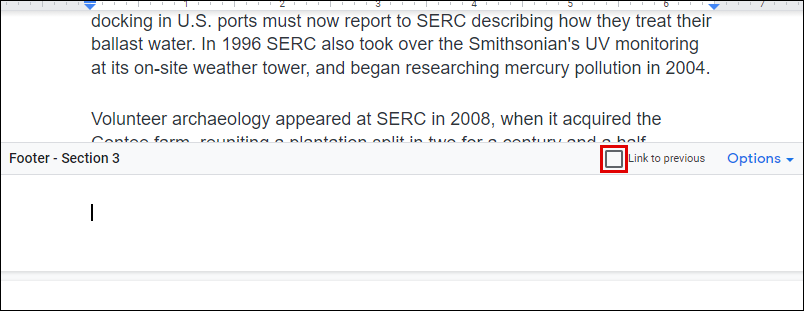
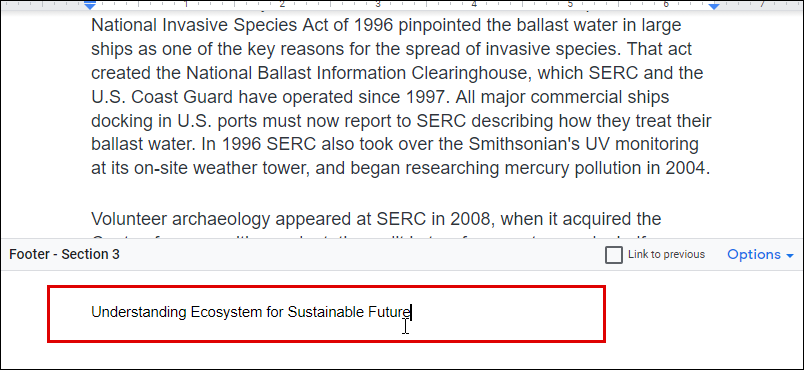
- Head to the bottom of the page where your cursor went and click on the footer.
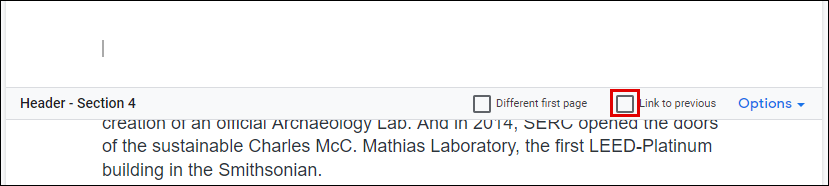
- From the footer options that appear, make sure to uncheck the Link to previous option. This will set your footer to behave as a separate document – you can format it any way you want.
- Add content to your footer. Once you’re finished, hit the Esc button on your keyword to close it.
You have now customized the footer settings for one page. You can scroll up and see that the footers are different for the current and the previous page. However, on the following page, your footer will still be the same. You’ll have to go over the steps again and apply them on every page as required.
Note: If you see a section break line appear after applying Step 6, you can hide it by doing the following:
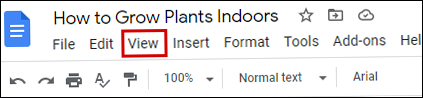
- Head over to the top Google Docs menu and click on View.
- Uncheck the Show section breaks option.
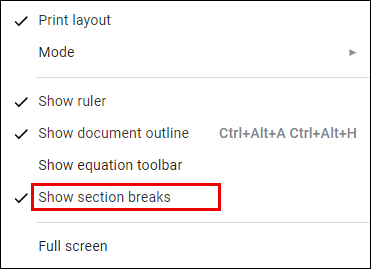
Now you won’t be able to see the section breaks anymore.
Additional FAQs
Here are some questions that might be useful regarding the footer customization settings in Google Docs.
How to Insert a Footer in Google Docs
Inserting a footer in Google Docs is as easy as it sounds. This tool can be quite handy for adding information to your page or adding page numbers, for that matter.
Follow these simple steps to insert a footer in your Google Doc:
• Launch Google Docs on your computer and open a new or an existing document.
• Click on the Insert section from the top menu.
• Go to the Header and Footer section and choose the Footer option.
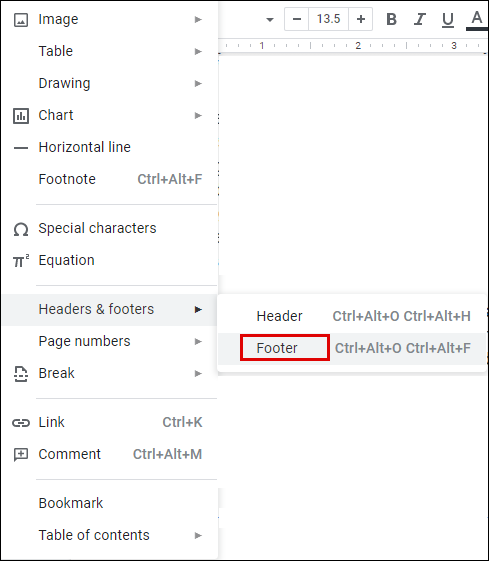
This will now create a new footer on all your Google Docs pages.
Another way to add footers is through keyboard shortcuts:
For Windows, hold the Ctrl and Alt buttons, then press the “o” and then the” f” key.
For Mac, hold the Control and Command button, press the “o” and then the “f” key.
These commands will make a new footer or move to existing ones.
How Do You Find the Page Number on Google Docs?
Organizing your pages by adding numbers to them is essential when working with longer documents. Google Docs doesn’t automatically number pages as you write them, so you’ll have to activate this feature manually.
The only way you can see page numbers by default is by using the scrolling sidebar at the right of the screen. As you scroll through your document, you’ll see the bar show a small black box with the page number you’re currently on. You’ll see something like “5 of 17,” meaning you’re on the fifth page out of seventeen existing pages.
To add page numbers to your document so they’re visible on the paper, follow these steps:
• Open the Google Doc you want to add page numbers to.
• Head over to the top menu and click on the “Insert” section.
• When you hover over the “Page numbers” section, it will show you a few options. Choose between the four available layouts for how you want the numbers to display on the page.
• (Optional) Format the numbers by bolding, underlining, or applying any other text editing option you wish.
How to Have Different Headers in Google Docs
Just like with footers, Google Docs doesn’t have an option that will simply let you have different headers on different pages in your document. That’s why you’ll have to apply the steps that will first insert a section break between two pages and then add a new header. The section break will “break” the formatting settings of your document and allow you to change them anyway you want.
Follow the steps below to insert a section break and then customize your header:
• Launch Google Docs and open the file you want to edit.
• Locate the page to which you want to add a header to.
• Place your cursor right at the end of the previous page, just after the last sentence. Remember – the previous page, not the one you want to add a header to (current one).
• Click on Insert at the top menu.
• From the dropdown menu, choose the Break option and then click on Section break (next page).
• Now you’ll see that your cursor moved to the following page. Potentially, you’ll see a line break at the end of the previous page as well.
• Head to the bottom of the page where your cursor went and click on the header.
• From the header options that appear, make sure to uncheck the Link to previous option. This will set your header to behave as a separate document – you can format it any way you want.
• Add content to your header. Once you’re finished, hit the Esc button on your keyword to close it.

Can a Footer Be Different on Each Page?
If you follow and repeat the steps from the “How to Add a Footer to Only One Page in Google Docs,” you can set your footers to be different on each page.
You’ll have to insert a section break that will allow you to make formatting changes to your document first. Then, you’ll have to add or edit your existing footer and then repeat these steps for each page.
It might take a while if you have tons of pages, and each has to have a separate footer. But for now, this is the only way to get around this.
Tweaking Google Docs According to Your Needs
Adding footers to only one page in Google Docs can’t be done through the footer and header layout settings. Luckily, there’s a workaround here, which we have outlined above. All you need to do is insert a section break that will let you change the format of your page as if it was a separate document. Then, just add content to your footer, and you’re done.
You’ve also learned how to tweak your headers the same way. Now you won’t have to spend time figuring out how to set footers and headers differently for each page.
Do you find adding footers to only one page useful? And what about headers? Let us know in the comments section below.
Disclaimer: Some pages on this site may include an affiliate link. This does not effect our editorial in any way.