Notes, an iOS app that found its way to OS X in Mountain Lion, is a great way to keep track of simple items and tasks, especially when combined with the syncing capabilities of iCloud. In keeping with its simplistic heritage, however, the OS X version of Notes lacks any preferences that allow users to customize their note-taking experience.
One customization option that many may find useful is the ability to set a default font size. Notes lets users change the default font to one of three choices (Noteworthy, Marker Felt, and Helvetica), and allows users to change the font size manually once a note has been created, but there is no way in the menus to set a default font size for new notes.

Like many OS X apps, however, settings that are not readily accessible in the app’s user interface can still be changed by modifying preference and configuration files.
To change the default font size in Notes, first close the app and then head to your system’s Applications folder (/Applications) and right-click on Notes.app. Select “Show Package Contents,” which will open a new Finder window. Navigate to Contents > Resources > en.lproj. That last folder is for English language users; those using OS X in another language should navigate to the appropriate localization folder (de.lproj for German, es.lproj for Spanish, and so on). In this folder you’ll find a preference file called “DefaultFonts.plist.”
This file is locked to prevent unauthorized changes. You can edit it by creating a duplicate of the file on your desktop, modifying it there, and the copying it back to its original location. An easier way, however, is to use the built-in Nano text editor in Terminal, along with a “sudo” command to give yourself the proper permissions to edit the file.

To do this, open Terminal and type the following command, changing the “en.lproj” as described above if necessary:
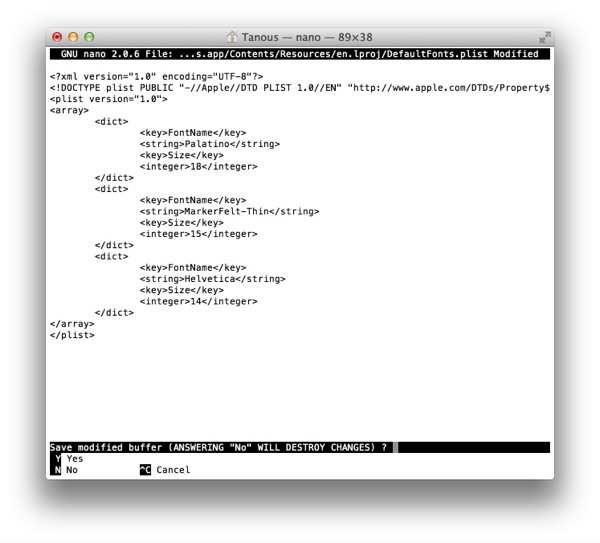
sudo nano /Applications/Notes.app/Contents/Resources/en.lproj/DefaultFonts.plist
Terminal will prompt you for an administrator’s password and then will open the file in the Nano text editor, which you’ll navigate using your keyboard’s arrow keys. Below some header information, you’ll see three entries for the three default font options in Notes. In each entry is an integer value which is set to 15 or 14 by default. This represents the default size for each font. To change it for one or more fonts, move your cursor using the arrow keys to the number’s location and replace it with a larger or smaller one. You’ll want to experiment with font sizes in Notes first so that you know what size works best for you.

Once you’ve changed your font sizes, save the preference file by pressing Control-X. Nano will ask you if you’d like to save the changes. Press the “Y” key to do so and then press Return to overwrite the existing file. You can now close Terminal.
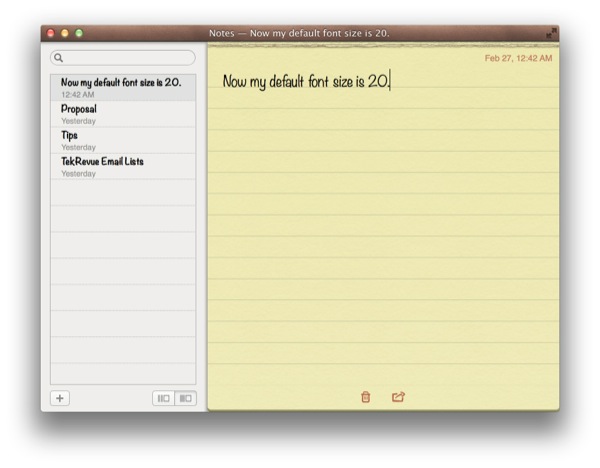
Finally, open Notes again and create a new note. You’ll see that your default font size has increased to the value you set in the preference file. If you don’t like the change, simply close Notes, reopen Terminal, and enter the command again to further modify the preference file.
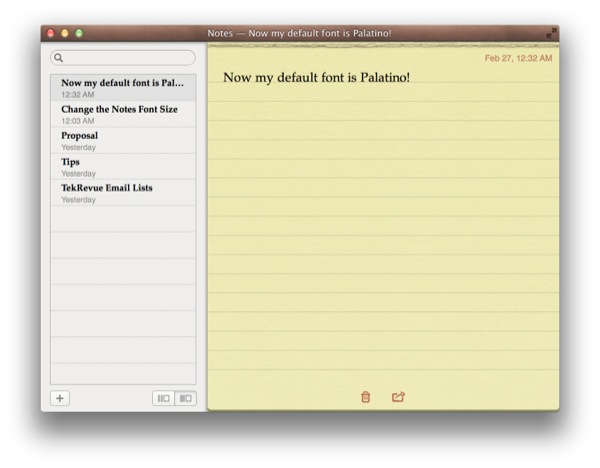
If you’d like to further customize the default options in Notes, you can also change the default font to one besides the default three that Apple includes. To do so, edit the preference file as we did above, but this time change the string value under the Font Name key. In the example screenshot above, we changed the Noteworthy font to Palatino. Once we saved the changes and reopened Notes, our default font was Palatino.
As long as the font exists in your /Library/Fonts/ folder, you can set it as a default font in Notes. With a little experimentation, the already useful Notes app can be perfectly customized to suit any user’s needs.
Disclaimer: Some pages on this site may include an affiliate link. This does not effect our editorial in any way.