If you’ve been using your Mac for a while, you might have come to a point where you don’t have available storage. This makes it difficult to download files or install new programs.
Mac doesn’t always make it easy or straight forward to clear up space. Use this guide to get more storage for your favorite photos or videos.
Freeing Up Space on Your Mac
Newer Mac models are coming with more storage capabilities with each update. However, users also have more files than ever before. Thankfully, your Mac has a few options to make storage management easier.
Checking your available disk space on your Mac is easy. Follow these steps:
- Click on the Apple icon.
- Click on About this Mac.

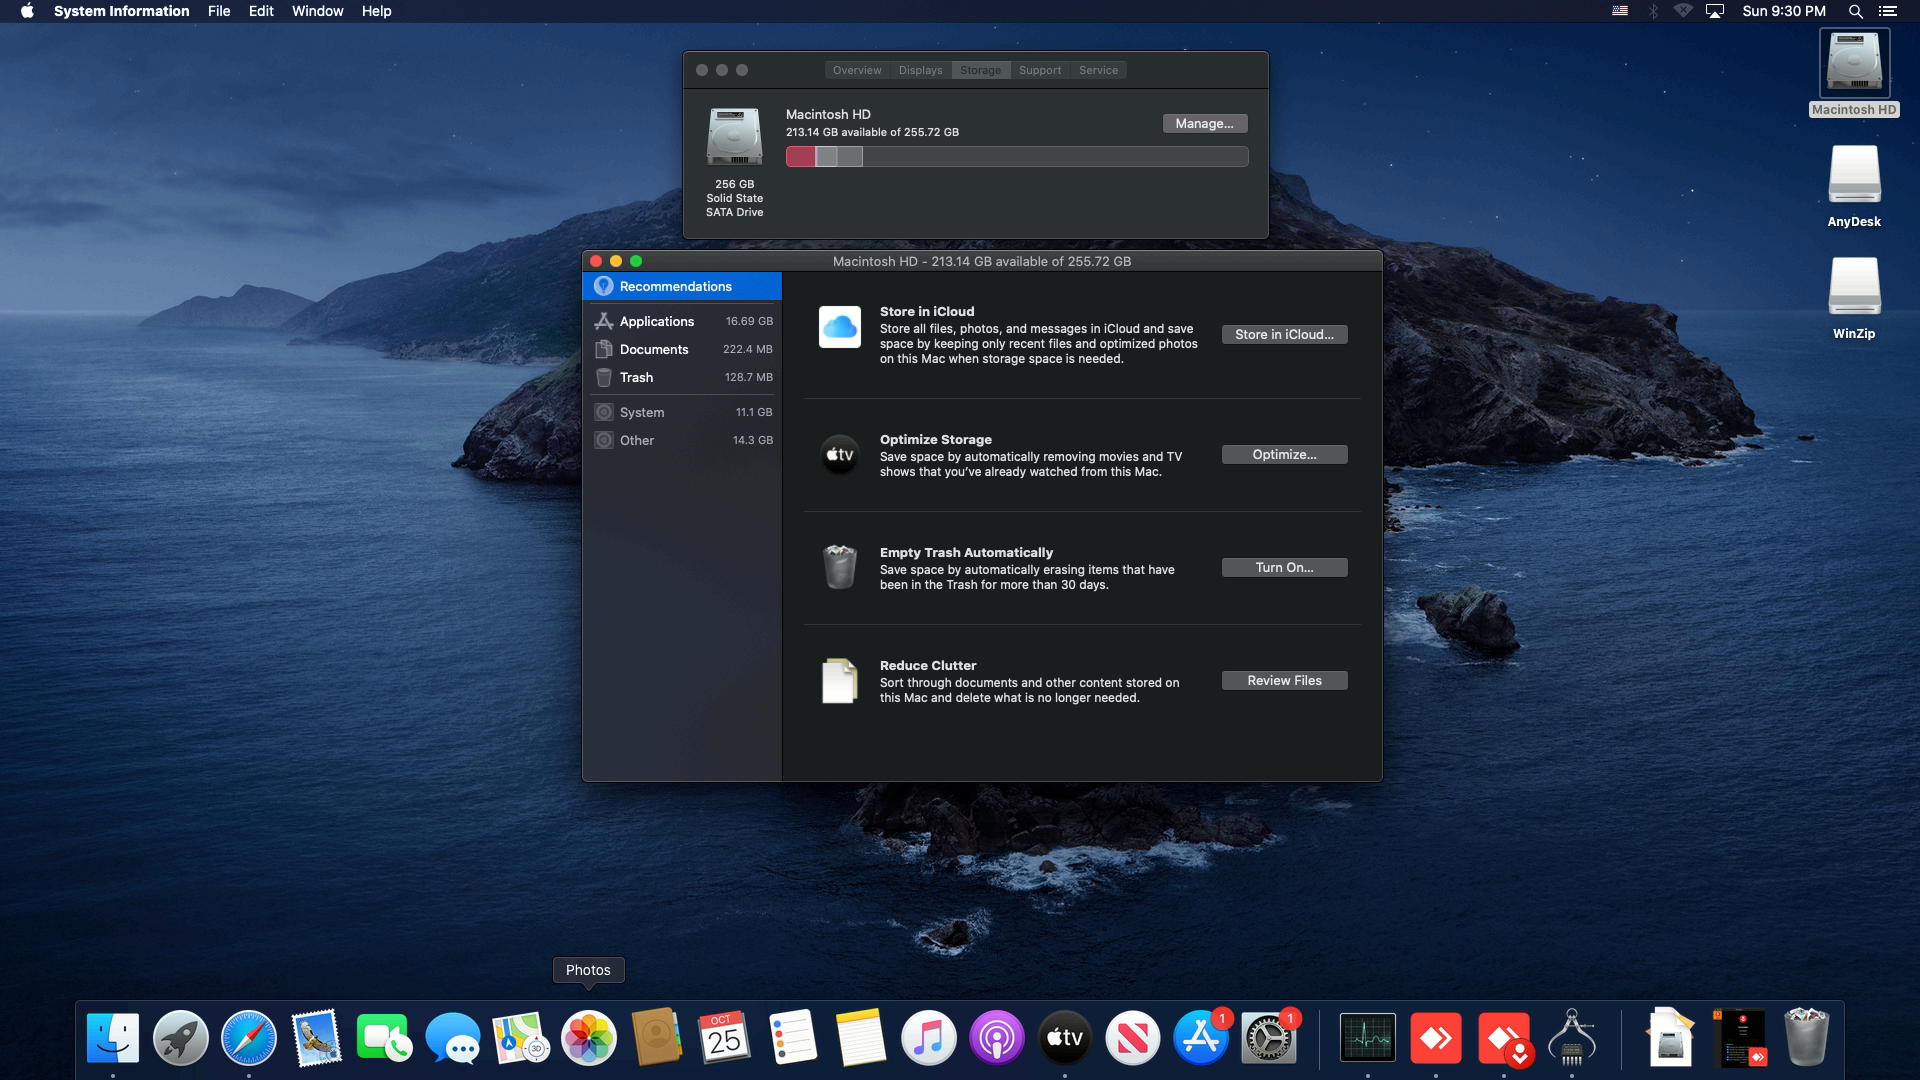
- Select Storage, on older Macs, you will need to select More Info and then Storage.

The menu will show the basic breakdown of your hard disk management, and you can click on each part to learn more details about it.
If you see a large number of non-application files, such as photos and movies, these are files that are easiest to move elsewhere. We will show you a few handy methods for cleaning up your Mac.
How to Free Up Space on Mac Startup Disk
If you’re receiving a notification that your disk is almost full, your Mac won’t be able to receive new updates. You will also have a more challenging time updating your applications.
Your startup disk will contain your most used applications and most background data that your system uses. Over time, this will pile up so it’s essential to keep the size of those files in check.
Clear Trash
A straightforward way to free up space is to empty your Trash. Whenever you delete a file on your Mac, it goes to the Trash application’s storage. If you don’t remove it from there, it will still take up space on your hard disk.
To delete files in the Trash, right-click on the docked app on your toolbar and press Empty Bin. Another way is to open the Trash application, then click Empty in the upper right.
If you’re using a newer version of Mac (macOS Sierra or later), you can also set up your Trash to empty automatically every once in a while. To do so, follow these steps:
- Click on the Apple icon.
- Open About this Mac.
- Select Storage, then select Manage.
- Next to Empty Trash Automatically, select Turn On.
- Your Mac will continuously remove files in the Trash that are over 30 days old.
Remove Caches
If you’re still low on space, you will want to remove your application caches. Removing the cache can save a tremendous amount of space depending on how long and how frequently you use memory-heavy applications, such as Photoshop.
To remove the cache of most applications, follow these steps:
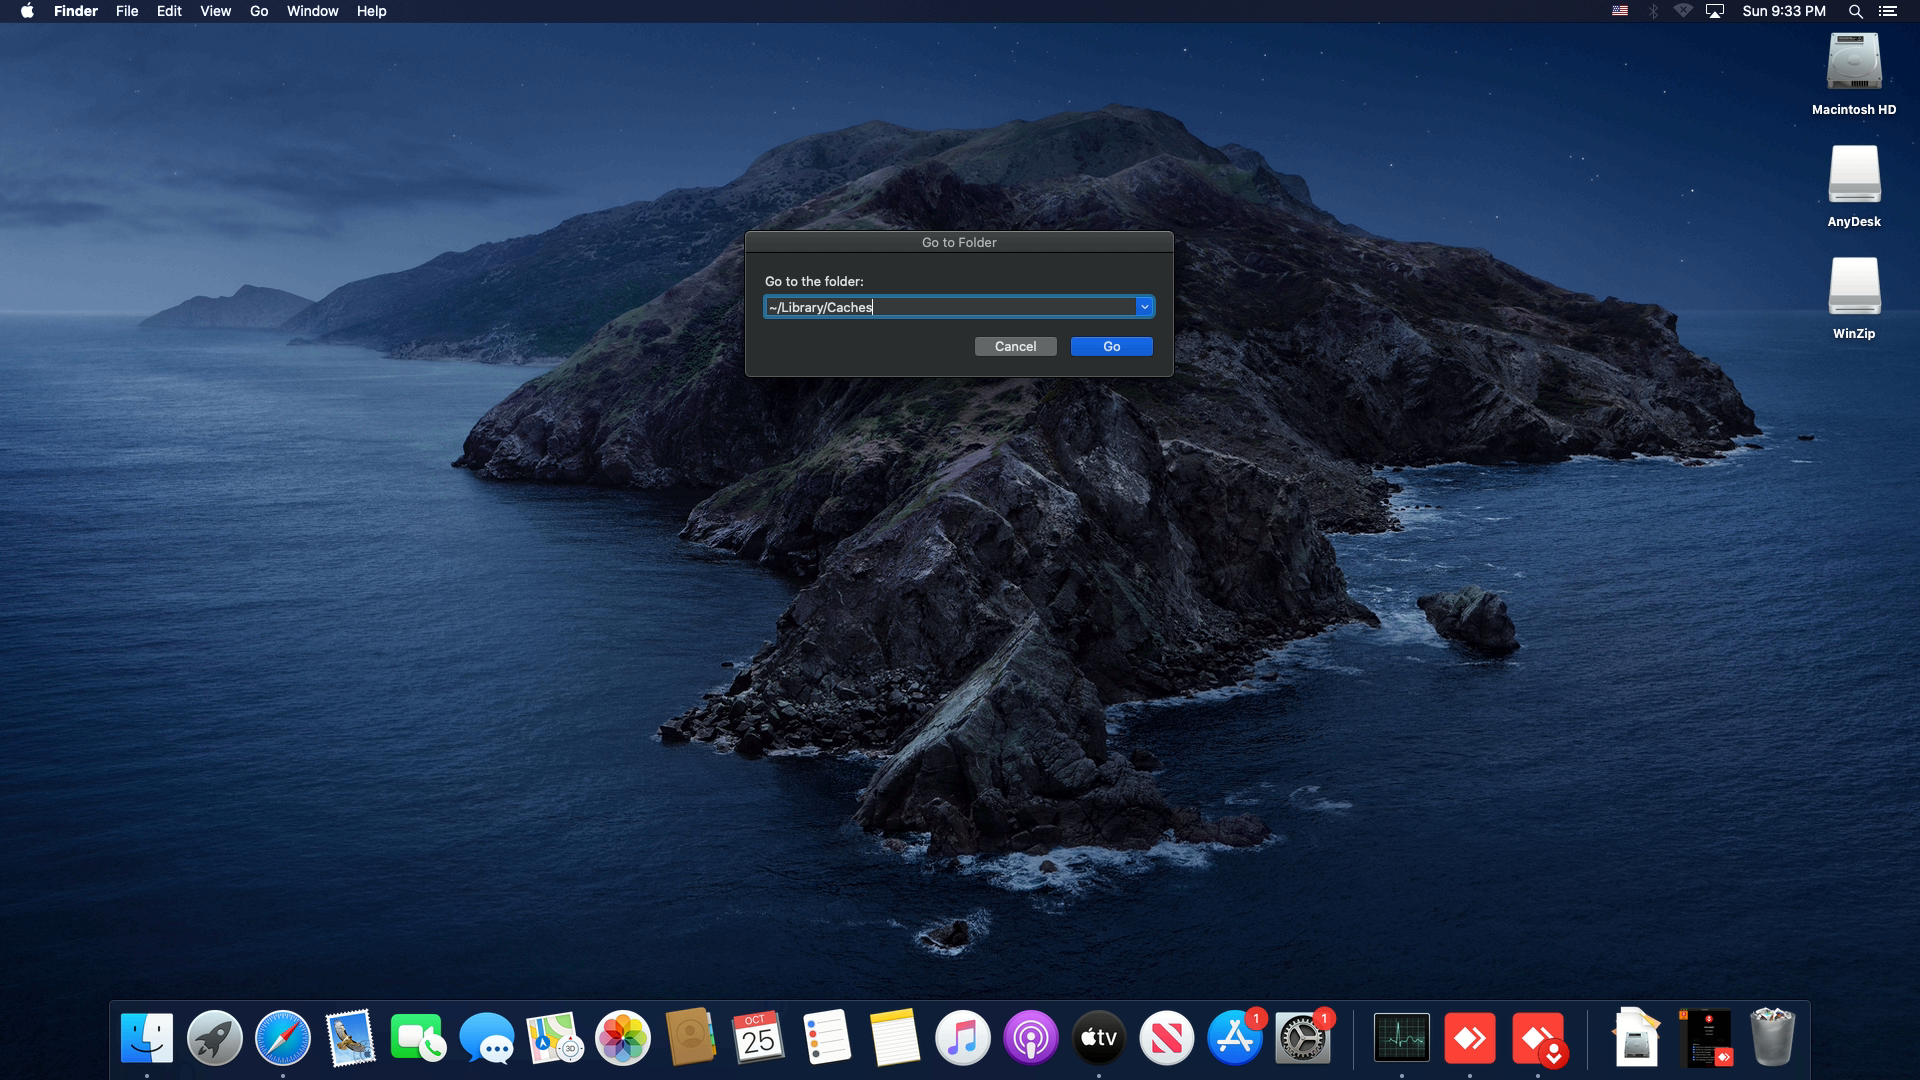
- In Finder, go to Go, then select Go to Folder.
- Type in “~/Library/Caches.” This will open a menu of folders, each with a cache for an application on your Mac.
- Go to each of the folders and delete the files inside. This might be tedious if you have a lot of folders, so prioritize folders taking the most space.
- Repeat the process when you go to “/Library/Caches” without using the ~.


A handful of applications will do this for you if you install them on your device. Some of these you won’t have to pay for and will be available for trial.
When you do delete these files, make sure to clean up the Trash folder afterward.
Clear Browser Cache
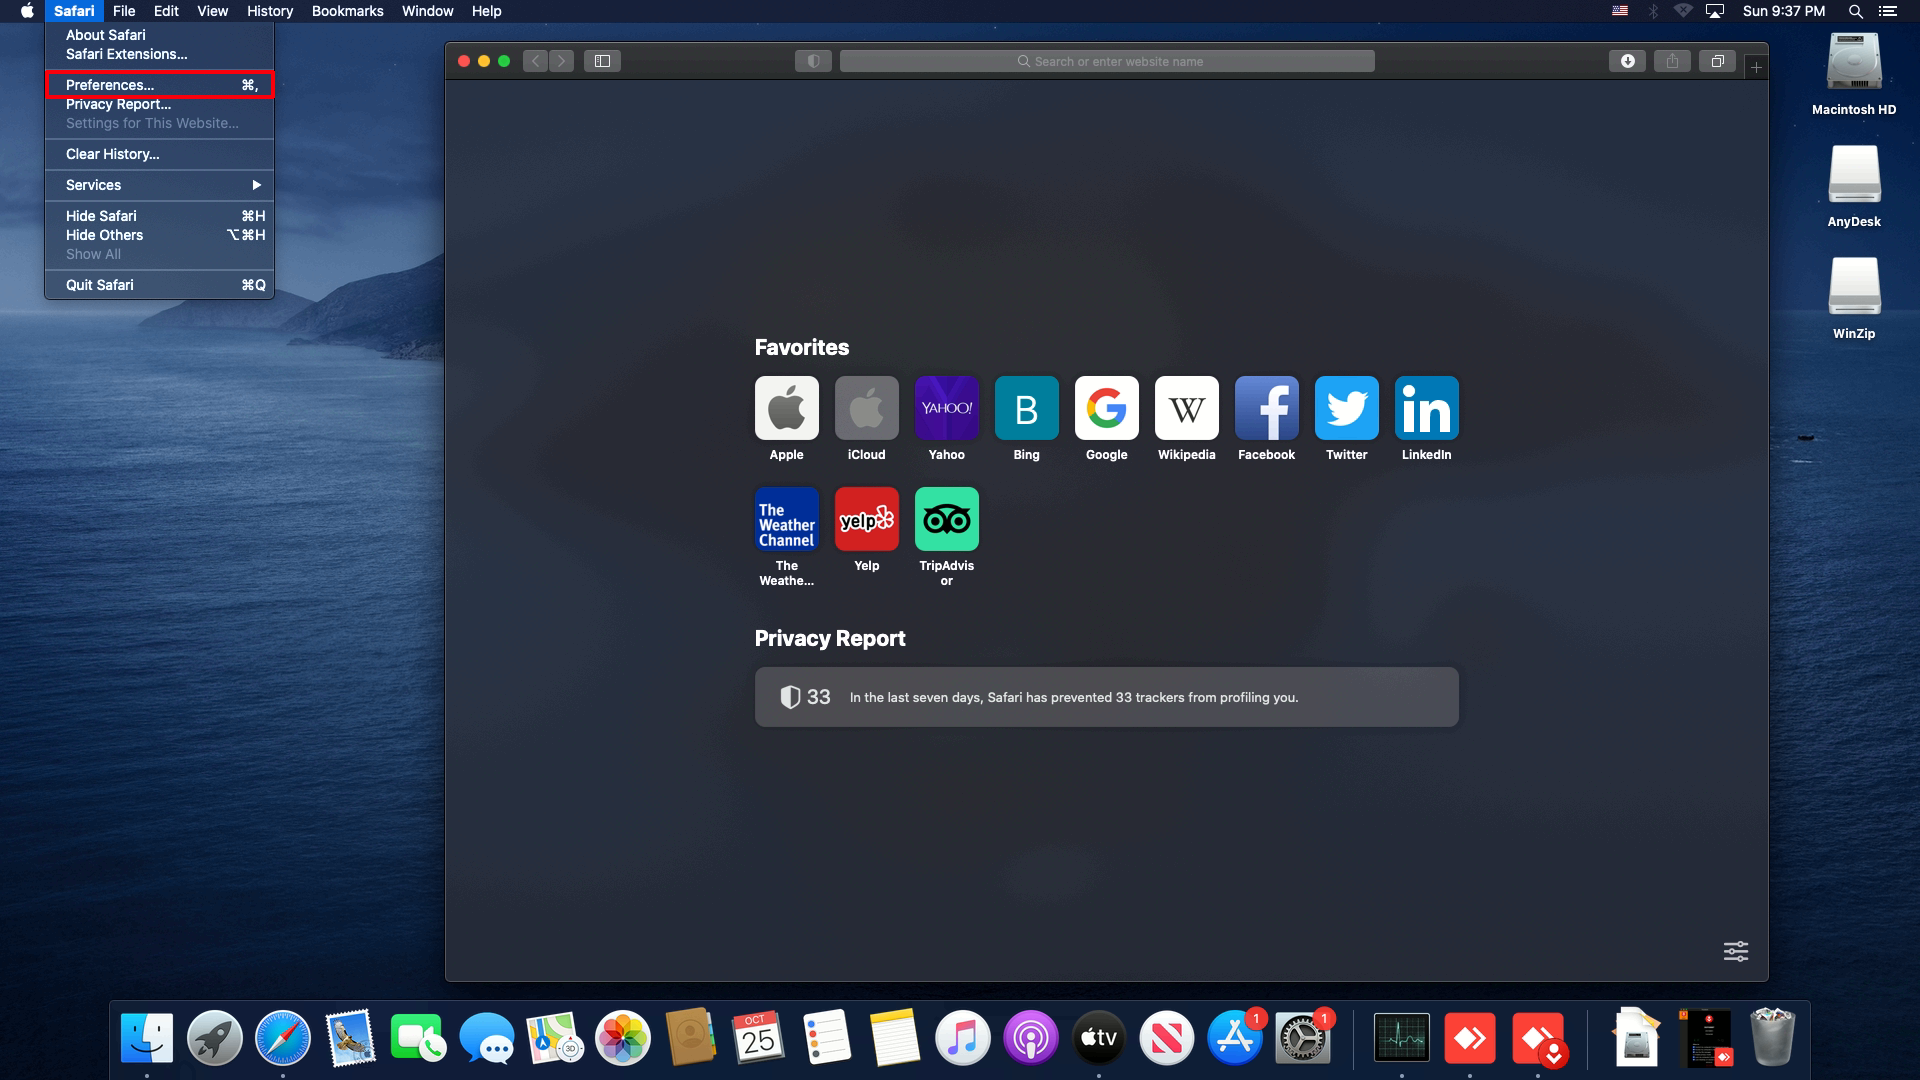
Browsers can also store a lot of data on your Mac, which can add up after a while. To remove Safari browser cache, follow these steps:
- Click the Safari icon to open your browser.
- In the menu, click on Preferences.
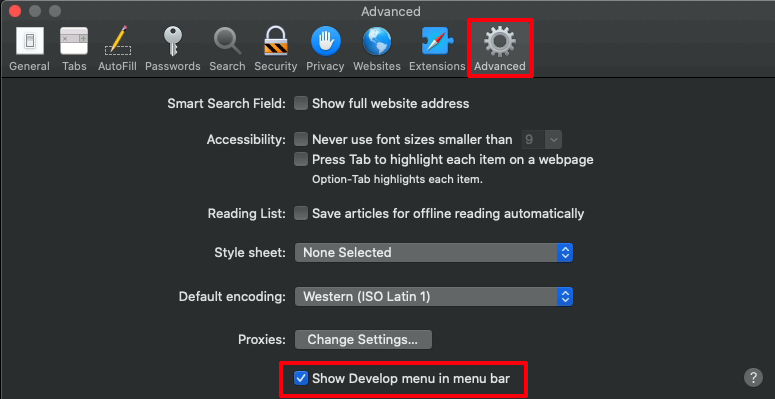
- Select Advanced and tick the Show Develop menu in the menu bar checkbox.
- Click the Develop button in the menu bar and choose Empty Caches.
- Close the Safari browser to complete clearing the cache.
If you’re using a different browser, go to its settings to remove its cache.
Clear Downloads
Another folder that can take up a lot of space is your Downloads folder. You can find it in the following location: /Macintosh HD/Users/Current User/Downloads
Delete old downloads that you no longer need or any outdated application installations. You can sort the files in the Downloads folder by name, size, type, date, and various other options, allowing you to find what you don’t need and remove them quickly.
Remove Mail Downloads
If you use the stock Mail application, you might need to check on it as well. The easiest way to find the folder that contains these downloads is to type in Mail Downloads in the search field of Spotlights.
Another way to open the folder is to go to the Finder (shortcut Shift+Cmd+G) and then type in ~/Library/Containers/com.apple.mail/Data/Library/Mail
Once there, select the files you don’t need and remove them. Make sure to empty the Trash afterward.
Remove Old iTunes Backups of Your iPhone and iPad
If you have old backups of your iPad and iPhone, you’ll want to remove them, they take up a lot of disk space.
- Go to ~/Library/Application Support/MobileSync/Backup to view the backups available.
- Select the ones you want to delete and click Delete Backup.
How to Free Up Space on Mac by Deleting Photos
If you have many photos, they are likely causing the bulk of your space issues.
The default destination for your photos is Photos Library, located in Users > [your username] > Pictures. You may be storing photos elsewhere on your Mac, so just adjust the steps accordingly.
Once you open Photos Library, you can remove any photos you don’t wish to keep. Alternatively, you can move them to an external hard drive or the cloud.
To store photos in the cloud, open the Storage Management options as described above. In there, locate the Store in iCloud option and click it, then select the Photos option there. All of your high-resolution images will be saved in the cloud and only the optimized versions will be on your Mac. Whenever you need to open a photo, the Mac will download the full file from the iCloud for viewing.
The Cloud option can also similarly save your Documents and can do the same with your Messages.
If you want to use an external hard drive to store your photos, plug the drive into your Mac and move the photos from the libraries that you use.
How to Free Up Space on Mac Catalina
macOS Catalina is one of the newer versions of macOS and will have all the previously mentioned options at its disposal. Most importantly, Catalina has access to the Storage Management options discussed above.
Another Storage Management option you can use is cleaning up clutter. This can be accessed via the Storage Management menu. Select Reduce Clutter. The application will open a list of all large files that you might no longer need. From there, you can easily remove them and save precious storage space.
Catalina can also automatically remove old videos you’ve already watched. To do so, go to Storage Management and select the Optimize Storage option, In there, select Automatically remove watches movies and TV shows. Any movies you’ve downloaded and watched through iTunes will be removed this way.
How to Free Up Space on Mac Yosemite
If you’re using an older version of macOS, such as Yosemite, then the options are more limited. Yosemite doesn’t have an integrated management option, as discussed above, so the only way is to check for files you want to remove manually. Alternatively, you can download a storage management application to do this work for you.
How to Free Up Space on Mac El Capitan
Likewise, as El Capitan is older than the Sierra model of the macOS, it also doesn’t have an integrated Storage Management option. To check which version of macOS you have, go to the Apple menu, then select the About this Mac option. The Overview tab will let you know which version you’re running.
If you want to use Mac’s default management options, you will need to update your operating system. Otherwise, all you can do is search for files to remove manually or use some of the more popular software to do it for you.
Free at Last
Managing your storage in your Mac is a great way to dodge headaches with low space and the inability to download updates. Thankfully, newer versions of Mac have all the appropriate options to make this hassle-free, and all you need to do is check them and forget about them.
Which of the storage management options worked for you? What macOS version are you using? Let us know in the comments below.
Disclaimer: Some pages on this site may include an affiliate link. This does not effect our editorial in any way.