Windows 10, Microsoft’s latest operating system, boasts lots of improvements and features for users. With an emphasis on connectivity, apps, and data sync, it’s become useful for not only the everyday tech person but business people as well.
But even such a streamlined OS isn’t immune from errors, software failures, or malware. If you’re reading this, then for whatever reason, an unwanted circumstance has occurred. Windows 10 is in a state you consider unusable and now you need to reinstall it. That, or you’ve replaced some hardware or are transferring storage to a new system.
This is also an excellent way to remove “bloatware” from your system. Windows 10 is typically packaged with laptops or compatible devices which contain lots of software you didn’t install. These are not usually necessary, unwarranted, and do little except take up HDD space and processing power.
Regardless of the reasons, you need to reinstall the OS.
What You Need
To make sure your reinstallation goes as smoothly as possible, it’s important to have the following things prepared:
- Windows 10 OS on USB/Disc
- External HDD (Optional but useful)
- System for OS Reinstallation
- Any Software Discs (Ex: Software for GPU Drives)
- Backups of Files
- Internet Connection (Broadband or 3mbps wireless recommended)
Just like you’re installing software on a brand-new system, a reinstall isn’t that much different. Get the things listed above into an organized area, so you’re not scrambling around when you begin the reinstallation process.
Windows 10 Requirements
While we assume your reinstallation is on a laptop or PC without the OS already there, some may decide to upgrade from Windows 7/8.1. Or, at some point, you have experienced a hardware change. Whatever the reason, these are the requirements for Windows 10. Make sure system meets the minimum standards. Otherwise, your system may not run at all.
- 1 GHz CPU (Processor) or Faster
- 1 GB of RAM for 32-bit systems, 2 GB of RAM for 64-bit systems
- Minimum 16 GB of free HDD space
- Broadband or Wireless Internet (recommended 3mbps)
- GPU Graphics Card that supports DirectX 9 or above
- Microsoft Account
Questions for Reinstall
You might have a few questions about the pre-reinstallation process. These can be good to know to save yourself some time.
- I did a free upgrade from Windows 7/8, can I still reinstall?
- Do I still need my product key?
- Can I still reactive my OS?
If you happened to have upgraded your Windows 7 or 8 installation for free, then yes, you can still reinstall Windows 10. Your system will still be recognized as “upgraded” by Microsoft when registering.
Speaking of registering, you will only need your product key if you activate Windows 10 while offline. When online, Windows 10 will automatically register itself in the background. The only reason this wouldn’t work is if the key or registration isn’t legitimate.
To answer the final question, reactivation is also an automatic process. However, if you made changes to your hardware, such as changing the motherboard, your version may no longer be valid. Fortunately, this is not a common problem, and for our purposes, not something we’ll worry about.
With these quick FAQ’s out of the way, it’s time to begin reinstalling the operating system. Before anything, make sure you create backups of all files and data (if you can).
Reinstalling Windows 10 With Flash Media
In the past, installing operating systems was usually done with a disc. While that’s still an option, another method individuals employ is flash media via USB to install. For this, you’ll need a compatible USB flash drive with Windows 10 optimized on it.
It’s important to note, just having a Windows 10 install on the USB isn’t enough. They have to be prepared and recognized by the BIOS flash boot before any actual installation can take place.
Preparing the USB Drive
You can create the installation media on a disc too, but for now, we’ll focus on a USB drive. To get started, first, you will need the installation ISO from Microsoft. These ISO’s can be found on Microsoft’s website.
But once again, having the ISO isn’t enough. You’ll need to prep the ISO on the USB so it can be read by a booting PC.
To do so:
- Download the Windows 10 ISO file from the link.
- Download the Windows 10 Media Creation Tool.

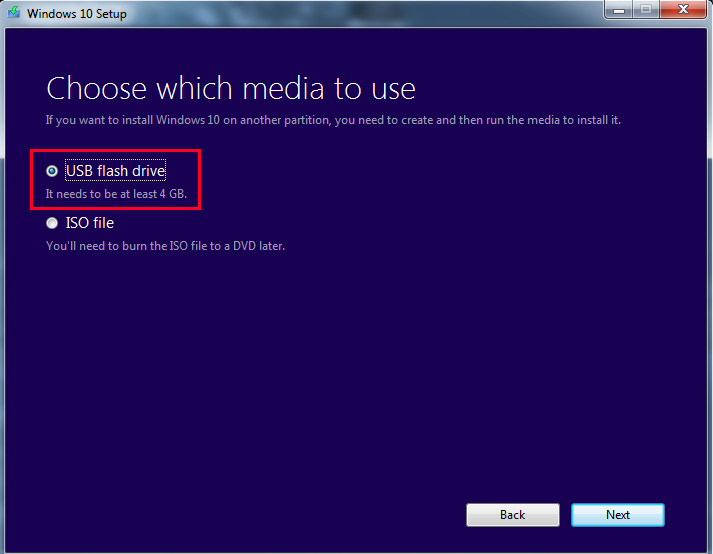
- On an available PC, plug in the USB drive you wish to use for reinstallation. Make sure there is enough space on the USB drive (about 4GB is recommended).
- Run the Media Creation Tool.
- You will be prompted with several options, one for Upgrading and another for preparing the USB. Select Create installation media for another PC.

- You’ll be prompted to choose the version (64-bit or 32-bit) and Language. Choose these options as appropriate.
- You will be asked to select the media for preparation. Select the USB drive you plugged in. NOTE: All data on the USB will be deleted, so it’s best to use a new or blank USB drive.
- Once complete, your installation media should be ready to go.


It’s important to note you may also need to download files to fully “assemble” the ISO. The time will vary depending on the speed of your internet.
Entering BIOS/UEFI to Boot From USB
Now, it’s time to reinstall the operating system using the USB. Reinstallation requires booting from the USB media.
- To do so, make sure your flash drive is plugged in and restart (or power on) the system you desire to reinstall the OS on.
- Next, you will need to go to the BIOS screen to do so, on boot you will need to rapidly press either the F8, F10, F12, or Del key. You can typically find which one you need to press by looking at the corners of your screen, it will vary based on the make of your motherboard.
- Once done, you will arrive at the BIOS screen. Again, it will differ slightly based on motherboard and hardware specifications. However, all BIOS share the same core options.
- Look for a section that details boot options, which should give you a choice to boot from a device. It’s here you’ll select and boot from your flash drive.
However, if you are reinstalling on a newer OS such as Windows 8.1, instead you will have a UEFI set of options.
You can access the UEFI using a simple method.
- Holding Shift while you restart the PC will bring you to the boot settings menu on startup. You will likely need to find the firmware settings to boot from your USB.
- On the blue screen available, click the Troubleshoot square and then Advanced Options.
- Look for UEFI Firmware Settings. A restart option should be available for selection. Selecting restart will put you in the separate boot menu.
Like BIOS, however, the hardware and make of your PC will determine where some settings are located. You should find a Boot from device option somewhere in a boot settings area, but where it is exactly is not always the same.
To Boot from UEFI/BIOS:
- Look for and select Boot Device.
- Scroll to find your connected Flash Drive.
- Press Enter or Select and your PC should then boot from the USB.
- The reinstallation process should begin.
From here, you will see a series of options depending on the setup. For instance, if installing Windows 10 on brand new hardware, you will be asked to input the registration number. Since we are reinstalling, however, you will simply select “I don’t have a product number.” Activation will occur once the OS is installed.
The following process will take some type depending on several factors. Throughout the installation, however, multiple screens will appear in which you need to select the correct options.
When the “Which type of installation do you want?” window appears, select Custom. This is because you’re not upgrading, you are doing a total reinstall.
There will also be an option for space partition. We assume you want to overwrite and delete all previous data if reinstalling on the same system. Therefore, select the option to overwrite the current partition. Otherwise, you may choose to partition the reinstall on the remaining HDD space.
If reinstalling a new system, the OS will install on the available hard disk space. From here, the installation process should finish up until you’re taken to a login screen. If you created a password, enter it now. If not, you’ll be taken to the main desktop.
At this point, if you’re connected to the internet, your Windows 10 OS should automatically register itself. If not, you will need to enter your product key when prompted. If you already did so, or registered before, but are unable to verify, it’s possible you installed with incorrect settings or changed designated hardware, such as the motherboard.
If the version of Windows is correct (Pro or Home) and you believe there are no issues but still haven’t been activated, it’s possible Microsoft servers are busy. You can restart the system also to try to resolve the issue (also good which to check for any boot hang ups).
If you still cannot activate your Windows 10 copy, either because of error or different hardware, you may need to contact Microsoft Support. You may also attempt to force activation by using the following command in command prompt (leave out quotations):
“slmgr.vbs /ato”
This restarts the activation prompt, asking for activation keys or whatever else is required.
Once you have activated Windows 10, you have successfully reinstalled the OS using a flash drive as your boot media.
Reinstalling Windows 10 With Disc Media
While flash drives work for some, others may not have one available. Or, prefer using traditional disc media. This can also be useful for storing physical copies of reinstallation media for Windows 10. Whatever the purpose, in this section we’ll cover how to reinstall the OS using a DVD disc. It follows similar steps to USB based reinstallation, though with a disc instead.
Like the flash drive, you need to create a bootable ISO for the system to recognize on BIOS setup. This media – the disc – will contain the Windows 10 ISO and files for installation. First, however, you must prepare your disc for the installation process.
Preparing the Disc
Again, download the Windows Media Creation Tool from Microsoft’s website. Per your specifications, this will create the ISO necessary to burn to a disc. Follow the link and download the appropriate version: https://www.microsoft.com/en-us/software-download/windows10ISO
Make sure you download the correct version which matches your hardware specifications. Home and Pro will have 32-bit and 64-bit versions. If you download and reinstall the incorrect version, activation won’t work, and you will experience hardware incompatibilities.
The tool will download and assemble your file. This will take time depending on your internet connection. Once done, it will give you an option to burn the ISO to disc media.
You will need the following before continuing:
- A PC with a DVD Writer/Burner capability
- A DVD disc with enough space (Minimum 4GB)
- A program that will burn the image to a disc as bootable media
Note that writing the files over will take longer than with a USB, so be patient during the process.
When you have the listed items ready, you can now move forward. The first step is to make sure your disc is ready to work as a bootable media.
- Insert your blank disc into the DVD drive.
- If you’re running Windows 10, there is a built-in program for burning media to a DVD. The option is also available for Windows 7/8.1. To use it, find the file location where the ISO file was saved.
- When located, right click the ISO and a dialogue box should appear. In the box, you should see an option for Burn disc image.
- Click on this option, and another dialogue windows will appear. You will need to select the file path for your disc burner (this should be filled automatically, but if not, is your DVD/Burn drive). Once selected, click Burn.
- Once the option is selected, your system will begin burning the ISO file to the inserted disc. This process can take some time and will vary based on hardware specifications of each user.
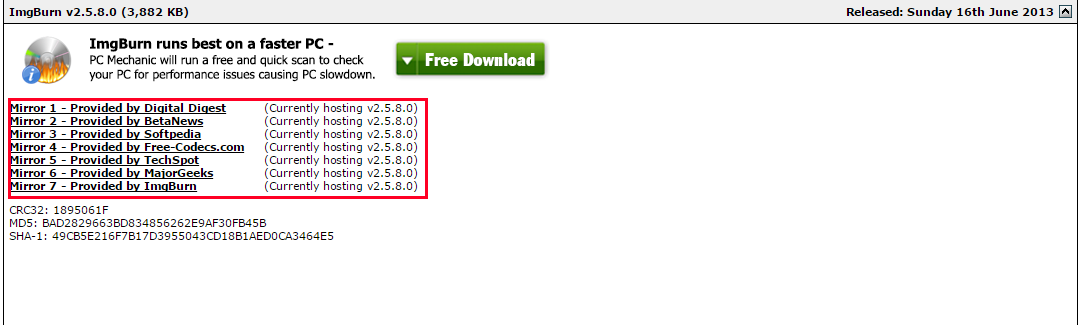
If you do not have the options for burning a disc, you will need to download a free program for disc burning. Most recommend ImgBurn, which is free and basic enough to cover our needs.
Creating the Disc Media Using ImgBurn
- Download the program from this site: http://www.imgburn.com/index.php?act=download
- Once download, find and run the program to install ImgBurn. When installing, select Custom Install. ImgBurn will attempt to install a web-plugin if you use express install.
- When custom install is selected, leave the boxed unchecked, then click Next.
- Once fully installed, run the program.
- When the program opens, you will see a variety of options. Select the top left option Wire image file to disc.
- You will be presented with a new screen, under which says Source, click the small image of a file to search for your Windows 10 ISO.
- Navigate to the folder where your Windows 10 ISO is located and select it.
- Once selected, you will be able to Write the file onto the disc. Click the icon at the very bottom to begin.
This process will take some time. Once completed, however, your disc media should now be ready to boot.
Now that you have created the boot media, you will need to reinstall Windows 10 from the disc. This requires accessing BIOS or UEFI (if applicable). Much like the instructions for booting from flash media, you will follow a similar path here.
You will first need to access the BIOS screen, assuming UEFI is not an option. On your PC startup, you will need to press one of the “F” keys quickly. This is usually F8 or F12, though all motherboards have their settings.
When correctly input, you will be taken to the system’s BIOS screen. From here, you will need to look for a boot option. Again, all motherboards have slightly different interfaces, so finding this may require some searching.
If located, you should see an option for “Boot from device” or “Boot from media.” You will want to select the drive with the disc media. This should be in a drive such as “D” or “E.”
Once you select this, the system will then boot from the disc. If burned properly, it will begin the reinstallation process. You will want to follow the on-screen instructions correctly. Choose the correct language and time settings, or any other settings required.
During this process, if connected to the internet, activation of your OS should be automatic. Or, you will be prompted to input your registration key. If not applicable or you do not have it, you can skip this setting and activate the OS once reinstallation has finished.
Assuming you have followed the steps correctly and settings are correct, Windows 10 should be successfully reinstalled.
This method takes longer and is a bit more complicated than creating a bootable flash drive. However, if you don’t have a flash drive handy or simply want to create a physical backup of the OS.
Resetting Windows 10
Another convenient option for doing a fresh reinstall of Windows 10 is to reboot the operating system. This is useful if you’ve upgraded from Windows 7/8.1 and want a clean install. Or, if you just want to circumvent some of the longer processes for a more expedited approach.
It’s important to note the reset will not always bring ideal results. Resetting the OS will bring it back to certain defaults. In some cases, this means it will include installed programs such as bloatware. It also cannot resolve issues such as data corruption, because you’re returning the system to a “state” instead of deleting data completely.
As before, make sure to backup all data, files, and programs you want to keep after the reset. You will lose everything that wasn’t part of the install’s original state. When you are satisfied, follow these steps:
- Click the Windows icon at the bottom left of the screen.
- Find and select Settings. You can type settings in the search function if you cannot locate it.
- Locate and select Update and Security. There should be an option for Recovery.
- Click Recovery and select Reset this PC.
- Under the Reset option you should see Get Started, and another option for Remove Everything.
- Select the latter. Once done, your system will begin wiping itself. Once again, make sure you have everything you want to be backed up.
Resetting Windows 10 for Purchased Devices
We mentioned a moment ago; Windows 10 sometimes comes with bloatware. These unwanted programs are usually part of a purchased system sale. You go to the store, buy a laptop, start up your new system only to find it has a dozen programs you don’t want. To your frustration, you find you can’t even uninstall all of them the usual way.
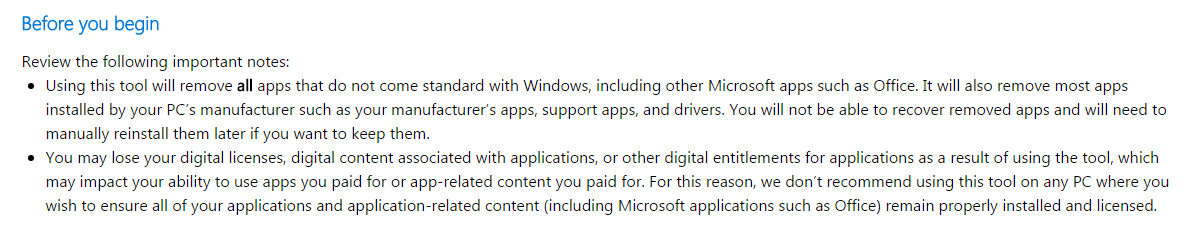
This is where the reset option comes in handy for purchased devices. It should, hopefully, return the system to a basic state. Note however you will lose all other important programs and will need to download them again. You will also need to download drivers and software updates for all installed hardware. However, if you’re okay spending a little extra time doing so, this step should work for you.
Before doing anything, backup all files (if any) on external drives. If you have them, also take and record product keys, as you may need to activate software again depending on what came with the purchased hardware. Double check to make sure you don’t need to “unauthorize” your software, so you don’t run into any future problems.
From here, you can now choose to reset Windows 10. You may follow the steps listed before. However, if you cannot find an option for resetting Windows 10, downloading the refresh tool is required.
To use the refresh tool:
- Download Microsoft’s clean install tool here https://www.microsoft.com/en-us/software-download/windows10startfresh
- Once you download the program, you should be able to run it. You will be prompted to accept the license agreement.
- From there, the tool will download any necessary files, up to 3GB. This process can take some time depending on your internet speed.
- You may choose to keep Nothing or Personal Files. The former will delete all current data, and the latter will retain what you choose.
- Once the settings and download are finished, Windows 10 will reset to manufacturer default. This should remove any unwanted files, programs, and settings.
This is a good method for creating fresh installs on purchased laptops or other devices which contain undesired hardware.
Backing Up Your Windows 10 Files
Any major reinstallation is going to set everything back to default. It’s handy when you want to remove unwanted programs, fix corrupted data, salvage a system infested with malware, or just start from scratch. But, in the process, typically all important files, programs, and data are lost.
So, it’s just as important to know how to properly back up your information before using our steps to reinstall. This requires both external media and, if applicable, utilizing some of Windows 10’s tools.
Before doing so, gather external media devices for storage. This can include anything like:
- USB Flash Drives
- DVD Discs for image burning
- External HDD’s
- External devices such as laptops or tablets
It’s also good to have an internet connection available. In some cases, you can backup and store information via online storage.
When you have gathered all suitable devices, begin listing out the files and programs you wish to make copies of. Files are easier, such as videos, music, word documents, and pictures, as they are single media types. Programs, however, cannot simply be copied or transferred over as their files are in an installed format. If you which to backup programs, you may only be able to copy its installation file.
For backing up files, select all applicable areas you wish to copy to an external drive. To make things easier, we recommend putting files in a single folder for each category. Documents for Word files, Pictures for images, etc.
You can backup this media by either transferring it or just copying it. Transferring files means you are moving the selected data to another applicable device or location. Copying it means you are replicating the data. Either will work for your situation.
To transfer data:
- Select all files and folders you wish to transfer.
- When highlighted, right-click. When the dialogue window appears, look for an option that says Send To.
- Highlight Send To, and you will see another series of options appear. If you have connected external media such as an external HDD or USB flash drive, this should show as one of the options.
- Select the external media, and all highlight files will begin transferring. This will take a varied amount of time depending on the file size amount and the write speed of your HDD and the external device.

You can also simply copy/paste all selected files to external media. When selecting files, right-click and select Copy. Then, in the desired external drive, right-click again and select Paste. This will create copies of all files but will leave the original files as well.
Troubleshooting
There are some common errors which occur during reinstallation. Some are more complex than others, but if you’re having trouble, here are a few possible issues you are experiencing and tips to resolve them.
- Reinstallation reboots constantly or stays the same for hours
Make sure you’ve unplugged all external media and devices that aren’t applicable to the reinstallation process. Also double check you’re reinstalling the correct version and architecture (Pro or Home, 32-bit or 64-bit). This typically happens when a person upgrades their older OS to 10 incorrectly. When you’ve double checked everything is right, try the reinstall process again.
- I can’t access the start menu!
A common occurrence which has plagued many people is their inability to even click the start button. Or for 10, the Windows icon at the bottom. Unfortunately, Microsoft hasn’t officially found a fix. However, the current workaround is to hold the shift key and restart your system, which boots it into safe mode. Booting into “safe mode with networking” and then restarting after the system boots in safe mode seems to temporarily resolve the issue.
- Windows 10 hasn’t registered OR don’t have my product key!
If you’ve already registered before with the same system you’re reinstalling Windows 10 with, give this process some time. Typically it’s automatic. In this case, you won’t need your product key. Some people report they have to restart the system multiple times before their OS is recognized. If you’re still having trouble (and this isn’t a different machine) you may have to contact Microsoft support to make sure it’s not an error on their end.
There are still numerous other issues that come with Windows 10 reinstallation, but they’re deserving of their own article. These problems, however, are among the most common.
Conclusion
Understanding how to reinstall an operating system, especially Windows 10, is important when the problems data corruption and malware are common. Just as well, sometimes resetting an OS back to its default state gives users a clean foundation to work with, especially when purchased devices are loaded with bloatware or unwanted programs.
By reading this guide, you should now have a general idea of how to reinstall Windows 10 on any compatible PC using boot media or Windows 10 reset. If you follow the instructions carefully, you should have no problems.
Remember, keep the following in mind:
- Have an internet connection
- Have external media such as DVD’s, external HDDs and flash drives for back up and boot media creation
- Make sure when reinstalling that you select the correct architecture (32-bit or 64-bit) and the correct version (Home or Pro)
- Make sure if reinstalling on new hardware that it meets the minimum requirements for Windows 10
- Backup all applicable files and understand you will lose any installed program when starting over
If you have any questions or problems, let us know in the comments!
Disclaimer: Some pages on this site may include an affiliate link. This does not effect our editorial in any way.


