
It’s no doubt that macOS has a great and thriving ecosystem. It’s often the perfect laptop for photographers, video editors, programmers, administrators, and many other fields. Unfortunately, there’s just some software that’s only available on Windows that would make some people’s lives over on Mac so much easier. Sometimes you need to be able to open up an Excel sheet and write down some numbers, or there are other times where Microsoft Word has to be used for a project. Suffice to say, there are programs that are exclusive to Windows that many Mac users need to are envious to use.
The good news is is that there’re plenty of ways to get Windows software working on macOS. Here’s how you can get those programs running your Mac in no time.
Running Windows on a Mac Using Boot Camp
Apple recognizes that there’s some reasons why people have to use Windows, and there’s just no way around that. So, they’ve come up with a pretty neat solution for those who need access to that type of software: Boot Camp. Boot Camp is a way that you can install Windows alongside macOS. The process is called dual-booting. You can only use one operating system at a time, but you’ll be able to pick and choose which operating system you need to use based on your needs.
Maybe you’re a gamer, but rely on Apple exclusive applications for your day job in video editing. Being a gamer, you know just how awful macOS is for gaming. By dual-booting, you can do your video editing by day, shut off your Mac at the end of the day, and then boot into Windows for some evening or late night gaming. That’s just one example on how this can work.
Of course, dual-booting isn’t for everyone. Sometimes you might need to run a macOS application alongside a Windows application. Unfortunately, you can’t do this natively with macOS, or even through dual-booting. Like we said, dual-booting only allows you to work with one operating system at a time, so for something like running application alongside each other, you will need to use a virtual machine.
Using a Virtual Machine to Run Windows on a Mac
Virtual machines software is something you can install on macOS, which will let you run a “virtual” operating system — the virtual part isn’t necessarily important here: all you need to know is that a virtual machine allows you to run another operating system in another window on macOS. You can choose to run various versions of Windows, Linux distributions, and you can even get macOS working on it.
Before we get started, it’s worth noting that a virtual machine can take up a considerable amount of your computer’s system resources. You need to allocate disk space and memory to these virtual machines. As far as memory goes, you should allocate at least 4-6GB to a virtual machine, with the latter being the most preferable. Anything lower, and your virtual machine is going to run at a crawl, often taking minutes to even respond to an action. With that in mind, your primary system should have around 16GB of RAM or memory for optimal performance. You can use a virtual machine with less, but again, you’ll take a huge performance hit.
We recommend using VirtualBox for Mac. This is a free piece of virtual machine software that you can download from Oracle. You can download it for free here.
Once downloaded run the installer. Launch the program, and you should see something like this.

- To create a Windows 10 virtual machine, hit the New button near the top of the screen.

- In the pop-up, give your Virtual Machine a name. You can call it whatever you want. Under the Type drop down, select Microsoft Windows. And then, under the Version drop down, select Windows 10 (64-bit).

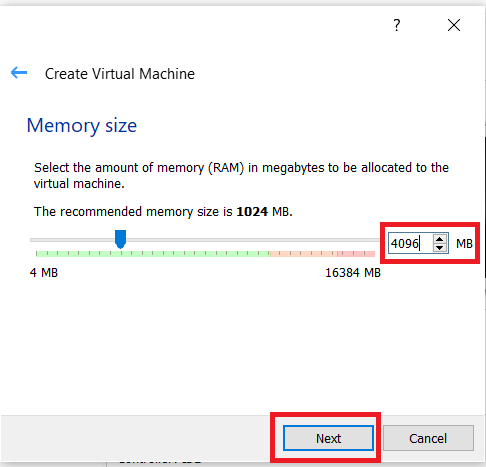
- Next, we need to allocate RAM to our virtual machine, set it to 4096 MB (4 GB) and hit Next. VirtualBox will recommend 2GB, but you’re going to experience some horrible performance at that. Windows 10 should run fine at 4GB, but if you want speed and snappy performance, anywhere between 6- and 8GB is optimal.
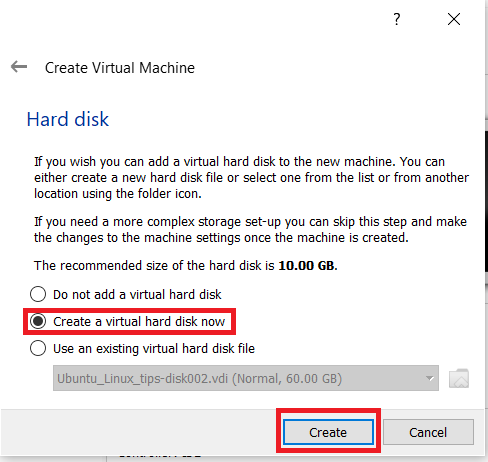
- Now, within the screen for creating our virtual hard disk, select the option that says Create a virtual hard disk now.
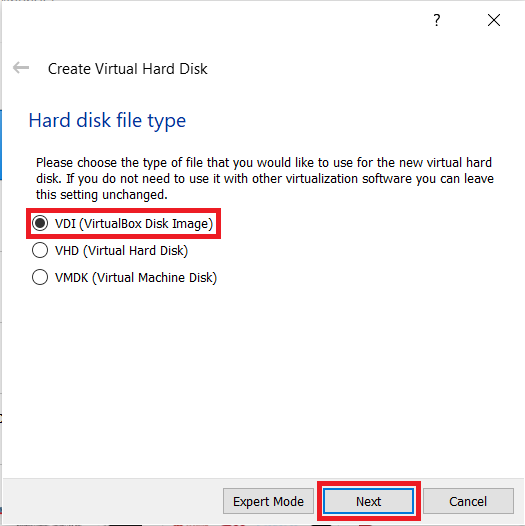
- Now, select the hard disk file type, the default option VDI (Virtual Disk Image) will work for most people.
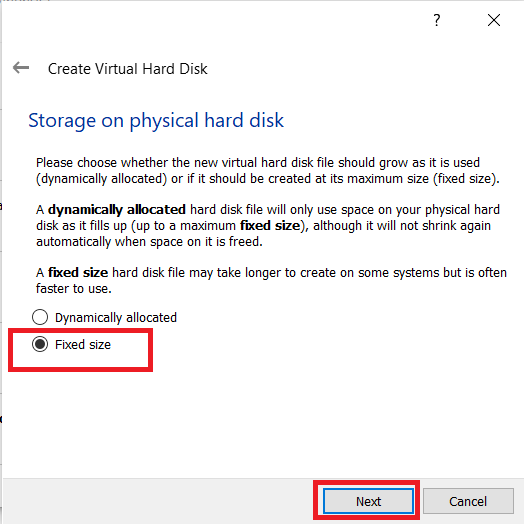
- Then, select the storage type and click Next. We recommend choosing the Fixed size option, as it will run the virtual machine faster, but Dynamically Allocated will also work if you’re limited on disk space.
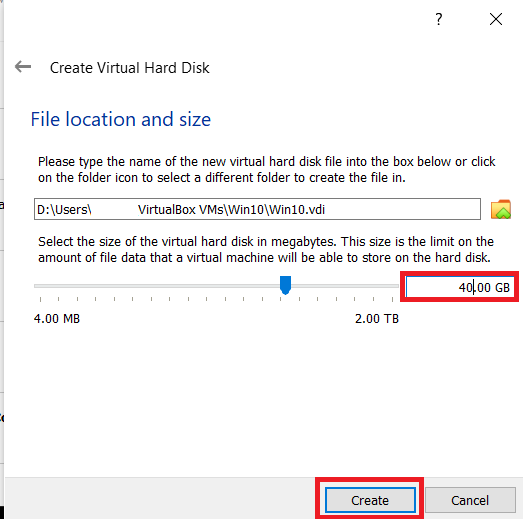
- Next, we’ll need to select the save location as well as the disk size and then click Create. We recommend giving it at least 40GB of space — Microsoft recommends 20GB for 64-bit Windows 10, but you always need more than their minimum recommended specifications for additional apps and files.
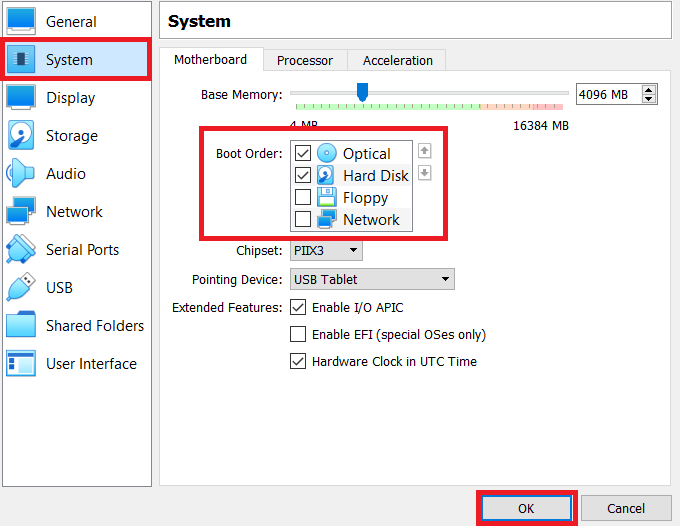
- Congratulations, you’ve created the virtual machine! Now all you need to do is install Windows on it. You’ll need to create an ISO image for Windows 10, and then under the System option in VirtualBox, you’ll need to change the Boot Order to Optical first. Select Optical, and then make sure it sits above Hard Disk. Press OK.

Now, you’re ready to start your Virtual Machine! Select it in Virtual Box and press the Start button with the green arrow. Your Virtual Machine will launch and take you through the steps of installing Windows 10, and once finished, you can install your Windows 10 programs as normal.
Using Remote Desktop to Operate Windows on a Mac
The final way to use Windows programs on Mac is through a remote desktop. It’s a lot less involved than creating a Virtual Machine, but will require you to have a spare Windows machine, whether at work or at home.

You’ll need to use remote desktop software on your Mac and PC. You can use something like TeamViewer, though it usually requires a license as well as someone to give you a PIN code for accessing your PC. You can follow the steps here to set all that up, though make sure to install the software on your Mac instead of your phone.
It’s worth noting that, if you’re trying to decide on what remote desktop software to use, GoToMyPC is probably the best here. It’s designed for personal use, so it won’t require you to always have that PIN code for access. It’ll cost you around $20 per month, depending on your type of usage, although corporate usage costs more. Get started with GoToMyPC here.
Verdict
As you can see, using Windows applications while on macOS is a complicated, long, and arduous task. If you’re looking for efficiency and time, the best way is to either dual-boot Windows 10 with Boot Camp or have a secondary Windows 10 PC available for use.
How do you use Windows apps while on macOS? Be sure to let us know in the comments section below!
Disclaimer: Some pages on this site may include an affiliate link. This does not effect our editorial in any way.


