If you’re working on your resume, a business document, or something else in Word, you may want to know how to insert a horizontal line to spruce up your work.
In this article, we’ll show you the quickest and easiest ways to add perfect horizontal lines to your Word documents. Plus, our FAQ section covers how to achieve horizontal lines in WordPress, and answers to the most commonly asked questions.
How to Insert a Horizontal Line in Word?
The quickest way to insert a horizontal line using Word is with “AutoFormat.” It works by typing specific characters three times then pressing “Enter” to turn the characters into a horizontal line:
Note: AutoFormat features are not available in Office Offline.
- Open the document and place your cursor where the line should be.
- Type in three of the following characters:

- Hyphens — (for a plain single line).
- Underlines___ (for a plain double line).
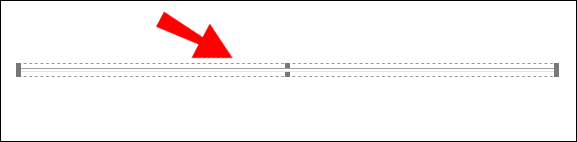
- The line will be inserted using the full width of the page.
Or use the “Horizontal Line” tool:
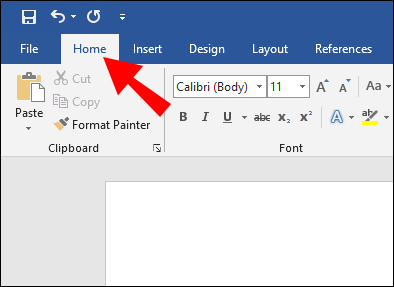
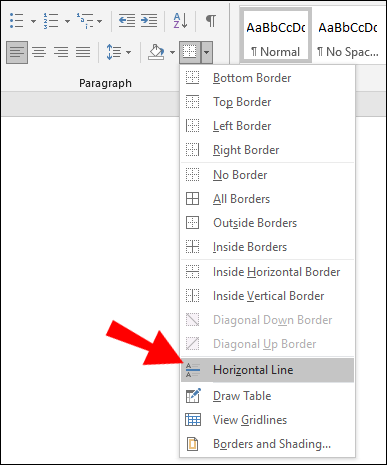
- Select the place to add the line.
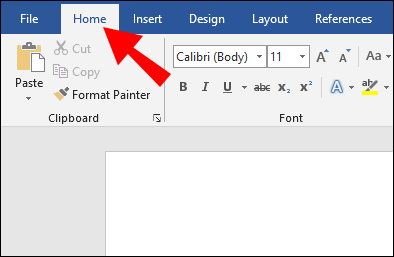
- Ensure the “Home” option is selected.

- From the “Paragraph” section, select the “Borders” pull-down menu and select “Horizontal Line.”
- To change the line design, double-click on it.
- From the “Format Horizontal Line” dialog box, you can modify the line’s alignment, color, width, and height.

Or to draw a horizontal line:
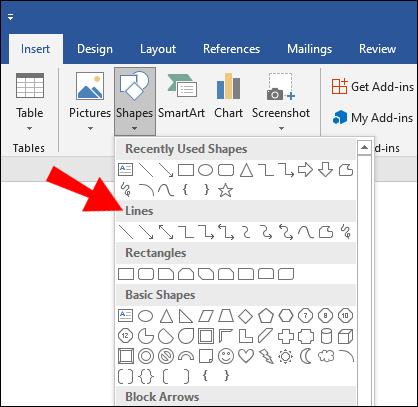
- Select the “Insert” tab, then “Shapes.”
- From “Lines,” select the style you want.
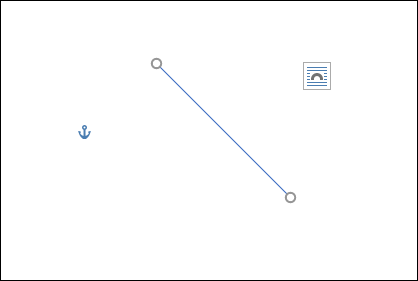
- On the document select the place insert the line.
- To draw the line, hold and drag your cursor, releasing it at the end.
How to Insert a Horizontal Line in Word on Mac?
The quickest way to insert a horizontal line using Word on your Mac is with “AutoFormat.” It works by typing specific characters three times then pressing “Enter” to turn the characters into a horizontal line:
Note: AutoFormat features are not available in Office Offline.
- Open the document and place your cursor where the line should be.
- Type in three of the following characters:
- Hyphens — (for a plain single line).
- Underlines___ (for a plain double line).
- The line will be inserted using the full width of the page.
Or use the “Horizontal Line” tool:
- Select the place to add the line.
- Ensure the “Home” option is selected.
- From the “Paragraph” section, select the “Borders” pull-down menu and select “Horizontal Line.”
- To change the line design, double-click on it.
- From the “Format Horizontal Line” dialog box, you can modify the line’s alignment, color, width, and height.
Or to draw a horizontal line:
- Select the “Insert” tab, then “Shapes.”
- From “Lines,” select the style you want.
- On the document, select the place to add the line.
- To draw the line, hold and drag your cursor, releasing it at the end.

How to Insert a Horizontal Line in Word on Windows?
The quickest way to insert a horizontal line using Word in Windows is with “AutoFormat.” It works by typing specific characters three times then pressing “Enter” to turn the characters into a horizontal line:
Note: AutoFormat features are not available in Office Offline.
- Open the document and place your cursor where the line should be.
- Type in three of the following characters:
- Hyphens — (for a plain single line).
- Underlines___ (for a plain double line).
- The line will be inserted using the full width of the page.
Or use the “Horizontal Line” tool:
- Select the place to add the line.
- Ensure the “Home” option is selected.
- From the “Paragraph” section, select the “Borders” pull-down menu and select “Horizontal Line.”
- To change the line design, double-click on it.
- From the “Format Horizontal Line” dialog box, you can modify the line’s alignment, color, width, and height.
Or to draw a horizontal line:
- Select the “Insert” tab, then “Shapes.”
- From “Lines,” select the style you want.
- On the document, select the place to add the line.
- To draw the line, hold and drag your cursor, releasing it at the end.
How to Insert a Horizontal Line in Word Online?
Here are two options for inserting a horizontal line into your Online Word document:
Use the “Horizontal Line” Tool:
- Select the area to add the line.
- Ensure the “Home” option is selected.
- From the “Paragraph” section, select the “Borders” pull-down menu and select “Horizontal Line.”
- To change the line design, double-click on it.
- From the “Format Horizontal Line” dialog box you can modify the line’s alignment, color, width, and height.
Draw a Horizontal Line:
- Open the document.
- Select the “Insert” tab, then “Shapes.”
- From “Lines,” select the style you want.
- On the document, select the place to add the line.
- To draw the line, hold and drag your cursor, releasing it at the end.
Additional FAQs
How Do You Type a Horizontal Line?
To draw a horizontal line using Word:
1. Open the document.
2. Select the “Insert” tab, then “Shapes.”

3. From “Lines,” select the style you want.
4. On the document, select the place to add the line.
5. To draw the line, hold and drag your cursor, releasing it at the end.
Or to add a line freehand:

6. Hold down “Shift” + underline key; release once you’ve got the length required.
How Do I Insert a Vertical and Horizontal Line in Word?
The following explains two ways to insert a vertical line in Word:
Draw the Vertical Line
1. From the document, select the “Insert” tab.
2. Select the “Shapes” icon, then select a line shape.
3. At the place you want your line to begin, click and hold down on your mouse button.
4. Drag your mouse to where the line should end, then release the mouse button.

Create Multiple Lines Using Tables
1. From the main menu, select “Insert” then ‘Table…”

2. At “Number of columns” enter the number of vertical lines you need.

3. At “Number of rows” enter “1.”
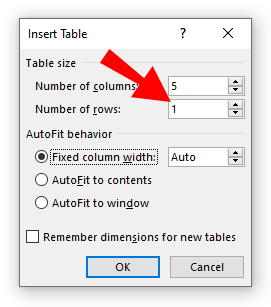
4. The table will be inserted.
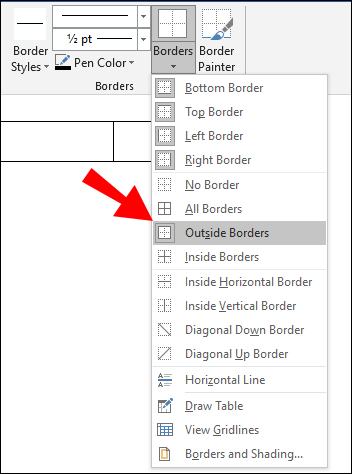
5. Then from the “Borders” pull-down menu in “Table Design,” uncheck “Outside Borders,” leaving the “inside vertical borders” checked.
How Do I Insert Multiple Horizontal Lines in Word?
If you want to add multiple horizontal lines in Word to add text to, use border lines:
1. Open the document you wish to add the horizontal lines to.
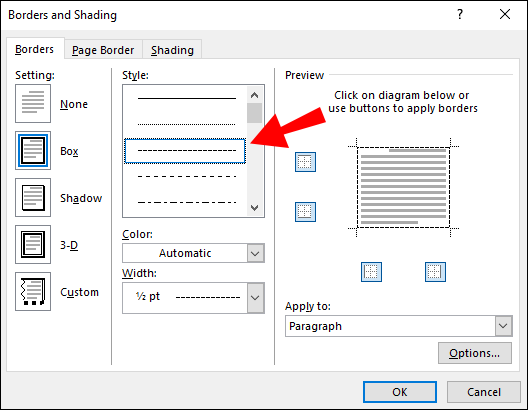
2. From the standard toolbar select the “Format” button > “Borders and Shading.”
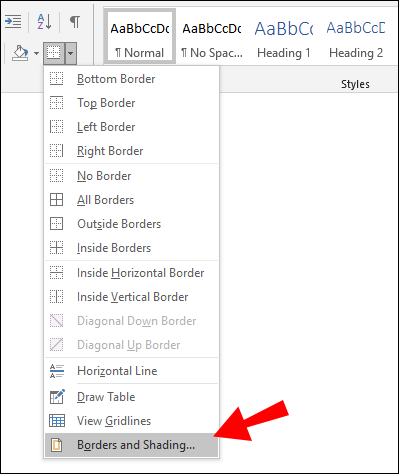
3. Select the “Border” tab.

4. From “Style”, select the line style width and color.
5. On the document, click where you wish to add the line.
6. To insert different colored lines and styles select “Horizontal Line.”

7. To position the line a certain distance from the text, select “Options” from the “Borders and Shading” window.
For multiple horizontal lines to be written on after printing, use tabbed lines:
1. Select “View” > “Ruler.”
2. From the Standard Toolbar check the “Ruler” box.
3. From the main Word menu, select “Format,” then “Tabs….”
4. In the “Tab Window” select “Clear all tabs.”
5. From the “Tab Stop” window, set a tab for where the right margin should end e.g. 6.0 inches.
6. Under “Alignment,” select “Right.”
7. In “Leader,” select one of the numbers listed for a straight line.
8. Click on “OK” then keep pressing the “Tab” key to insert a straight line.
9. Copy and Paste the lines or keep pressing “Tab” until you have the number of lines you want.
How to Insert a Horizontal Line in WordPress?
Here are three ways to insert a horizontal line into a blog post in WordPress:
Use the Block Editor
1. Sign in to WordPress and access a new/existing post to work on.
2. To add a new block where the line should be, select the “+” icon.
3. From the “Layout Elements” section, select the “Separator block.”
4. Add the horizontal line to your content area.
Use the Classical Editor
1. Sign in to WordPress and access a new/existing post to work on.
2. Above the post editor, if in the toolbar you only see one row of buttons, select the Toggle icon on the right to access the row with the horizontal line option.
3. Select the area where you need the line to go then, select the “Horizontal Line” button.
Use the Horizontal Line Divider With HTML
· Simply add the <hr> tag to your post’s content in the position where the line should be inserted.
Designing Sophisticated Word Documents Using Horizontal Lines
Word supports various ways of inserting lines into your documents to break up sections, for a neater layout, and to make them visually appealing and unique.
What method did you use to insert your horizontal or vertical line[s]? Did it achieve the look you wanted? We’d love to hear how your document turned out, let us know in the comments section below.
Disclaimer: Some pages on this site may include an affiliate link. This does not effect our editorial in any way.