Having access to a constant stream of movies and tv shows is now the norm for most people. As Chromebooks become more popular, you may wonder if the ChromeOS-based device is capable of supporting Kodi.
Kodi, formally known as XBMC (not quite as catchy as the newer name), is a completely free and open-source media player with a fantastic interface, a great theming engine complete with plenty of options and preferences, and the ability to add applications from multiple sources using software repositories.
In this article, we’ll show you how to install Kodi on your Chromebook.
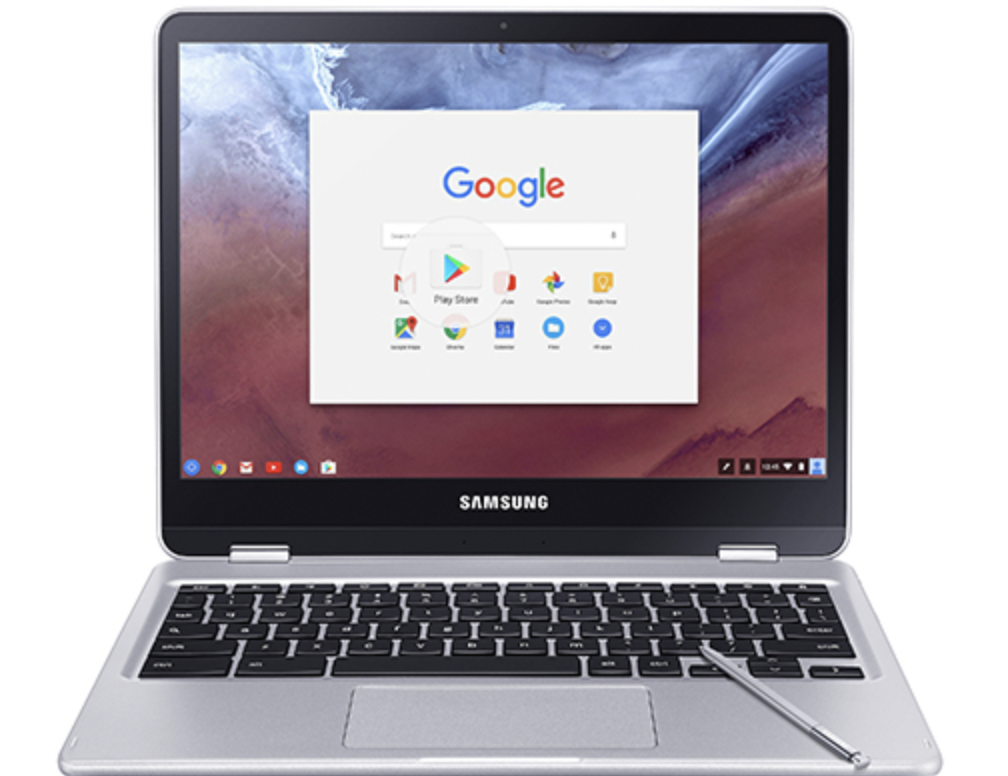
Using the Google Play Store on Chrome OS
These days most Chromebooks have the Google Play Store as a native app. If yours does, it’s pretty simple to get Kodi on your device.
The process of installing Kodi on your device is surprisingly easy, as you won’t have to deal with any difficult methods of installation or buggy processes to get the app up and running on your device. Instead, with the Google Play Store, you can quickly install an official version from Google and Kodi the same way you’d install an app on Android.

If you aren’t sure whether your Chromebook supports Kodi, you can view the full list here.
Here’s how to install Kodi:
- Launch the Google Play Store on your Chromebook.
- Use the search bar at the top to type in ‘Kodi.’

- Click ‘Install’ when the Kodi app appears.


Once the app is installed, launch your program and you’ll be actively using Kodi! You can then use Kodi exactly as you would on a desktop PC or an Android device. You can add your standard repositories, tweak the appearance of the app as you’d like, and do anything else to change how the app works on your end!
Installing Kodi Without the Play Store
Of course, if you’re here then you probably don’t have a Chromebook that supports the Play Store on the stable channel of the device (and you aren’t willing to switch to unstable Beta or Developer channels on your Chromebook; an understandable concern for most users), you do have the option of using some of those tools earlier to get your device up and running on your Chrome OS device.
This isn’t the easiest solution—and as we mentioned earlier, it can occasionally cause errors and other bugs to pop up, and even crash during media playback. We’ve also heard reports about some network problems when using this method. Given that neither method is ideal, whether you want to rely on this method or a Beta channel is largely up to your personal choice.
Still, this is the only way to get Kodi up and running on Chrome OS without relying on the Play Store, so with all that said, here’s how to get Kodi installed on your Chromebook!
Make Sure Chrome OS is Updated to Latest Version
Let’s start out with a basic tip. For all of this to work, we’ll want to make sure we’re running the current stable version of Chrome OS. Stable versions roll out updates every six weeks, which are automatically downloaded by Chrome OS whenever an update is shipped to your machine.
Once you have the upgrade, all you have to do to install the new version of your operating system is to use the Restart option, typically hidden in the system tray in the lower right-hand corner of your screen. If an upgrade has been shipped out to your device, you’ll typically see a Download icon in the notification tray, signaling that you can restart your machine to finish the upgrade.
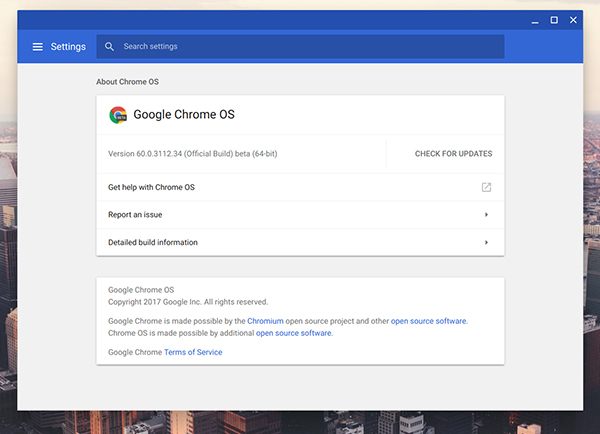
To check for an upgrade (if the Download icon isn’t there), open a Chrome window, use your mouse to select the triple-dotted menu button in the top-right corner of the screen, and select Settings.
Once you’ve opened the Chrome settings menu, tap the triple-lined menu icon in the top left, and select “About Chrome OS.”
Once you’re there, tap “Check for Updates.” If there is an update, it will begin downloading in the background of your operating system. If not, you’re ready to proceed.
Once you’ve ensured you’re running the newest version of Chrome OS, you’re ready to move into the actual process of installing Kodi—and by association, installing ARC Welder, too.
Install ARC Welder
If you’ve never heard of ARC Welder before, you probably aren’t alone. Though we’ve covered the program a few times on this website, it’s really only useful as a utility for those looking to install Android applications for testing and repackaging. ARC, or App Runtime for Chrome, is an in-beta development tool assisting developers in repackaging and testing their apps within Chrome and Chrome OS.
While this might seem like an odd application to use if you aren’t a developer, it’s really the only way to reliably install Android apps onto your Chrome OS device without using the Play Store.


So, we’ll have to start by installing ARC Welder onto your Chromebook. Start by heading to this Chrome Web Store link to download ARC Welder straight from Google. There are some other instances of the ARC Welder on the Web Store (easily found by searching Google for the app instead of simply following from the link in this paragraph), but we want to make sure we have the most up-to-date instance of the app running on our machines if we want it to behave the way it’s supposed to.
For that, we’ll need to make sure you’re using the official version. On the Web Store, it was officially uploaded by “arc-eng.” The app installs like any other Chrome app will install, with a shortcut loaded into your Chrome launcher (accessible either via the Search button on your keyboard or by using the launcher icon in the bottom-left corner of your screen).
Use ARC Welder to Install Kodi on a Chromebook
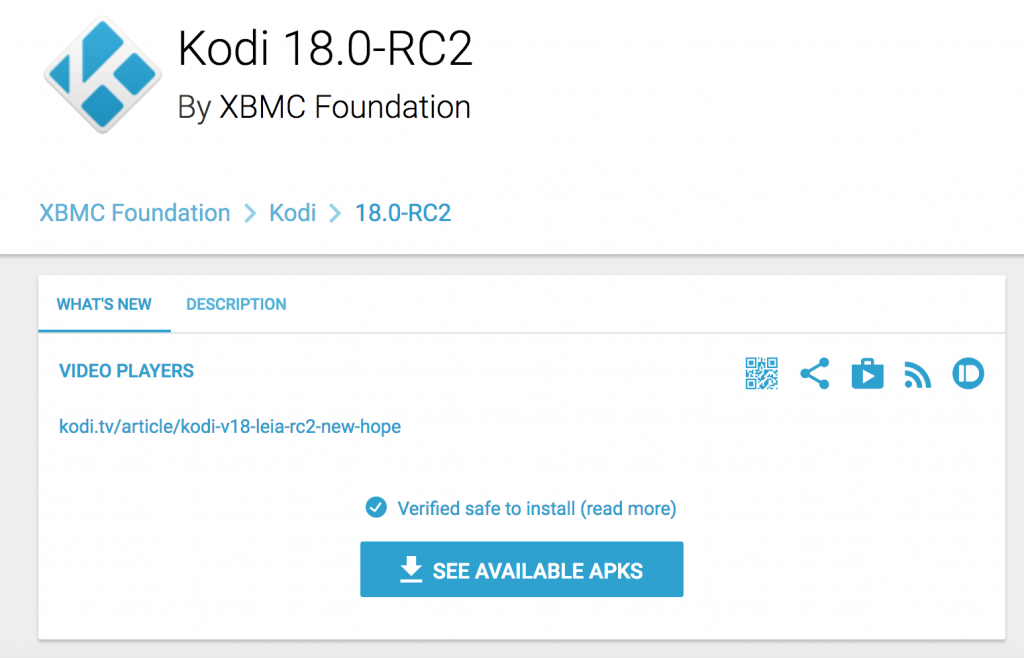
Once you’ve installed ARC Welder, we’ll also need to grab an instance of Kodi to install on your Chromebook. Since we can’t use the Play Store downloads, we’ll have to turn to an .APK file from a trustworthy and reputable source. There are a ton of shady and malicious third-party sources for .APK files (the format Android apps use for installations) online, so for our purposes, we’ll be turning to the best source for .APK files online, APKMirror. APKMirror is the sister-site of well-known Android news site Android Police and is trusted by both users and developers, including notable development site XDA-Developers.
The site doesn’t allow the posting of any paid, modded, or pirated content on their servers, and they’re known for being used by official devs for pushing updates and any content that can’t be posted on the Play Store for various reasons.
You can download the newest update for Kodi from APKMirror here (select the newest version; as of writing, it’s version 18.0. Some of the example images throughout this article are older, but the steps to install it and use it are the same regardless).
If for whatever reason, you can’t use or access APKMirror, APKPure is another trusted source, and you can download Kodi from their site here. We don’t recommend using any other outside sources for APKs, for security and safety reasons.
You want to be safe. We want you to be safe. And the easiest way to make sure that’s the case is to avoid sources that are shady or that you know nothing about. A good rule of thumb is to avoid getting software from unknown, untrusted sources.
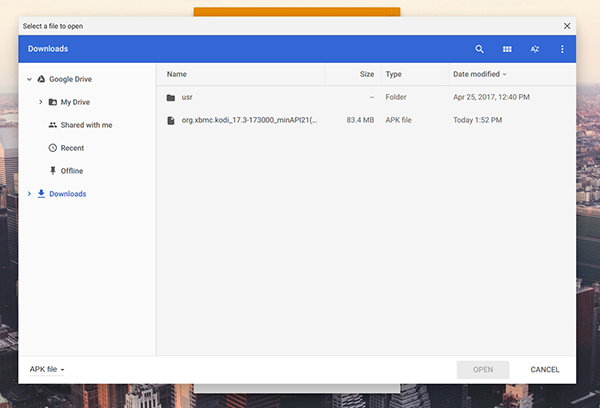
Once you’ve downloaded the APK to your Chromebook’s Downloads folder, it’s time to use ARC Welder to install and “test” Kodi on your Chrome OS device. Start by opening ARC Welder if you haven’t already, by using the launcher on your Chrome OS device.
Once ARC is open on your Chromebook, click on the Plus sign (contained within an orange circle) that reads “Add your APK.” This will open your Chromebook’s file explorer, typically launching on the Downloads folder. Find the APK you downloaded from APKMirror and hit the blue “Open” button in the bottom-right corner of the display of your computer.
ARC Welder will begin to load your APK, with the Kodi app being compiled within ARC Welder to run on your device. Once the application has completely loaded, you’ll be presented with some options for how to run the application on your device.
You’ll want to make sure your orientation is set to Landscape and your form factor is set to Tablet for the app to work best on your device. Alternatively, for form factor, you can also use Maximized.
Once the application and preferences are ready to go, hit the Test button in the lower right hand corner of ARC Welder. Kodi will begin to load and prepare for its initial run. Things may take a while to finish loading while the application prepares to be run on your device, so give it some time and have some patience with this part of the process.
Make some tea or coffee, have a snack, and once the app has finished preparing itself for launch, you’ll see the app launch on your Chromebook. This isn’t always a perfect solution, so if the app crashes or fails to load, try reloading the app within ARC Welder.

Making Kodi a Chrome Extension
ARC Welder only allows for one Android app at a time to be tested within Chrome OS, so we’ll have to save an instance of Kodi running on your Chromebook as an extension within Chrome to make it easier to launch at any given time. This involves adding the .APK as a link to the right of your URL bar within Chrome.

Start by opening a new Chrome browser page by either clicking the Chrome icon on your shelf or by hitting Ctrl+N, the shortcut within Chrome for opening a new page. Click on the triple-dotted menu icon in the top-right corner of your browser, then scroll down to “More tools.”
Arrow over the menu and select “Extensions” from the drop-down menu. At the top of this page, you’ll need to ensure that “Developer mode” has been checked at the top of the page.
When you check this option, you allow Chrome to support development-based extensions and applications, which is needed in order to make Kodi an extension-based shortcut.

With Developer mode checked, locate the “Load Unpacked Extensions” button at the top left of the page, underneath where the page says “Extensions.” Click this button to activate the option to begin supporting your extensions.
You’ll have a prompt open with your file browser. Navigate to your Downloads folder within the file browser for Chrome and find the KODI.apk_export file ARC Welder created when we set up the app in earlier steps. Select the “Open” button at the bottom of the file explorer, and you’ll see an extension added to Chrome OS.
A pink warning box will appear speaking about the extension, alerting you about the status of development extensions and the possible problems and security concerns that come from doing just that.
In this case, this box can be safely ignored, and you’ll have a Kodi extension within Chrome allowing you to quickly add and launch the app right from within your browser.
***
Kodi on a Chromebook isn’t a perfect solution unless you’re using one of the newer Chromebooks that supports the Play Store out of the box. While we wait for that capability to roll out to steadily more and more models, it’s worth noting that using ARC Welder for Kodi isn’t the most stable solution to using Kodi on the platform.
It is, unfortunately, the only true option available at the moment to anyone without Play Store support, but network problems and other connection and stability issues have been known to plague the platform, preventing the software from working to its fullest capacity.
Still, network issues aside, ARC Welder is a great tool for getting Kodi up and running on your Chromebook if a better option isn’t available, so for now, the only way to use the media center on your device is to accept the quirks and flaws that come with running an Android app on unsupported hardware.
Do you have any tips on the best way to install Kodi on a Chromebook? Did you run into any problems installing Kodi on your Chromebook? If so, how’d you solve problems with the install or getting Kodi running? Please tell us about it in the comments below!
Disclaimer: Some pages on this site may include an affiliate link. This does not effect our editorial in any way.


