If you need to connect to other devices on your network, you need to have Microsoft Window’s network discovery feature turned on. Most Microsoft devices offer you the option to connect to other devices (such as printers) the first time you connect to a network. That can lead to the assumption that network discovery is always on.
But it isn’t.
Network discovery can be turned off in both Windows 10 and Windows 11. Thankfully, there are several methods you can use to turn it back on.
Network Discovery Turned Off in Windows 11
There are several reasons why network discovery may get turned off in Windows 11. Some of these relate to your device whereas other reasons may have something to do with your firewall. Here are three troubleshooting techniques to try to turn network discovery back on.
Configure Your Advanced Settings
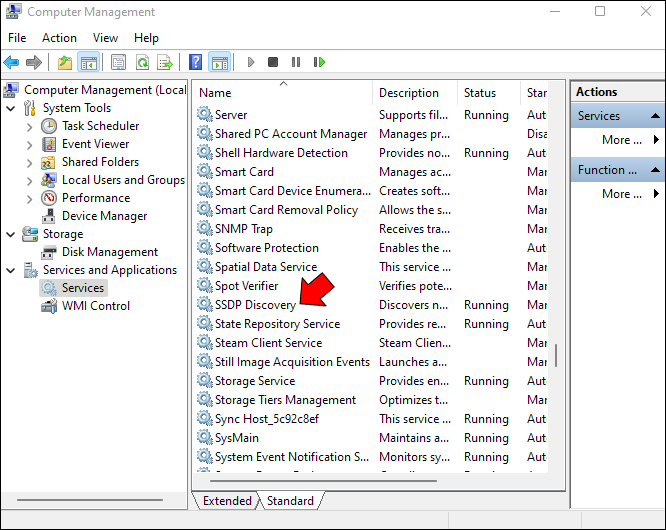
Altering your advanced settings may be the key if your network discovery keeps turning off despite your efforts to reactivate it. First, you need to navigate to the Services section of Computer Management.
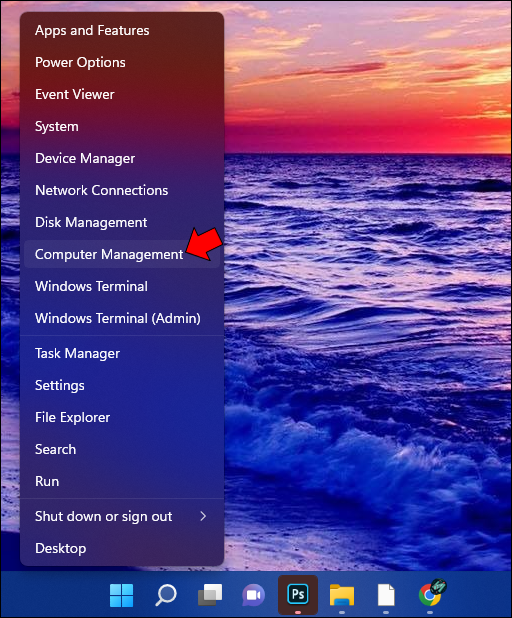
- Right-click on the Windows Start menu icon and select “Computer Management” from the pop-up box.
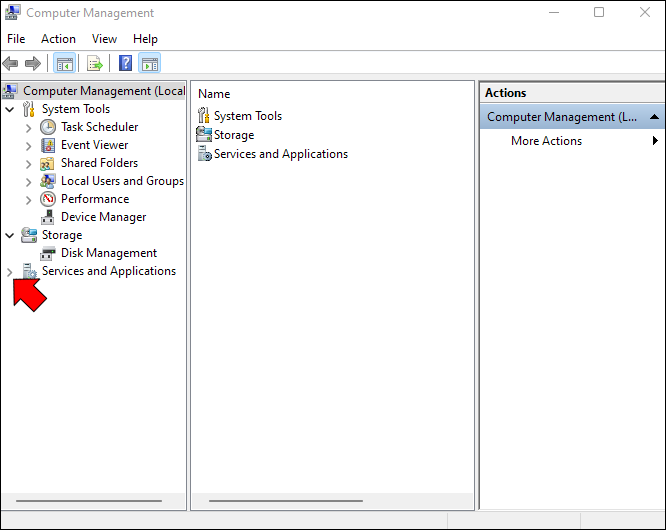
- Find “Services and Applications,” then click on the drop-down icon attached to it.

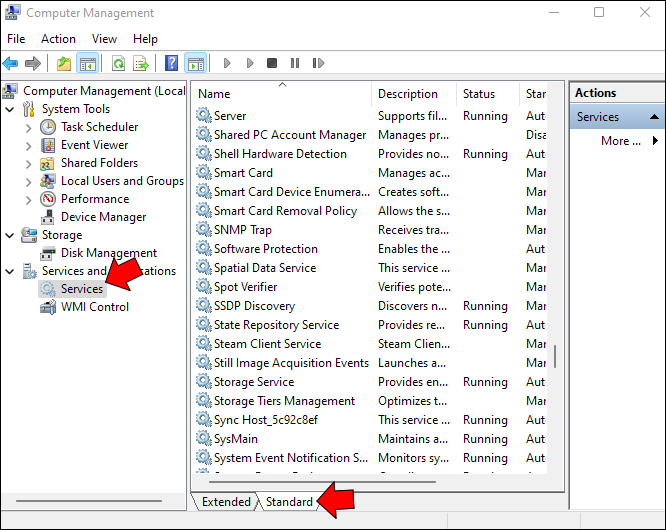
- Choose “Services” to open the menu in the extended view. You can click the “Standard” button at the bottom of the pop-up to revert this view to standard mode.
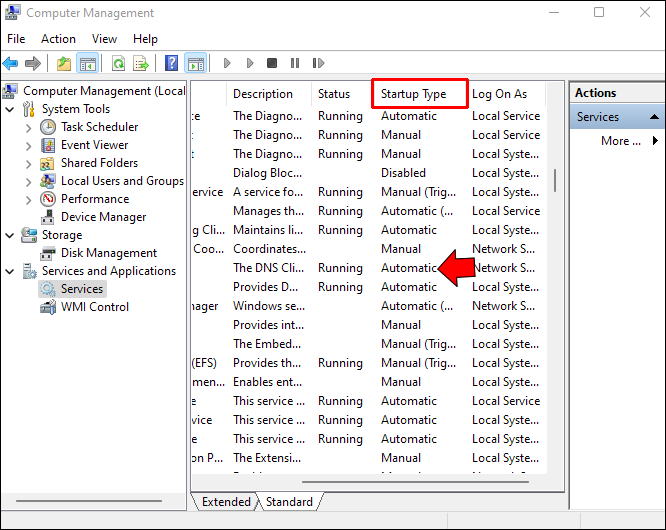
Next, you’ll check a few advanced settings, starting with your Domain Name Server (DNS):
- Navigate to “DNS Client” on the Services page and confirm that it says “Running” in the Status column.
- Check the Startup Type column to confirm that it’s set to “Automatic.”

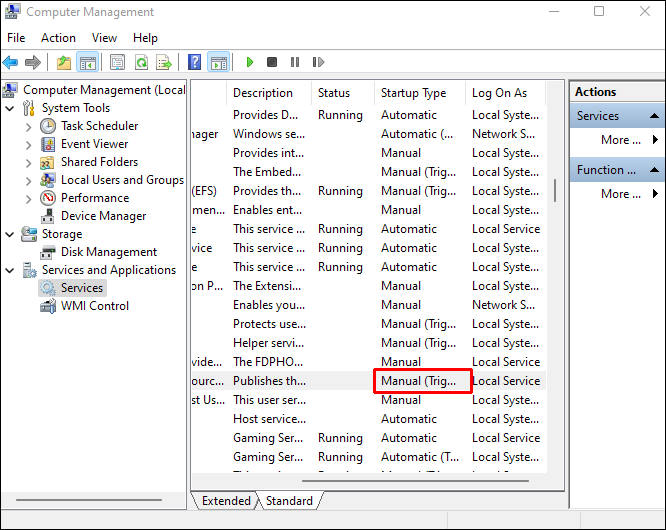
With your DNS status confirmed, you move onto a “Function Discovery Resource Publication” service:
- While still in the Services pop-up box, locate “Function Discovery Resource Publication.” It should be a few rows below “DNS Client.”
- Check to see if its Startup Type column reads “Manual,” “Automatic,” or “Disabled.” Ideally, it should read “Automatic.”
- If the column doesn’t say “Automatic,” double-click the word to open the properties pop-up box.
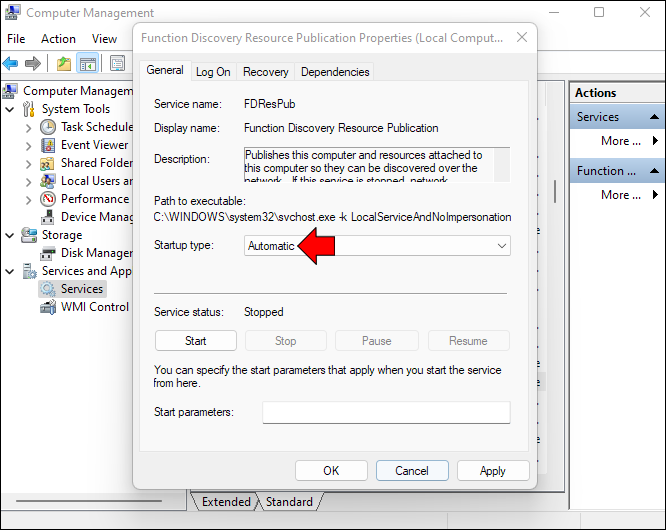
- Stay in the “General” tab and select “Automatic” from the Startup type drop-down box.
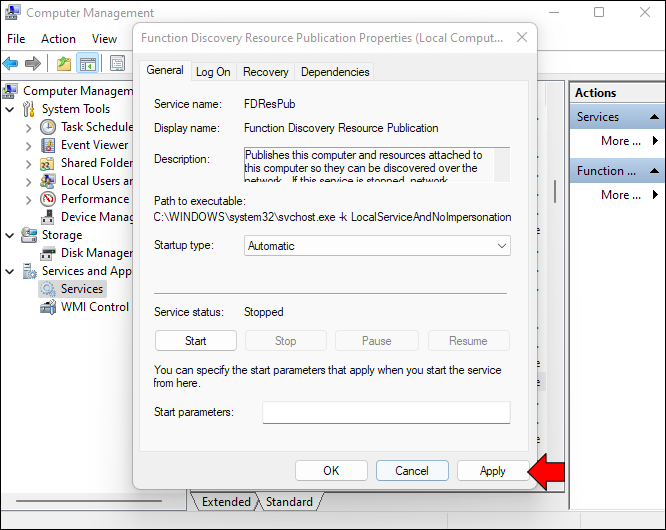
- Click “Apply.”
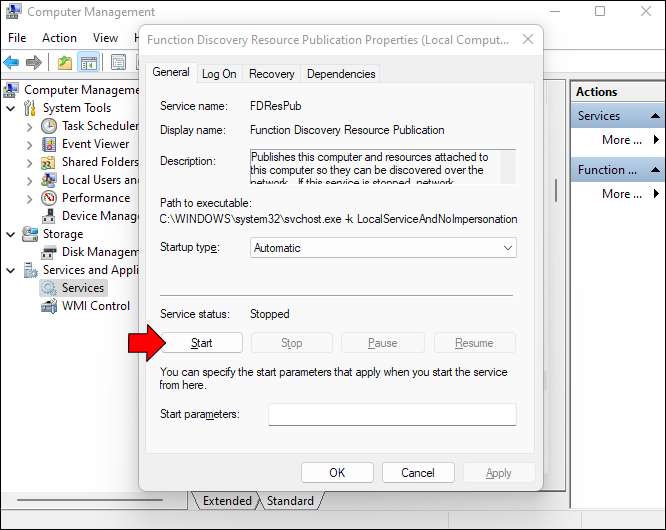
- Select “Start” to turn this functionality on. You should see the Service status change to “Running.”


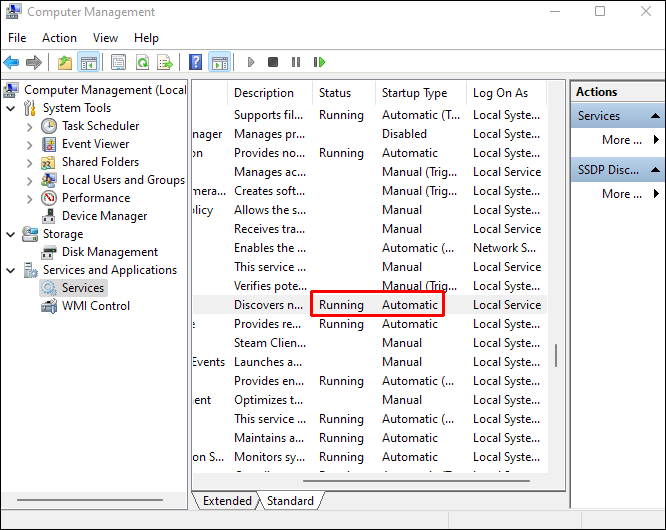
Now that the “Function Discovery Resource Publication” is active, you’ll move on to checking the status and startup settings for the “SSDP Discovery” service.
- Staying in the “Services” area, scroll down to “SSDP Discovery.”
- Check that its Status is “Running” and the Startup Type is “Automatic.”
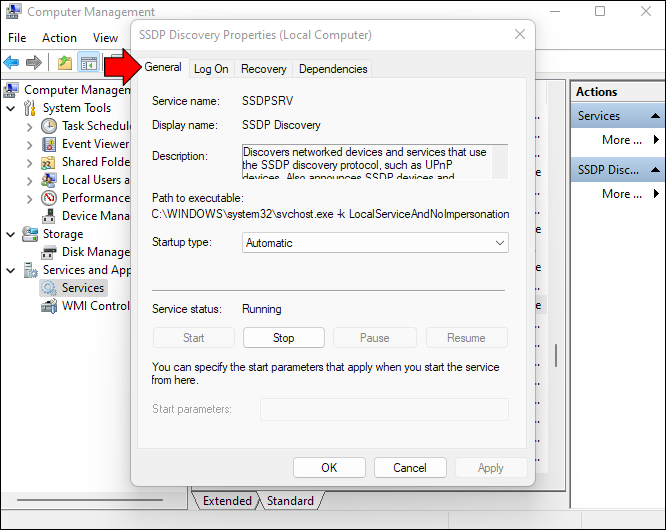
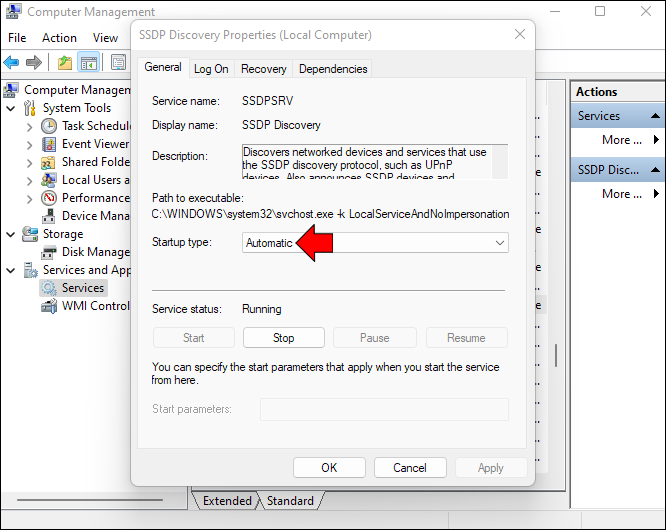
- If Startup Type isn’t “Automatic,” double click “SSDP Discovery” and navigate to the “General” tab.
- Choose “Automatic” from the Startup type drop-down box.
- Click “Apply.”

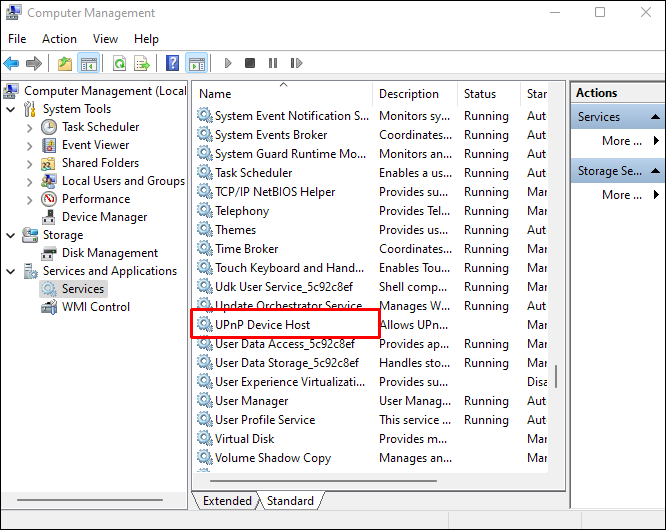
The last advanced setting to check is the “UPnP Device Host” service:
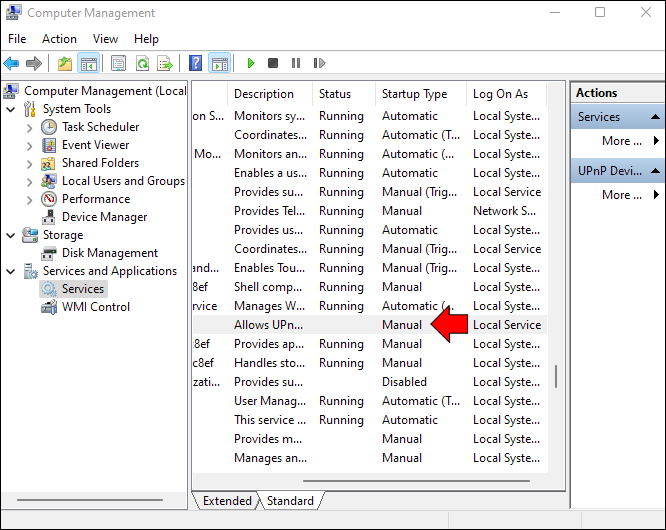
- Find “UPnP Device Host” in the “Services” section of Computer Management.
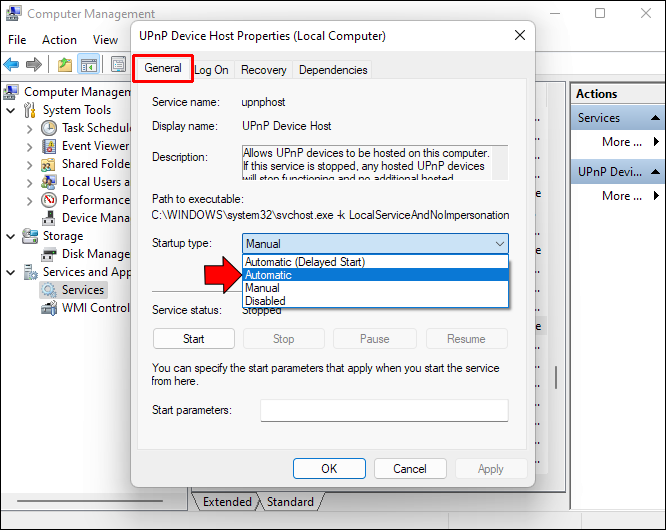
- Check to see that its Startup Type is “Automatic.” If it isn’t, double-click “UPnP Device Host.”
- Go to the “General” tab and select “Automatic” from the Startup type drop-down.
- Select “Apply.”

With all of these advanced functions running and set to automatically start when you boot up your computer, the only task left is to start network discovery in Windows 11.
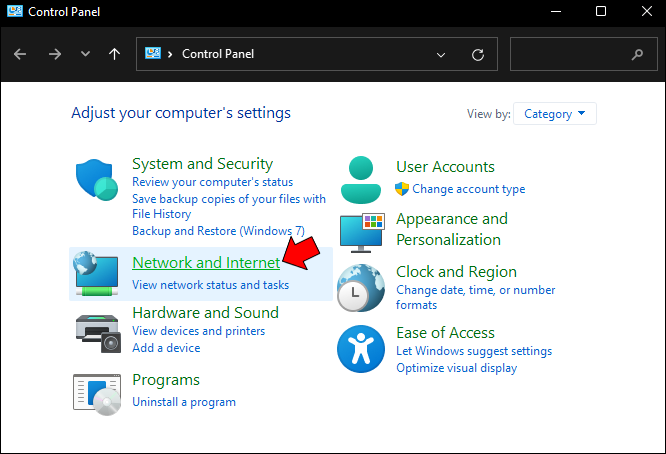
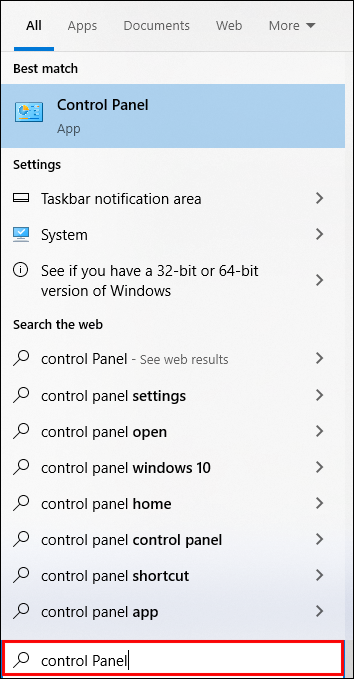
- Select the Windows 11 search icon, which looks like a magnifying glass.
- Type “control panel” into the search bar and click the “Control Panel” icon when it appears.
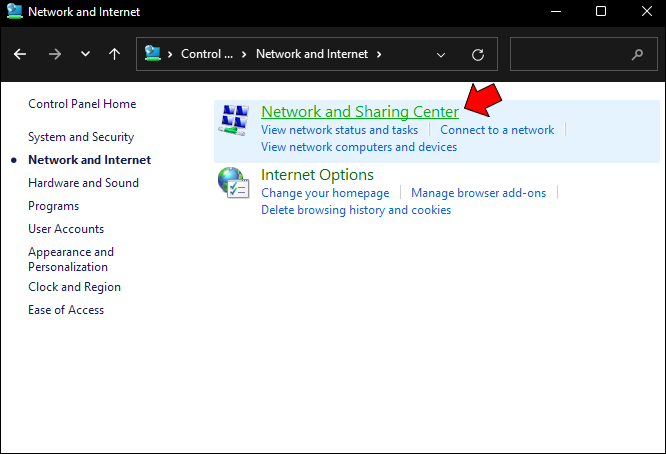
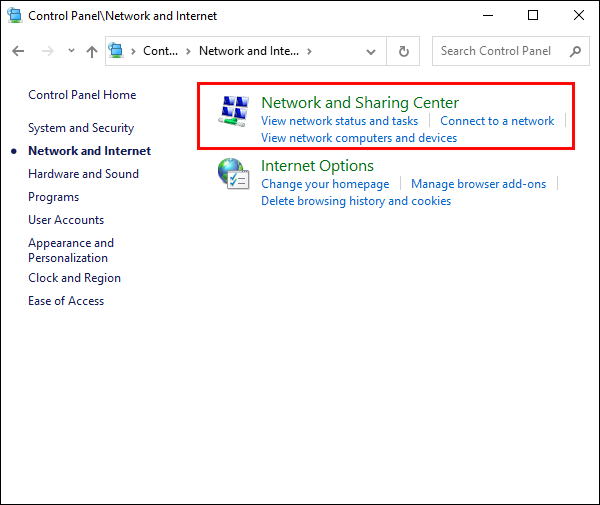
- Choose “Network and Internet.”
- Click on “Network and Sharing Center.”
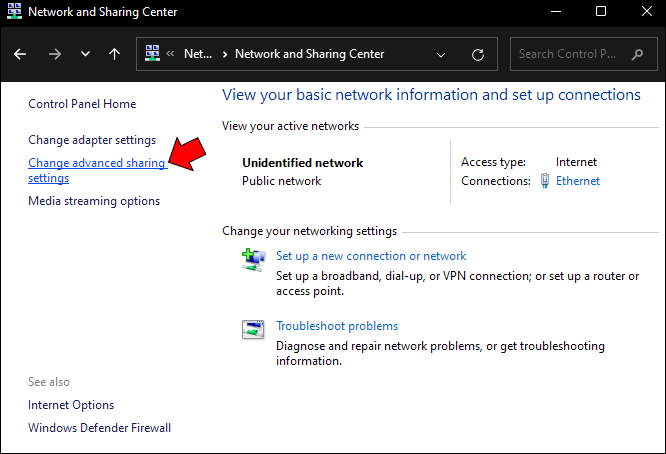
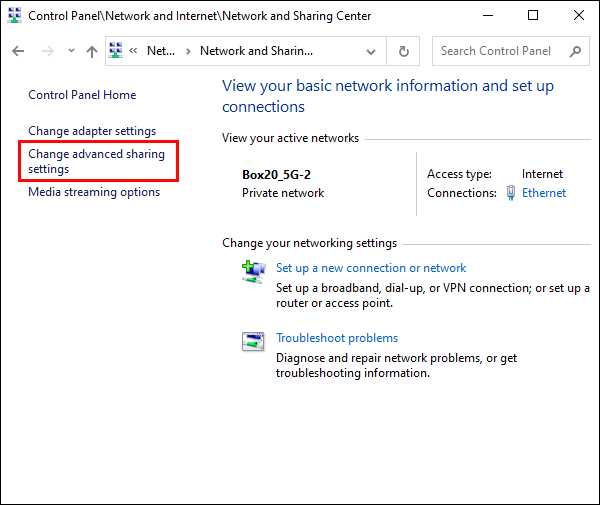
- Select “Change Advanced Sharing Settings” from the left side of the page.
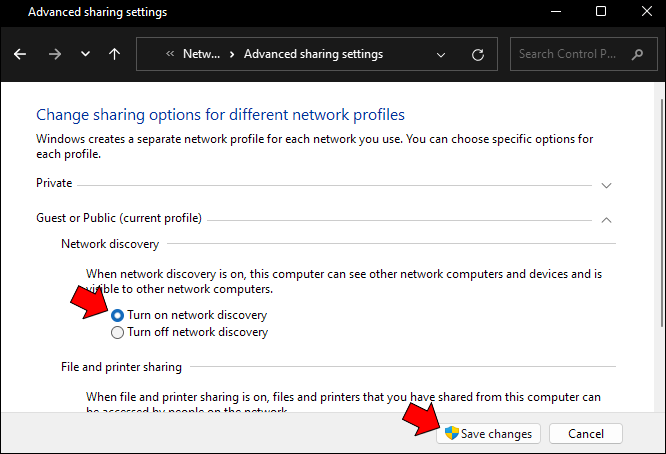
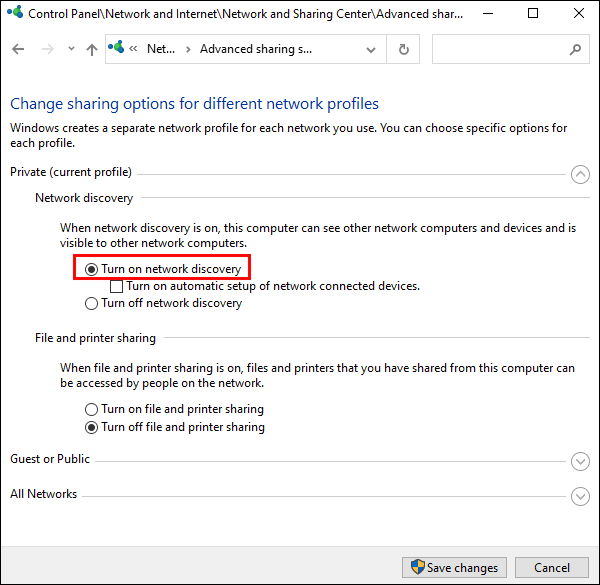
- Click “Turn On Network Discovery” and hit “Save Changes.”


You should find that network discovery starts on your device. Furthermore, it should start automatically whenever you boot up the device.
Alter Firewall Settings to Allow Network Discovery
If your network discovery issues aren’t related to the advanced settings, you may have an issue with your firewall. Here’s how to allow network discovery via Windows 11’s default Windows Defender Firewall:
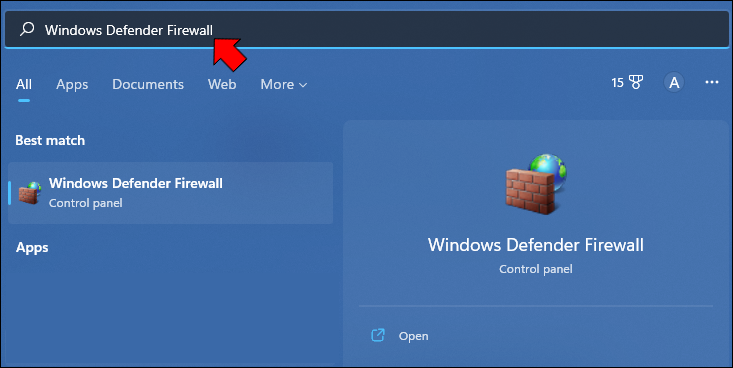
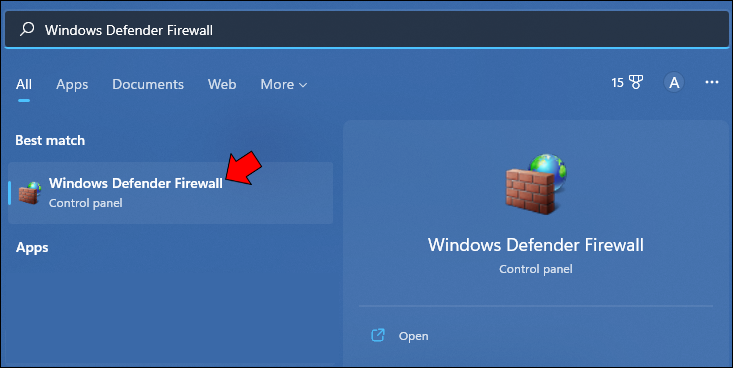
- Click the magnifying glass icon at the bottom of the screen and type “Window Defender Firewall” into the search bar.
- Select the “Windows Defender Firewall” icon from the matches.
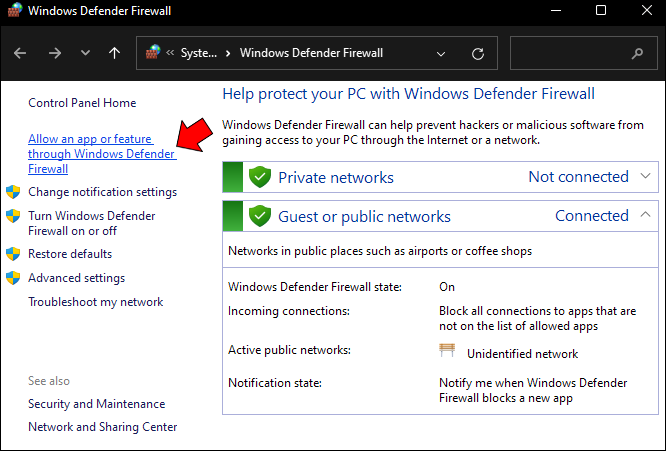
- Choose “Allow an app or Feature Through Windows Defender Firewall” on the left-hand side of the screen.
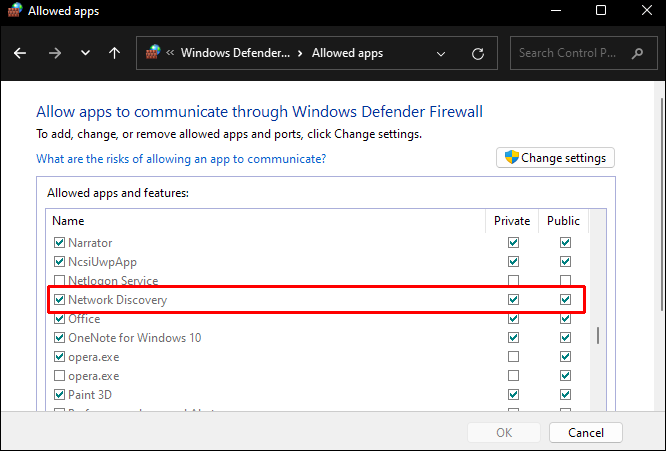
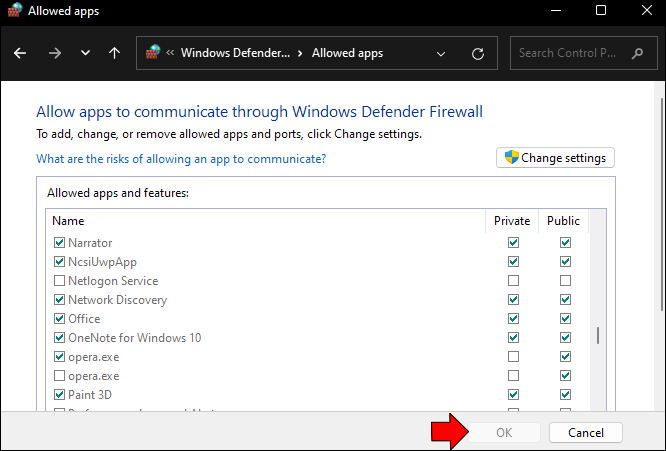
- Navigate to “Network Discovery” and check both the “Private” and “Public” boxes.
- Click “OK.”
Network Discovery Turned Off on a Windows 10 PC
The fixes for Windows 11 also work for Windows 10, with the steps being mostly the same. Here are two more methods you can try if altering firewall settings and the advanced settings don’t work in Windows 10.
Alter Your Advanced Sharing Settings
Network discovery may get turned off in your computer’s advanced sharing settings. Here’s how to fix that problem.
- Click the Windows key and search for “Control Panel” in the search bar.
- Open Control Panel and select “Network and Internet.”
- Navigate to “Network and Sharing Center.”
- Select “Change Advanced Sharing Settings” from the pane on the left-hand side.
- Navigate to “Private” and check the box next to “Turn On Network Discovery.”
- Check the box next to “Turn On Automatic Setup of Network-Connected Devices.”

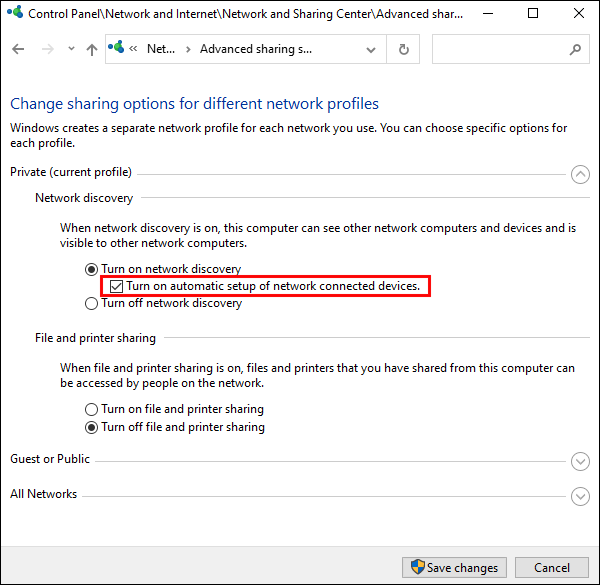
You may also want to ensure that your printer can connect to your network from this section:
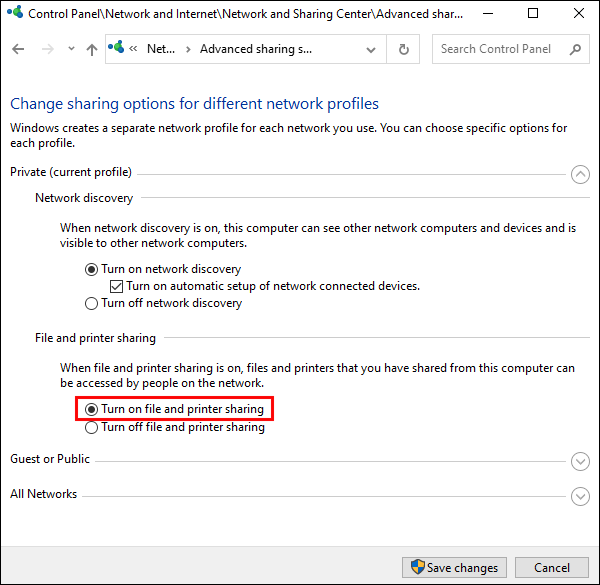
- Scroll down to “File and Printer Sharing.”
- Check the box next to “Turn on File and Printer Sharing.”

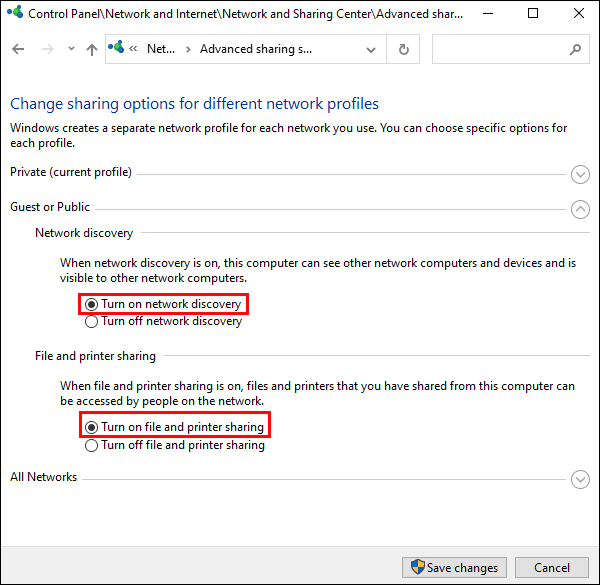
Finally, if you want to activate network discovery when using public Wi-Fi networks, stay in the advanced sharing settings and do the following:
- Scroll down to “Guest or Public” and use the downward arrow icon to expand this section.
- Check the boxes next to “Turn On Network Discovery” and “Turn On File and Printer Sharing.”

With all of these steps completed, restart your computer to see if you’ve resolved your issues with network discovery.
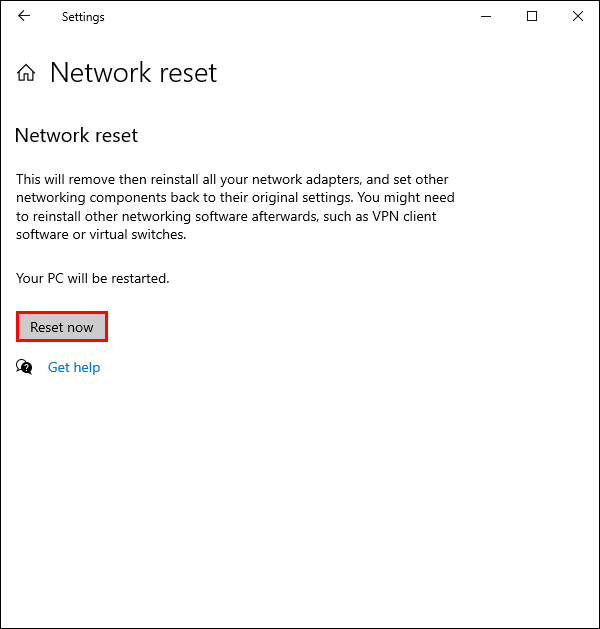
Reset Your Network
If all else fails, you can try a network reset to solve the issues with network discovery:
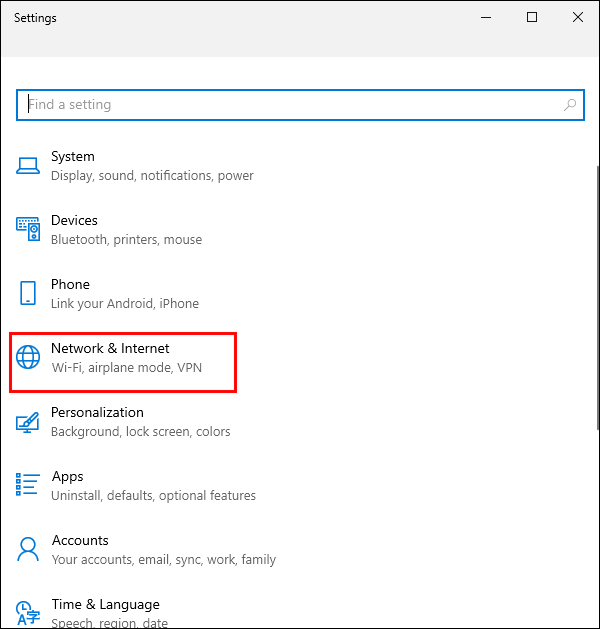
- Navigate to the “Start Menu” and select “Settings.”
- Click on “Network and Internet.”
- Choose “Status” from the navigation bar.
- Click the “Network reset” link.
- Read the information provided and select the “Reset now” button.
- Click the “Yes” button in the pop-up box.


Your device will warn you that you’re about to get logged out and your computer will reboot. Make sure you save your work and close any open applications.
Once your computer restarts, you’ll see that you don’t have an active network connection. You need to activate your connection to turn network discovery back on:
- Click the “Network” icon.
- Select the network you want to connect to and click “Connect.”

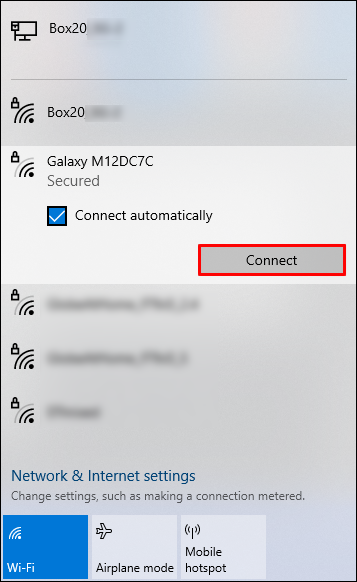
Your computer should automatically detect your network and configure the appropriate settings automatically.
Reactivate Network Discovery
Finding that your device’s network discovery feature has been deactivated can be a frustrating experience when you’re trying to connect to a network. Furthermore, there are several possible causes of the issue. The fixes in this article can help you check for the most common causes. If all else fails, resetting your network allows you to start from the beginning and hopefully resolve your connection problems.
Now, we want to hear from you. Do you have any other techniques for reactivating network discovery? What’s the most frustrating experience you’ve had with a device that refused to connect to your network? Tell us all about it in the comments section below.
Disclaimer: Some pages on this site may include an affiliate link. This does not effect our editorial in any way.


