Pinging is a good way to test a certain network and troubleshoot it if it’s not working. When it comes to Windows, pinging is something you usually perform from your Command Prompt, which hasn’t been changed for quite a while now. As such, the “Ping transmit failed. General Failure” error can appear on each popular version of Windows, including 7, 8/8.1, and 10.
There are a lot of things that could be causing this problem, but there are a lot of possible solutions for it as well. Stay with us to see what you can do to prevent such problems and keep pinging normally in the future.
Causes
The usual causes for this problem may include Virtual Machine (VM) issues (if you’re using one), network drivers or firmware that are in need of an update, issues with the Domain Name System (DNS), a firewall that’s not configured correctly, and various hardware and software issues. Fortunately, there are solutions to all these problems.
Solutions
Disable Windows Firewall
To check if your firewall is causing the problem, you can try turning it off. The easiest way to do this is to use the Command Prompt:
- Run the Command Prompt as an administrator. You can find it by opening the Start menu and typing “cmd” in the search box. If you’re using Windows 10, just start typing and the system will start searching.
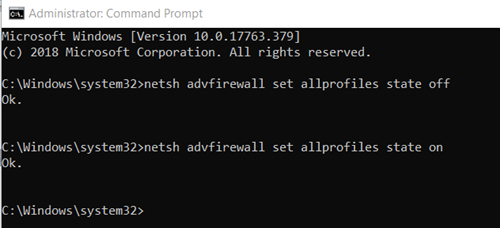
To run a program as an administrator, right-click on it and choose “Run as administrator.” You can also do this when opening programs directly from the Start menu. - Inside the Command Prompt, type “netsh advfirewall set allprofiles state off” and press Enter to turn it off.
If successful, the system will just return a message that says “OK.”If you’ve not run the program as an administrator, cmd will notify you about that. You’ll know you’ve done it successfully if the window label is “Administrator: Command Prompt” and if the folder path leads to the “system32” folder instead of your user folder. - To turn the firewall back on, all you need to do is type “netsh advfirewall set allprofiles state on” and hit Enter. The same “OK.” message will signal you’ve successfully turned it on.

Don’t Want to Deal with the Command Prompt?
If you’re not very keen on using the Command Prompt, there’s another method that works and all previously mentioned versions of Windows and doesn’t require using the Command Prompt:
- Click on the Start button and type “firewall” in its search box.
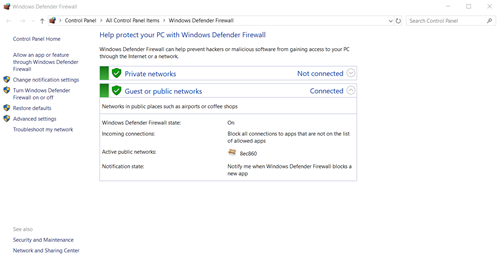
- “Windows Defender Firewall” should be the first result. Click on that. You can also access it from the Control Panel.
- While inside, click on the “Turn Windows Defender Firewall on or off” option that’s located on the sidebar to the left.
- To turn the firewall off, click on the circle next to “Turn off Windows Defender Firewall (not recommended)” for each network type you want to disable it on. Alternatively, you can try just blocking all the incoming connections by clicking the checkbox under the option that keeps the firewall on.
- To turn it back on, return to this option and click on “Turn on Windows Defender Firewall.” An even easier way of doing this would be to just click on the “Use recommended settings” button.


Even More Command Prompt Tinkering
Unlike the previous method, this one requires you to use the Command Prompt, so run it as administrator and then:
- Type “ipconfig/release.”
- Follow up with “ipconfig/renew.” These two commands are used to renew your IP address and should ideally solve network connection issues.
- Clear your Domain Name System (DNS) with “ipconfig /flushdns.”
- Reset the TCP/IP (Transmission Control Protocol/Internet Protocol) settings by typing “netsh int ip reset c:tcp.txt.”
- Finally, reset Winsock with the “netsh winsock reset” command.
Use the Enter key after entering each of these commands to let Windows carry it out.
Update Your Software
Maybe your network adapter software drivers are outdated. Here’s how to check if that’s the case and update them if necessary:
- Enter the Device Manager. You can do this by searching it from the Start menu or finding it in the Control Panel.
- You’ll notice right away that the devices in this manager are divided by their function. Expand the “Network adapters” category and find the one that’s related to your network device.
- Right-click on that device and right-click on “Update Driver Software…” (“Update driver” in Windows 10).
- A new window will appear, asking you which drivers you want to install and in which way. Click on the “Search automatically for updated driver software” option. This way, you’ll see if your drivers are properly updated or not.
- If Windows doesn’t offer any drivers, you can try to disable the current drivers or uninstall them and install the new ones, but this is only recommended for advanced users.

Power Cycle Your Modem or Router
Finally, you can perform a power cycle if you deem it necessary. What that means is that you can turn a modem, router, or both off, wait for a while, and switch them back on again. Here’s how to properly power cycle just one of these:
- Unplug your modem or router.
- Wait for a while. At least thirty seconds should go by.
- After this, plug the device back in.
- Make sure that the lights on the device you’ve just connected back aren’t blinking at all. This usually takes at least a minute.
To power cycle the entire Local Area Network (LAN), which is usually a smaller network such as a home network, do the following:
- Unplug your modem by disconnecting the power cable.
- Do the same for your router.
- Wait for a minute and then reconnect the power cables.
- First, turn on your router and wait for the LED lights to calm down. If the Wireless Area Network is not blinking, you’re headed in the right direction.
- Finally, turn your modem on as well, and wait for the lights to stabilize.
The synchronization between devices that this method offers might solve your issue if it’s related to the WiFi/LAN connectivity.
Ping Like There’s No Tomorrow
This problem might look quite scary at first as there are a lot of possible causes. But if you succeed in finding the culprit, finding the solution shouldn’t be a problem. And even if you don’t find the culprit at first, there are a lot of methods outlined here, so make sure to try them out.
Which of these methods helped you fix this issue? Did we leave out any other possible solution? Let us know in the comments below.
Disclaimer: Some pages on this site may include an affiliate link. This does not effect our editorial in any way.