Plex is among the leading software tools for storing your media files. You can give family and friends access to your Plex Media Server and add some restrictions. If you’re new to Plex, adding a library is the first thing to do to keep your media files organized.
Fortunately, this is a relatively straightforward process. This article covers the best methods of adding a library to Plex.
How to Add a Library to Plex
As mentioned, adding a library to Plex is a great way to keep your files organized. Here’s how it’s done:
- Open the Plex Web App on your device. Click on the “Settings” button located in the top right corner.

- A “Manage” window with a left pane will appear with different menu items. Click on “Libraries.”

- Choose “Add Library.” Then, click “Select type,” and “Select your library type.”
- Name your Plex library and select the language you’ll use for data gathered from the web. Click “Next.”
- In the next window, press “BROWSE FOR MEDIA FOLDER.” This will let you select the folder containing your media files. Click “Add Folder” to put all your media folders in the new library.
- After adding all folders, finish by clicking “ADD LIBRARY.”


Note: You can open many libraries to organize different media files. In addition, you can add many folders to one Plex library.
Explaining Buttons Under Add Library
There are four buttons you should use when adding a new library.
Select a Type of Media
One of the ways to add a library to Plex entails selecting the type of media to store in the library. When you reach this step, your media options will be:
- TV shows
- Movies
- Music
- Photos
- Videos
You can add many libraries to Plex Media Server. For you to distinguish your libraries, you should give them unique names. If you intend to keep Videos in your newly-added library, you can call them simply videos or something more personal. Since you’ll gather your media files from across the web, you must choose a language your friends and family can understand.
For instance, you can choose English to ensure all the files you get from the internet are in this language.
Adding Folders
If you have no folders with media yet, add empty folders. You can add audio or video files to use later. You only need to click “Add Folder” until you finish putting all the folders you plan to keep in your new library. Each added folder should store specific videos or whatever your library is about. To access the media locations, click the “Browse for Media Folder” button.
You will view “Add Folder” or a path to where your media is located. Click “ADD” to finish or “Cancel” to abandon. If you have one or more content locations, you should specify that. Choosing many locations at once will let the system combine media content from all places for your new library. Note that Drive C isn’t a safe content location. Create a new folder and save it in Drive D. Then, specify this folder as your content location.
Options
The “Options” button is for music libraries. Any music library you add to Plex will use “Options” to select the best subscription plan. If you don’t mind paying, the Premium music library with a Plex Pass subscription will be the best pick. On the other hand, select the basic plan if you want to use Plex for free.
Advanced Button
This is the last button under “Add Library.” Using the “Advanced” button is optional. If your library requires some of the features in the “Advanced” tab, you can click it. Once it opens, you can check the boxes depending on your needs.
Items to Use With Your Plex Library
After adding a new library, there are some tools you can use to simplify your work.
Scanner
A scanner will help you evaluate filenames or folder structures. If you can’t recall where a given item is located, the scanner can find it for you. When you create a library, the app assigns a scanner by default. However, you can click the drop-down menu to shift to a different scanner that could work more effectively.
Agent
You need an agent to use with a newly-added Plex library. An agent grabs the data from the scanner and uses it to search for metadata about a media on the internet. Again, the Plex app generates an agent automatically when adding a library. If you don’t like the default agent, click the drop-down list and change it.
What to Enable for Music and Video Media Libraries
You know the types of media to add to a library. Each media type is broad and you should know what to enable first.
Music
One feature to enable in your Music library is iTunes. Hence, click on “Import from iTunes” to get your favorite playlists. Along with music tracks, the import feature will copy metadata like the date of adding the tune, your ratings, play counts, skip counts, etc. Ensure iTunes is on the computer containing the Plex Media Server.
Other options to activate include “Use embedded tags,” “Store Track Progress,” “Agent settings,” Gracenote genre level, etc. Downloads to enable are concerts information from Last.fm. You can also activate download popular track data from the most renowned artists and album reviews.
Videos
If you name your first library “Videos,” you should enable specific features. First, click on “Cinema Trailers” to enable it. You can then alter its settings as you please.
Another item to enable is “Video preview thumbnails.” Enable the main setting to ensure this feature works. Go to “Settings,” “Server,” and then “Library” to enable it. Also, activate the “advanced per Library” option. Disable the “Video preview thumbnails” for the library you don’t want it generated.
How to Manage Access to the Library
After adding new libraries, you should learn how to manage them. Managing library access in Plex means determining and controlling who can view the files in your Media Plex Server. Here’s how it’s done:
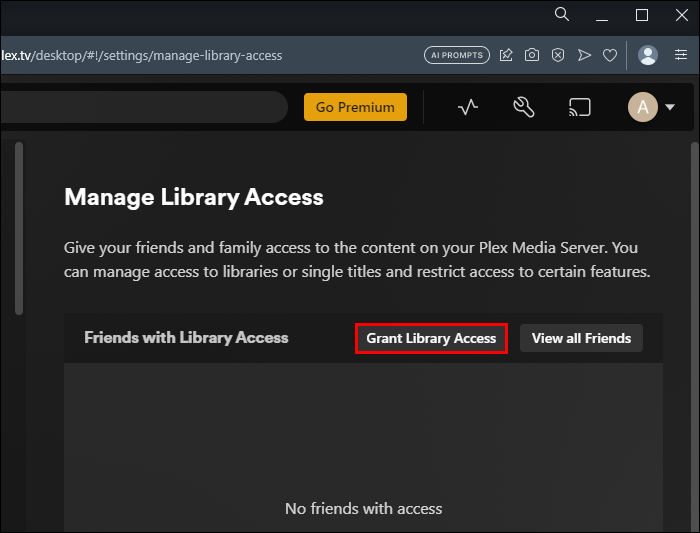
- Access “Manage Library Access” via the “Settings” icon.
- Next to “Friends with Library Access,” click “GRANT LIBRARY ACCESS.” Now enter the email address or username of the person you want to invite and click “Continue.” If the person has no Plex account, they can create one if they accept your invitation. On the other hand, if they have a Plex account, you’ll see a field with their name and a green tick.
- Plex Media Servers with your libraries will appear. Decide the libraries your friend can view by checking boxes.
- Restrict access to the content only if you’re a premium member. You can prevent access by checking boxes, including “Allow Downloads.” To invite your friend, check the “Add to Plex Home” box.
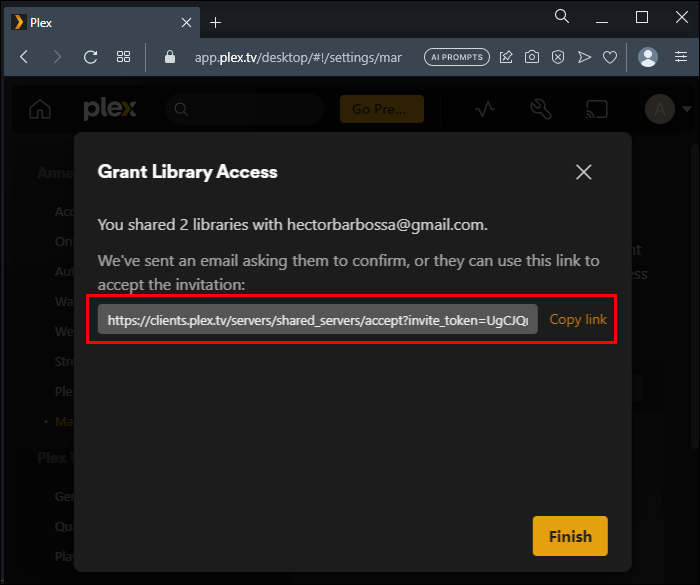
- Copy the “Accept” link you sent to your friend’s email address and paste it onto another communication tool.


FAQs
How comes Plex isn’t showing the library?
You may not be able to view the Library because your Plex Media Server is outdated. Another reason could be that you’re using a VPN or router. Disable these and see what happens. Also, you won’t be able to find Plex Library if your Plex Media Server is inactive. So, check to see if it’s on the Devices page.
Can you use Plex on Android?
You can use Plex on an Android device by downloading an app from Google Play Store. However, ensure you’re a Plex Pass subscriber before installing the app. Plex will recognize your account on Android at once if you login.
Add Many Libraries
Adding a library to Plex is pretty straightforward. If you have different types of media to share with family and friends, create enough libraries for them all. Follow the straightforward steps shown above when creating libraries and adding items to them. After finishing, your media files will appear organized enough to share with others.
Have you ever added a library in Plex? Did you use any of the tips and tricks featured in this article? Let us know in the comments section below.
Disclaimer: Some pages on this site may include an affiliate link. This does not effect our editorial in any way.